


Eine vollständige Anleitung zur Verwendung von Audacity zum Entfernen von Gesang
Audacity ist eine leistungsstarke, kostenlose Open-Source-Software zur Audiobearbeitung, die sowohl bei Musikliebhabern als auch bei Content-Erstellern große Popularität erlangt hat. Mit seinen vielseitigen Funktionen können Sie eine Reihe von Aufgaben ausführen, von der einfachen Audioaufnahme bis hin zu komplexen Bearbeitungsprozessen. Eine der gefragtesten Funktionen von Audacity ist die Möglichkeit, Gesang aus Liedern zu entfernen, sodass Sie Karaoke-Tracks erstellen, Instrumentalstücke isolieren oder einfach Ihre Lieblingsmusik ohne Gesang genießen können. In diesem Artikel zeigen wir Ihnen die Schritt-für-Schritt-Anleitung, um effektiv Entfernen Sie mit Audacity den Gesang aus Liedern.

- LEITFADENLISTE
- Teil 1. So verwenden Sie Audacity zum Entfernen von Gesang
- Teil 2. Stimmisolation in Audacity funktioniert nicht
- Teil 3. Alternative Methoden zum Entfernen von Gesang
Teil 1. So verwenden Sie Audacity zum Entfernen von Gesang
Egal, ob Sie ein erfahrener Audio-Editor oder ein Anfänger sind, Sie werden dieses Tutorial leicht befolgen können.
Notiz: Das Entfernen von Gesang aus Audio ist nicht dasselbe wie Aufteilen einer Audiospur in Audacity, und die folgenden Schritte werden angewendet, um eine Stimmisolierung zu erreichen.
Schritt 1: Importieren Sie das Audio
Um zu beginnen, müssen Sie die Audiodatei, die Sie bearbeiten möchten, in Audacity bringen.
1. Öffnen Sie Audacity: Starten Sie die Anwendung auf Ihrem Computer. Audacity ist mit Windows, Mac und Linux kompatibel und Sie können es auf diesen Plattformen kostenlos herunterladen.
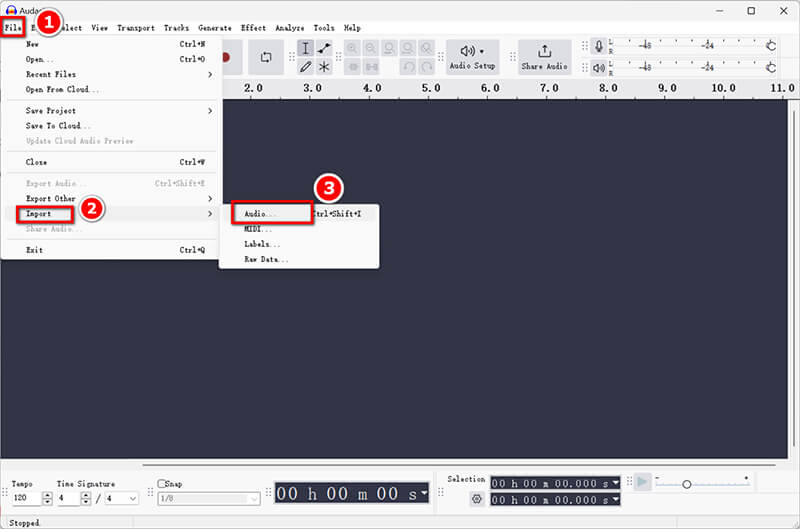
2. Audiodatei importieren: Klicken Sie auf Datei > Importieren > Audio und wählen Sie den Song von Ihrem Gerät aus. Sie können die Datei auch einfach per Drag & Drop in das Audacity-Fenster ziehen.
Schritt 2: Erstellen Sie eine Gesangsspur
Als Nächstes möchten Sie zum Bearbeiten eine Kopie der Originalspur erstellen.
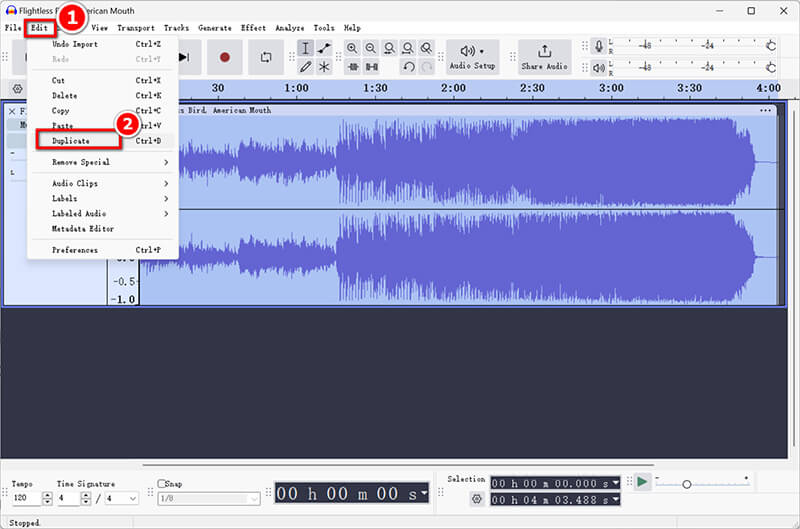
1. Track duplizieren: Wählen Sie die Audiospur durch Anklicken aus und gehen Sie dann zu Bearbeiten > Duplizieren. Dadurch wird eine zweite Spur erstellt, die Sie bearbeiten können, um den Gesang zu extrahieren.
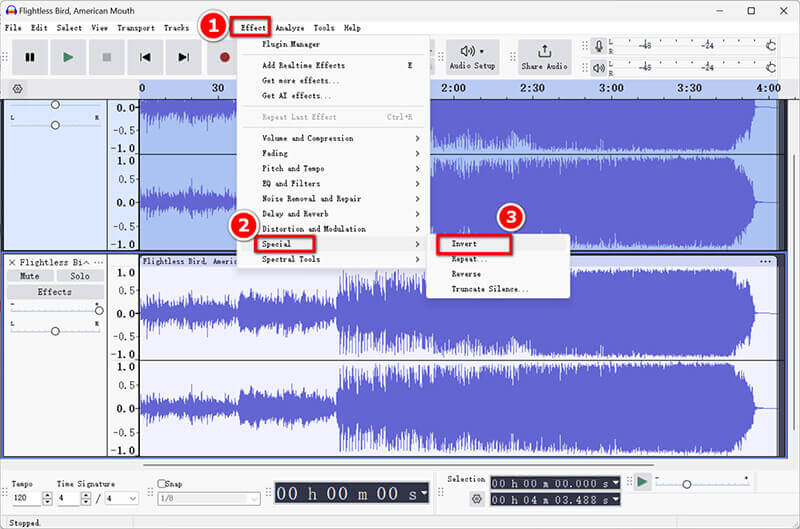
2. Effekte anwenden, um Gesang zu isolieren: Wählen Sie die duplizierte Spur aus und gehen Sie zu Effekt > Umkehren. Dieser Schritt ist für die Entfernung der Stimme unerlässlich.
Schritt 3: Gesang isolieren
Jetzt, da Ihre Tracks fertig sind, ist es an der Zeit, sich auf die Isolierung des Gesangs zu konzentrieren.
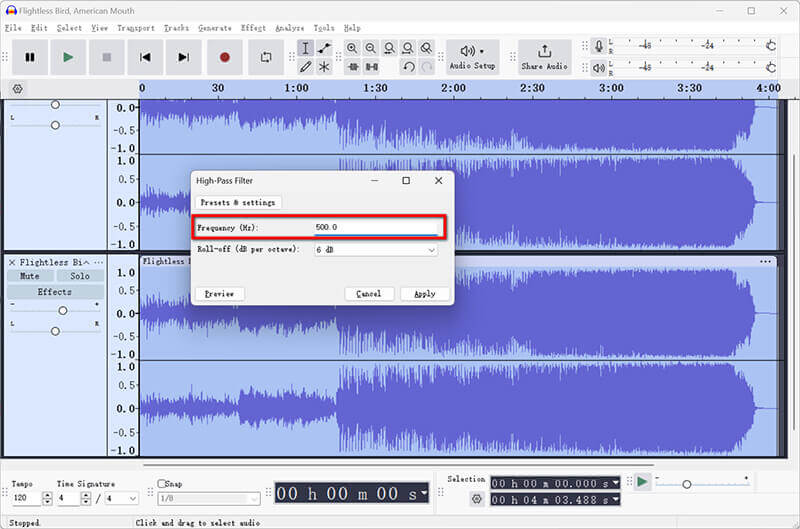
1. Verwenden Sie Filter und Effekte: Lassen Sie die duplizierte Spur ausgewählt und navigieren Sie zu Effekt > EQ und Filter. Wählen Sie die Hochpassfilter Option zum Eliminieren niederfrequenter Geräusche, die typischerweise mit Gesang in Verbindung stehen.

2. Passen Sie die Einstellungen für optimale Ergebnisse an: Experimentieren Sie mit den Filtereinstellungen. Ein guter Ausgangspunkt ist eine Grenzfrequenz zwischen 300 Hz und 500 Hz, Sie können diese jedoch gerne basierend auf Ihrer Audiodatei anpassen.
Schritt 4: Verfeinern Sie die Gesangsspur
Nachdem Sie den Gesang isoliert haben, ist es wichtig, Ihren Track für eine bessere Klarheit zu verfeinern.
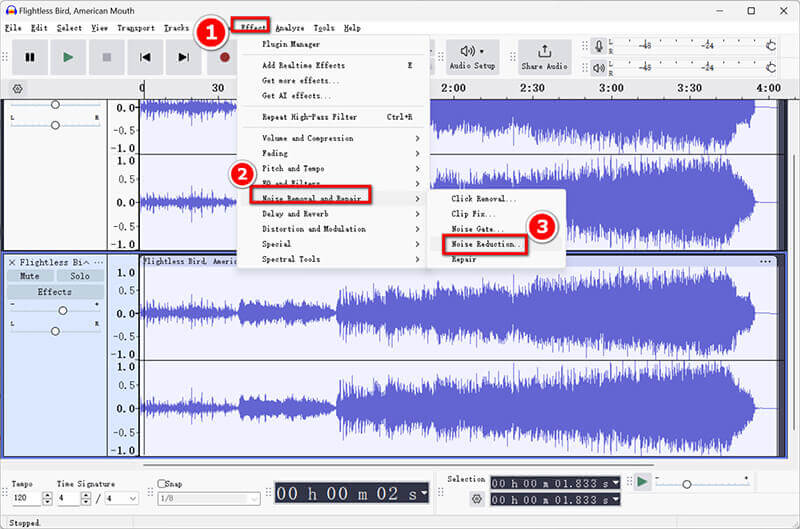
1. Restgeräusche oder Artefakte entfernen: Gehen Sie zu Effekt > Rauschentfernung und -reparatur > Rauschreduzierung. Wählen Sie ein Audiosegment mit Hintergrundrauschen aus, klicken Sie auf „Rauschprofil abrufen“ und wenden Sie es dann auf die gesamte Spur an. Dadurch werden alle verbleibenden Geräusche nach der Entfernung des Gesangs entfernt.
2. Optimieren Sie die Stimmisolation: Hören Sie sich die Ausgabe genau an. Möglicherweise müssen Sie die Lautstärke anpassen oder Effekte wie Kompression oder Hall hinzufügen, um den Gesamtklang zu verbessern, bevor Sie mit der Stimmreduzierung in Audacity beginnen.
Schritt 5: Exportieren Sie die Spur ohne Gesang
Schließlich ist es Zeit, Ihre bearbeitete Arbeit zu speichern.
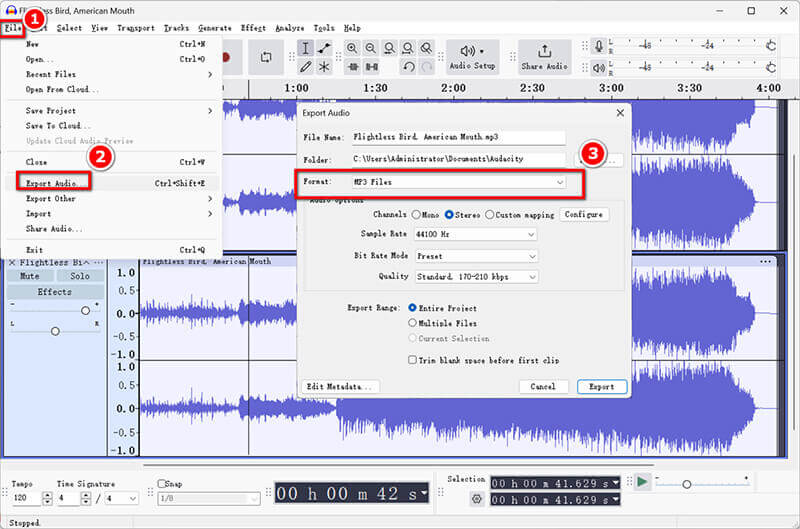
Klicken Sie auf Datei > Audio exportieren, um die isolierte Stimme auf Ihrem Computer oder audio.com in der Cloud zu speichern. Wählen Sie im Popup-Fenster die Ausgabe der Stimme als MP3 oder Ihr bevorzugtes Format aus.
Um den isolierten Gesang als separate Datei zu behalten, exportieren Sie einfach die duplizierte Spur, bevor Sie den Gesang löschen.
Audacity ist eine einfache Audiobearbeitungssoftware, mit der Sie alle Audioprobleme lösen können. Wenn Sie möchten Audio aus Video entfernen, sehen Sie sich diesen Beitrag an.
Teil 2. Stimmisolation in Audacity funktioniert nicht
Manchmal haben Benutzer Probleme damit, dass die Stimmisolation nicht wie erwartet funktioniert. Hier sind einige häufige Gründe und Lösungen:
Qualität verfolgen
Wenn die Originalspur eine schlechte Qualität oder übermäßiges Rauschen aufweist, kann es schwierig sein, den Gesang effektiv zu isolieren. Erwägen Sie die Verwendung einer Audiodatei mit höherer Qualität.
Probleme mit Stereospuren
Techniken zum Entfernen von Stimmen funktionieren häufig am besten bei Stereospuren. Wenn Ihre Spur mono ist, versuchen Sie, sie in Stereo umzuwandeln, bevor Sie die Stimmenentfernung anwenden.
Plugin-Einschränkungen
Einige Effekte funktionieren möglicherweise nicht richtig, wenn Sie die erforderlichen Plugins nicht installiert haben. Stellen Sie sicher, dass alle Plugins auf dem neuesten Stand sind.
Falsche Effektanwendung
Überprüfen Sie noch einmal, ob Sie die Schritte korrekt ausgeführt haben, insbesondere beim Anwenden der Umkehr- und Filtereffekte. Durch Experimentieren mit verschiedenen Einstellungen können Sie bessere Ergebnisse erzielen.
Teil 3. Alternative Methoden zum Entfernen von Gesang
Wenn Sie nach Alternativen zu Audacity für die Stimmentfernung suchen, haben Sie folgende Möglichkeiten:
Plugins von Drittanbietern
Es sind verschiedene Plug-Ins von Drittanbietern verfügbar, die die Stimmextraktionsfunktionen von Audacity verbessern können. Vocal Remover Pro ist eines davon.
Dieses Plugin kann dabei helfen, eine effektivere Stimmisolation zu erreichen. Installieren Sie es einfach, navigieren Sie dann zu „Effekt“ und wählen Sie das Plugin aus der Liste aus, um den Vorgang zu starten.
Audiobearbeitungssoftware: Adobe Podcast
Adobe Podcast ist eine weitere robuste Option zur Stimmisolation. Seine erweiterten KI-Funktionen können Gesang mit minimalem manuellen Eingriff effektiv entfernen. So verwenden Sie es:
Laden Sie den Titel in Adobe Podcast.
Verwenden Sie die Stimmisolierungsfunktion und passen Sie die Einstellungen nach Bedarf an.
Wenn Sie mit dem Ergebnis zufrieden sind, exportieren Sie Ihre Datei im gewünschten Format.
Bonus: ArkThinker Video Converter Ultimate
Wenn Sie auch mit Videodateien arbeiten, sollten Sie die Verwendung von ArkThinker Video Converter Ultimate. Es bietet Funktionen zur Rauschunterdrückung für Videos, was nützlich sein kann, wenn Sie Audio aus Videodateien extrahieren und gleichzeitig die Stimmpräsenz minimieren möchten. Außerdem können Sie die Hintergrund-Audiospuren einer Videodatei deaktivieren, ändern und hinzufügen. Darüber hinaus bietet dieses Tool leistungsstarke Audiobearbeitungseffekte wie Trimmen, Zusammenführen und mehr.
- Unterstützt über 1000 Formate, darunter MP4, MKV, AVI, MP3 usw.
- Mit der Stapelkonvertierung können Sie mehrere Dateien auf einmal bearbeiten.
- Der integrierte Video-Editor bietet Werkzeuge zum Trimmen, Zuschneiden und Hinzufügen von Spezialeffekten.
- Die Hardwarebeschleunigung garantiert eine 30-mal schnellere Konvertierungsgeschwindigkeit.
Abschluss
Dieser Artikel bietet eine umfassende Anleitung zum Entfernen von Gesang aus einem Song mit Audacity. Es ist ein unkomplizierter Vorgang, bei dem ein Song importiert, die Spur dupliziert, Effekte angewendet und das Ergebnis exportiert wird. Denken Sie daran, dass die Qualität Ihrer Ergebnisse von Ihrer ursprünglichen Audiodatei und den Einstellungen abhängt, die Sie während des Vorgangs auswählen. Auch wenn Sie Audacity nicht ausprobieren möchten, werden die oben genannten Alternativen oder Plug-Ins empfohlen, um Ihnen bei der schnellen Gesangsextraktion zu helfen.
Was haltet Ihr von diesem Beitrag? Klicken Sie hier, um diesen Beitrag zu bewerten.
Exzellent
Bewertung: 4.9 / 5 (basierend auf 412 Stimmen)
Finden Sie weitere Lösungen
Die 10 besten MP3-Cutter zum Schneiden von MP3-Dateien auf verschiedenen Geräten Audio-Cutter: Offline- und Online-Tools zum Schneiden von Audiodateien So ersetzen Sie Audio in einem Video auf verschiedenen Geräten 2024 4 einfachste Möglichkeiten zum Ändern und Bearbeiten der Audiolautstärke auf PC und MacRelative Artikel
- Audio bearbeiten
- Die 4 besten Song-Repeater für Mac, PC, iPhone, Android, Online
- So ändern Sie eine Sprachaufnahme schnell in eine andere Stimme
- So ersetzen Sie Audio in einem Video auf verschiedenen Geräten 2023
- Audio-Cutter: Offline- und Online-Tools zum Schneiden von Audiodateien
- Effektive Technik zum Teilen eines Tracks in Audacity
- So ersetzen Sie Audio in einem Video auf verschiedenen Geräten 2022
- So schneiden Sie Audio in Audacity, WMP, iMovie, Online, Trimmer
- 4 einfachste Möglichkeiten zum Ändern und Bearbeiten der Audiolautstärke auf PC und Mac
- 4 einfache Methoden zum Bearbeiten von Audiodateien unter Windows und Mac
- So komprimieren Sie Audiodateien, ohne die Klangqualität zu verlieren