


So vloggen Sie mit dem iPhone wie ein Profi – Vollständige Anleitung
Immer mehr Menschen möchten Vloggen mit einem iPhone und teilen Sie Vlogs in Echtzeit. Das iPhone ist leicht zu tragen und seine Vlogging-Funktionen werden mit jeder Version immer fortschrittlicher. Egal, ob Sie Anfänger oder Profi sind, das iPhone kann Ihnen helfen, attraktive Vlogs zu erstellen und Ihr wundervolles Leben oder Ihre Erfahrungen aufzuzeichnen. Es ist also auch eine gute Möglichkeit, ein professioneller Vlogger zu werden und viele Fans auf Social-Media-Plattformen zu gewinnen. Heute gibt Ihnen dieser Leitfaden einige nützliche Tipps und Möglichkeiten, um großartige Vlogs auf Ihrem iPhone zu erstellen. Entdecken Sie es jetzt!
- LEITFADENLISTE
- Teil 1. Einrichten Ihres iPhones für Vlogging
- Teil 2. Tipps zum Aufzeichnen hochwertiger Vlogs
- Teil 3. Bearbeiten von Vlogs auf dem iPhone
- Teil 4. Häufig gestellte Fragen zum Vloggen mit dem iPhone
Teil 1. Einrichten Ihres iPhones für Vlogging
Der erste Schritt zum Vloggen mit einem iPhone besteht darin, die richtigen Einstellungen vorzunehmen. In der Zwischenzeit müssen Sie einige Zubehörteile für hervorragendes Vloggen vorbereiten.
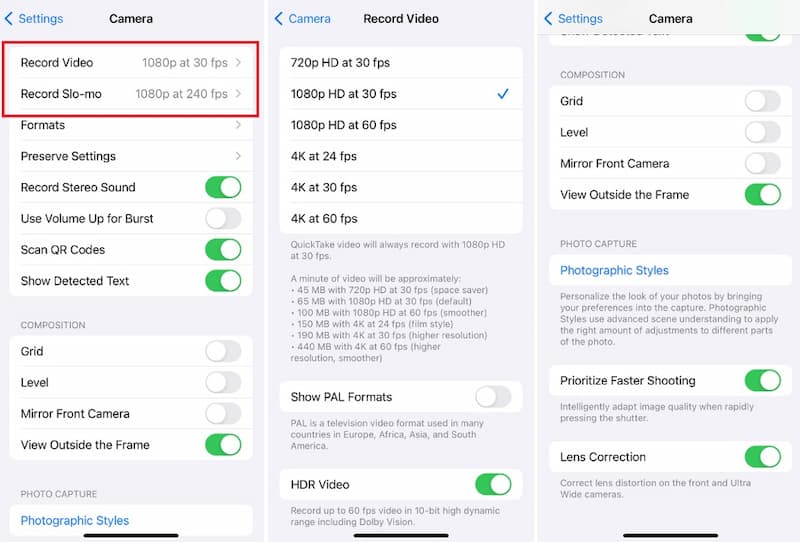
1. Die richtigen Kameraeinstellungen wählen
Normalerweise gilt: Je höher die eingestellte Auflösung, desto höher die Videoqualität. Um dies zu erreichen, gehen Sie zu Einstellungen und tippen Sie dann auf Kamera. Als nächstes können Sie wählen Ein Video aufnehmen um die Auflösung für iPhone-Vlogging einzustellen. Hier können Sie 1080p HD/60 fps für allgemeines Vlogging oder 4K/60 fps für höhere Qualität einstellen. Darüber hinaus ist das Einstellen der richtigen Auflösung für Zeitlupe auch eine der besten iPhone-Einstellungen für Vlogging.
2. Wichtiges Zubehör vorbereiten
Nach der Einrichtung des iPhone-Vloggings dürfen einige grundlegende Vlogging-Zubehörteile wie Stativ, Mikrofon, Beleuchtung usw. nicht fehlen.
◆ Stativ: Mit einem Stativ können Sie Ihre Aufnahmen stabilisieren, Verwacklungen reduzieren und Langzeitbelichtungen oder Zeitrafferaufnahmen machen. Darüber hinaus können Sie damit auch ganz einfach den Aufnahmewinkel anpassen.
◆ Mikrofon: Ein externes Mikrofon sorgt für eine klarere, professionellere Audioaufnahme als das eingebaute Mikrofon des iPhone. Und es reduziert normalerweise die Störungen durch Wind und andere Hintergrundgeräusche.
◆ Beleuchtung: Die richtige Beleuchtung kann für Ihr Vlogging ausreichend Licht liefern, den Fokus des Videos hervorheben und die Atmosphäre im Bild regulieren.
Teil 2. Tipps zum Aufzeichnen hochwertiger Vlogs
1. Beleuchtungstipps
Gute Beleuchtung ist wichtig, um hochwertige Vlogs mit einem iPhone aufzunehmen. Normalerweise können Sie, wenn möglich, natürliches Licht nutzen. Wenn Sie in Innenräumen fotografieren, positionieren Sie sich in der Nähe eines Fensters, um das weiche, diffuse Licht zu nutzen, das es bietet. Außerdem können Sie in ein Ringlicht investieren, um Schatten zu reduzieren und bei künstlicher Beleuchtung ein gleichmäßiges Leuchten auf Ihrem Gesicht zu erzeugen. Sie sollten jedoch Oberlicht vermeiden, da es unvorteilhafte Schatten auf Ihrem Gesicht erzeugen kann.
2. Tipps zur Rahmung und Komposition
Auch der Bildausschnitt ist für optisch ansprechende Vlogs entscheidend. Für ein ausgewogenes Erscheinungsbild können Sie die Drittelregel verwenden. Indem Sie Ihr Motiv außermittig positionieren, können Sie dynamischere Kompositionen erstellen.
3. Tipps zur Audioaufnahme
Klarer Ton ist genauso wichtig wie gutes Video. Einerseits können Sie Hintergrundgeräusche minimieren, indem Sie in ruhigen Umgebungen aufnehmen. Andererseits können Sie für die Audioaufzeichnung ein externes Mikrofon verwenden.
Teil 3. Bearbeiten von Vlogs auf dem iPhone
Nachdem Sie mit einem iPhone vloggt haben, können Sie Ihr Vlog mit einer professionellen App oder Desktop-Software noch verschönern. Hier empfehlen wir die beliebteste Wahl auf dem Markt!
1. Verwenden von iMovie zum Bearbeiten eines iPhone-Vlogs
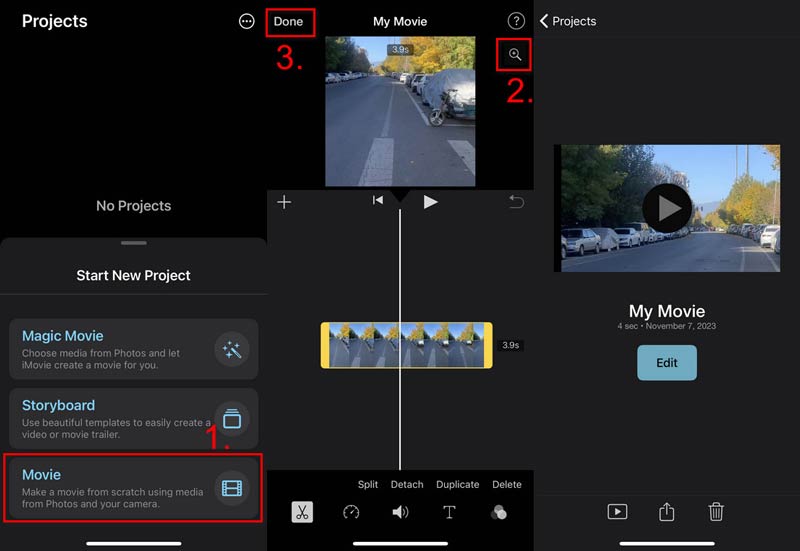
iMovie ist ein beliebtes Tool zum Bearbeiten von Vlogs auf Ihrem iPhone. Um es schnell zu verwenden, können Sie die folgenden einfachen Schritte befolgen!
Herunterladen und öffnen iMovie auf Ihrem iPhone. Zu Beginn können Sie Ihre Vlog-Clips in iMovie importieren.
Auf der Zeitleiste, können Sie auf einen Clip tippen, um ihn auszuwählen oder ihn zu ziehen. Oder Sie können das Trimmwerkzeug ausprobieren, um unerwünschte Clips zu löschen.
Als Nächstes können Sie einen Voiceover für diesen Vlog hinzufügen. Bei Bedarf können Sie sogar Übergänge hinzufügen, um Ihren Vlog zu verbessern, oder ein bestimmtes Thema festlegen, indem Sie auf das Einstellungen Symbol.
Wenn Sie mit dem iPhone-Vlog zufrieden sind, tippen Sie auf Erledigt in der oberen linken Ecke Ihres Timeline-Bildschirms.
Alles in allem können Sie mit iMovie den Vlog entsprechend Ihren tatsächlichen Anforderungen anpassen!
Tipp:
Nachdem Sie Ihr iPhone-Vlog in iMovie bearbeitet haben, können Sie es zum besseren Teilen in andere Formate konvertieren.
2. Verwenden von ArkThinker Video Converter Ultimate zum Bearbeiten von Vlogs
Wenn Sie tolle iPhone-Vlogs erstellen möchten, benötigen Sie professionelle Bearbeitungssoftware. Normalerweise Desktop-Software wie ArkThinker Video Converter Ultimate bietet Ihnen erweiterte Funktionen. Hier erfahren Sie, wie Sie iPhone-Vlogs auf einem Desktop bearbeiten.
Laden Sie diesen iPhone-Vlog-Editor auf Ihren Windows- oder Mac-Computer herunter.
Installieren und öffnen Sie dieses Tool. Importieren Sie dann Ihren iPhone-Vlog, indem Sie auf Plus Symbol auf der Hauptoberfläche. Sie können auf das Schere Symbol, um das Bearbeitungsfenster zu öffnen. Hier können Sie Vlogs nach Belieben bearbeiten.
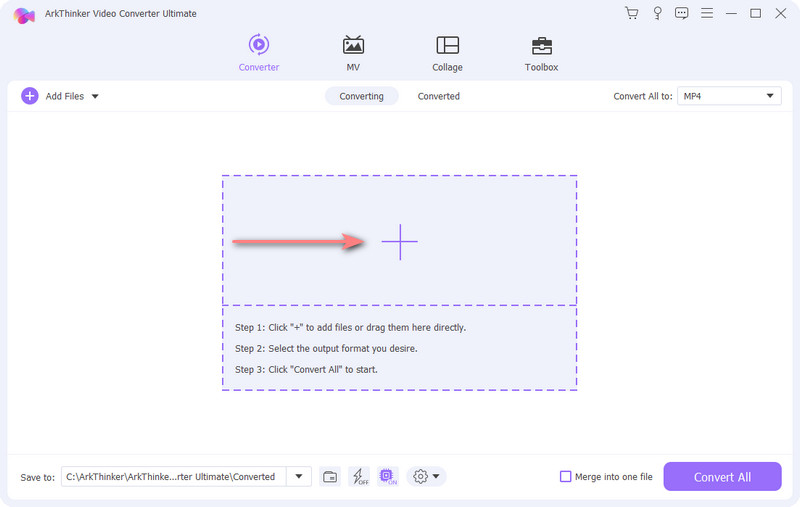
Außerdem können Sie wechseln zu Werkzeugkasten von der Hauptoberfläche aus. Wählen Sie dann das richtige Tool für die Bearbeitung Ihres iPhone-Vlogs.

Mit diesem professionellen Tool können Sie tolle Vlogs für das iPhone erstellen. Neben der Bearbeitung von Vlogs können Sie damit auch Videos in andere Formate konvertieren. Musik zum Video auf dem iPhone hinzufügen, Videos zusammenführen usw.
Teil 4. Häufig gestellte Fragen zum Vloggen mit dem iPhone
Sind iPhones gut genug zum Vloggen?
Absolut. Das iPhone ist normalerweise tragbarer als eine Kamera. Und es hat eine eingebaute tolle Kamera, die perfekt für die Aufnahme eines Vlogs ist. Außerdem gilt: Je neuer die iPhone-Version, desto besser ist der Vlog-Aufnahmeeffekt.
Was ist das beste Zubehör für iPhone-Vlogging?
Sie können ein Stativ für Stabilität, ein externes Mikrofon für klare Audioeffekte und eine Beleuchtung für bessere visuelle Effekte mitnehmen. Außerdem können Sie einen Vlog mit professioneller Bearbeitungssoftware bearbeiten.
Wie kann die Videoqualität bei iPhone-Vlogs verbessert werden?
Um die Qualität Ihres Videos zu verbessern, können Sie vor dem Vloggen eine hohe Auflösung einstellen. Versuchen Sie dann, mithilfe eines Stativs zu vloggen, um Ihr Filmmaterial zu stabilisieren. Außerdem können Sie Ihre Vlogs mit einem benutzerfreundlichen Bearbeitungstool verschönern.
Abschluss
In diesem Artikel erfahren Sie einige Einstellungs- und Aufnahmetipps für das iPhone-Vlogging. Und Sie erfahren, wie Sie Vlogs auf Ihrem iPhone bearbeiten. Mit mehr Übung können Sie hier bessere Vlog-Inhalte erstellen! Außerdem können Sie mit professionellen Bearbeitungstools wie ArkThinker Video Converter Ultimate erstaunliche visuelle Effekte erzielen. Probieren Sie es jetzt aus!
Was haltet Ihr von diesem Beitrag? Klicken Sie hier, um diesen Beitrag zu bewerten.
Exzellent
Bewertung: 4.8 / 5 (basierend auf 406 Stimmen)
Finden Sie weitere Lösungen
Tutorial zum Komprimieren eines Videos auf dem iPhone ohne Qualitätsverlust 3 einfachste Möglichkeiten, ein Video auf dem iPhone in hoher Qualität zu drehen Konkrete Anleitung zum Umdrehen eines Videos auf dem iPhone für Anfänger Ein Video auf dem iPhone ganz einfach verlangsamen [Bonus-Tipp] Nützliche Fähigkeiten zum Bearbeiten von Videos auf iPhone, Android und Mac-PC Untertitel zum Video hinzufügen – Wie fügt man einem Video Untertitel hinzu?Relative Artikel
- Video bearbeiten
- 4 Möglichkeiten, Gesichter in Videos mithilfe von KI zu verwischen
- 2024 60FPS-Videokonverter zum Hochskalieren höherer Qualität
- Das beste YouTube-Videoformat, das Sie 2024 konvertieren möchten
- 3 Möglichkeiten, Gesichter in Videos mithilfe von KI zu verwischen
- 2 Möglichkeiten zum Zuschneiden einer Videodimension in CapCut [Handbuch 2024]
- 3 Möglichkeiten zum Entfernen von Wasserzeichen aus PowerDirector-Videos
- So entfernen Sie Wasserzeichen aus Renderforest-Videos auf 2 Arten
- Movavi-Wasserzeichen: Vollständige Anleitung zum Hinzufügen und Entfernen
- WMV-Datei mit 4 einfachen Methoden zuschneiden, um schnelle Ergebnisse zu erzielen
- So verlängern Sie ein kurzes Video mit drei verschiedenen Methoden