Step-by-Step Guide to Sync Audio and Video in Premiere Pro
When editing in Adobe Premiere, one of the most common issues creators face is syncing audio and video. Whether it’s interviews, music videos, or any content with separately recorded audio, syncing the tracks can feel challenging. Fortunately, Premiere Pro offers several methods to sync sound and video seamlessly, including a manual approach and a more automated solution using its built-in sync tool.
In this guide, we’ll show you how to sync audio and video in Premiere both manually and using Premiere’s sync feature.

- GUIDE LIST
- Part 1. How to Sync Audio and Video in Premiere Pro
- Part 2. An Easy Alternative Way to Sync Audio and Video
Part 1. How to Sync Audio and Video in Premiere Pro
Syncing audio and video in Premiere Pro is a common task, especially when working with footage recorded separately from its audio. Here are two detailed methods to sync audio and video in Premiere Pro:
Method 1. Automatic Sync Using the 'Merge Clips' Feature
This method is ideal when you have separate audio and video clips that you want to sync automatically based on their audio waveforms.
Import your Clips
Open Premiere Pro and import both the video clip and the external audio file into the project panel. Make sure the audio track has clear waveforms that match the video’s onboard audio.
Select the clips:
In the project panel, select both the video clip and the corresponding external audio clip. You can do this by holding the Ctrl (Windows) or Cmd (Mac) key and clicking each file.
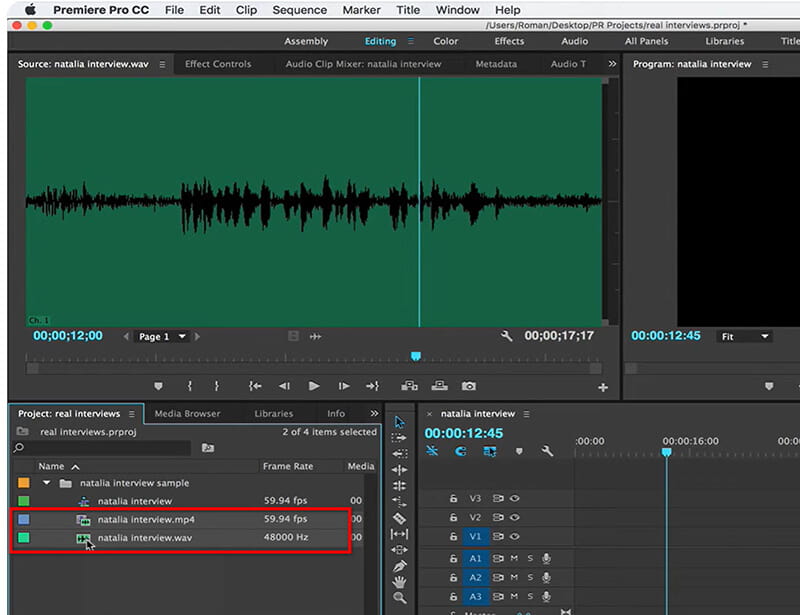
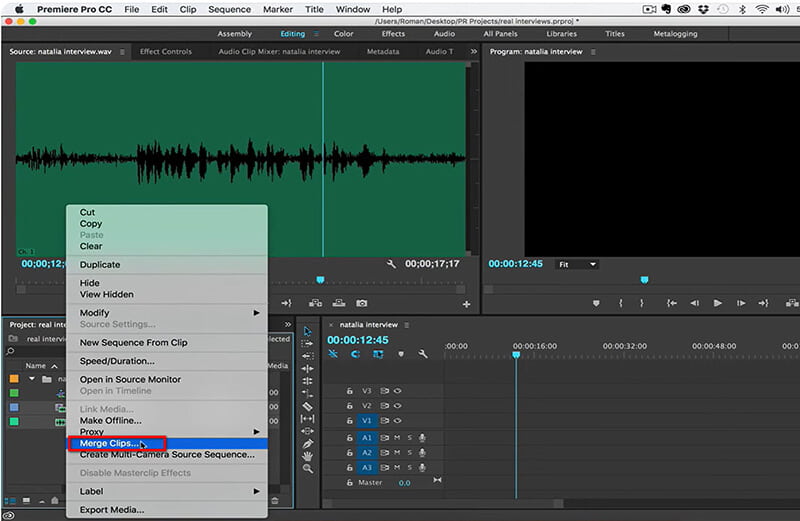
Right-click and choose 'Merge Clips':
Once both clips are selected, right-click on either clip and choose the Merge Clips option from the context menu.
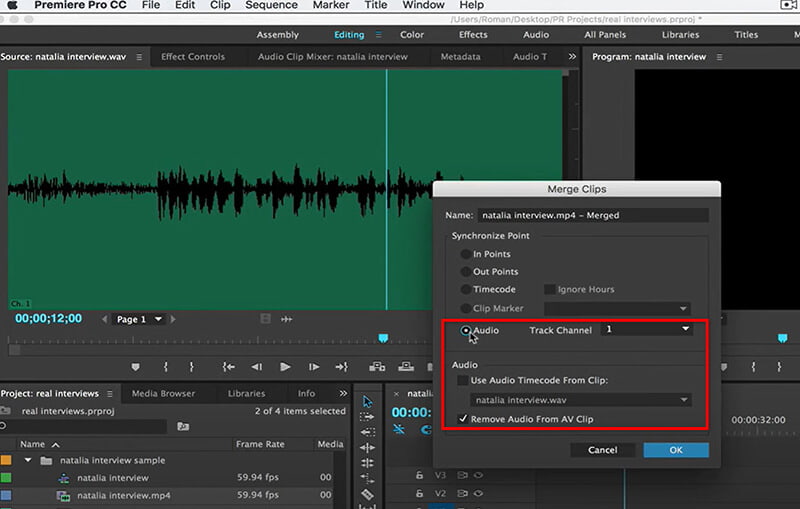
Select Sync option
In the dialog box that appears, select Audio as the sync method. This ensures that Premiere Pro uses the waveforms of both clips to align them automatically.
Merge videos
After choosing the audio sync option, click OK. Premiere Pro will now create a new merged clip that combines the video with the external audio, aligned based on the waveforms. The new merged clip will appear in the project panel.
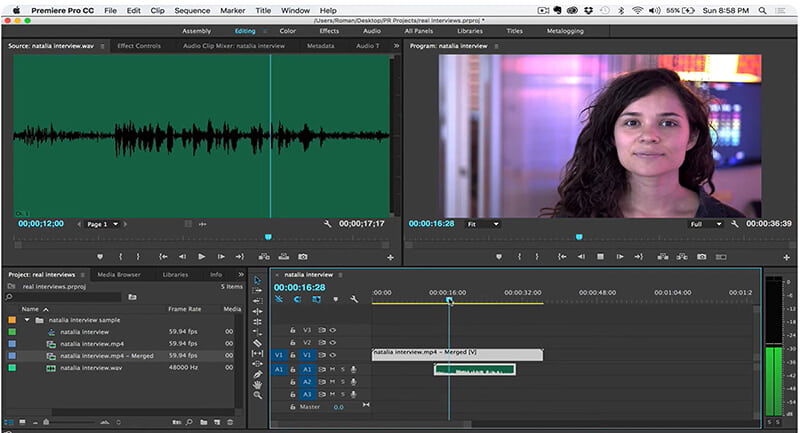
Place the combined clip onto the timeline and play it back to check that the audio and video are in sync. If needed, you can manually fine-tune the sync by moving the audio track a few frames to the left or right.
Tips for Better Results:
◆ Ensure your audio tracks are clear and distinct for Premiere’s tool to work effectively.
◆ Record a sync signal (like a hand clap) to create an easy reference point for both the camera and microphone.
Method 2. Manual Sync Using Waveforms
If the automatic method doesn’t work well, you can manually sync the audio and video using the waveform comparison.
Import your clips
Import both your video and external audio files into the Premiere Pro project.
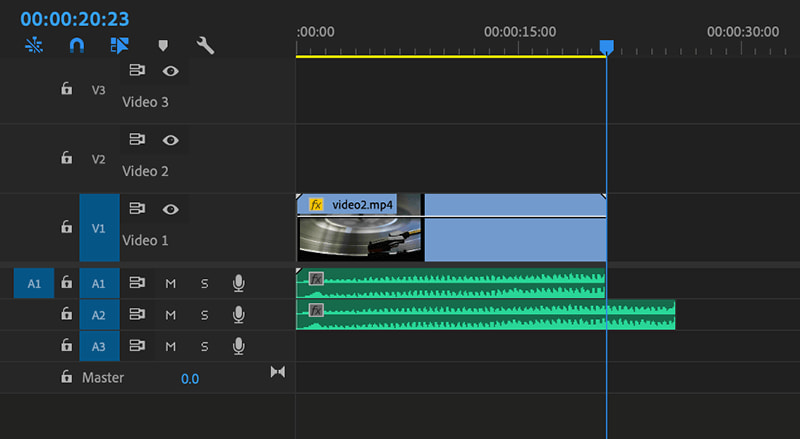
Add video and audio to the timeline
Drag both the video and external audio clips onto the timeline. Ensure that both the video’s original audio and the external audio are visible in the audio tracks.
View audio waveforms
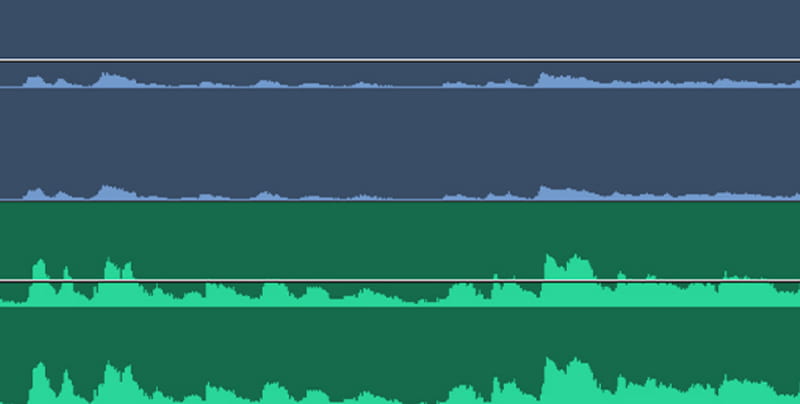
Expand the audio tracks in the timeline to view the waveforms. You can do this by clicking the small triangle or dragging the track height to make the waveforms more visible.
Match the Waveforms
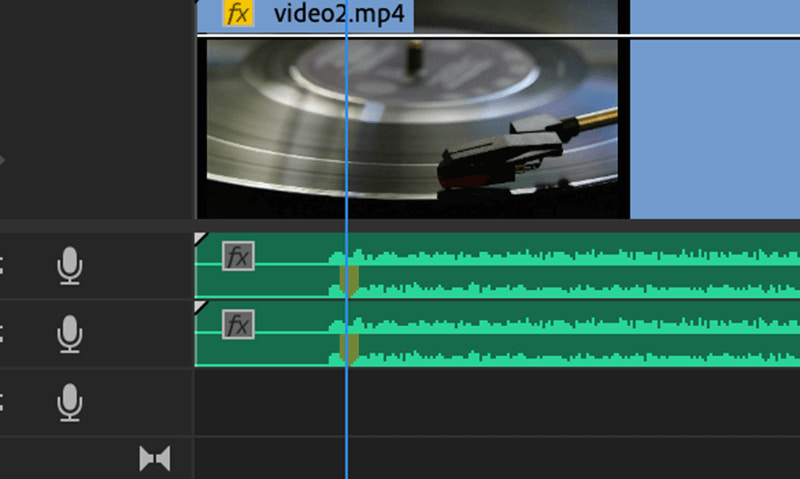
Align the external audio clip with the video by comparing the waveforms of the video’s onboard audio and the external audio. Look for peaks or distinctive shapes in the waveform to match them up.
If the waveforms are slightly off, nudge the external audio clip left or right using the arrow keys for precise movement until the waveforms align.
Mute the original Audio optionally
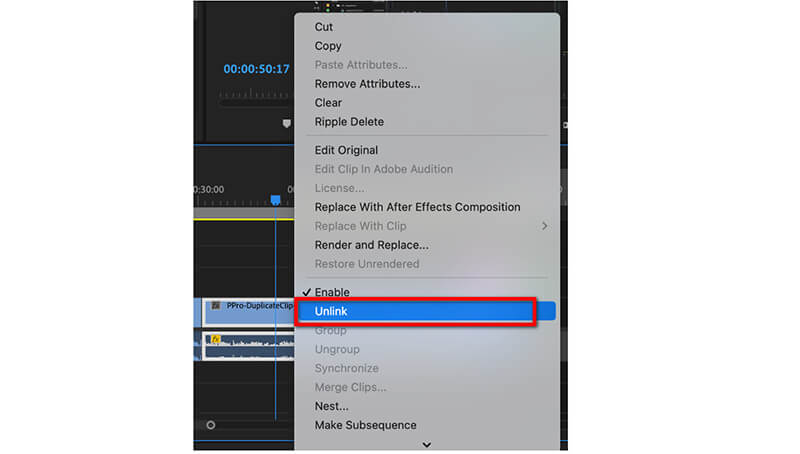
Once you’ve successfully synced the external audio with the video, you can mute or delete the original audio track if you don’t need it. Right-click on the video’s original audio track, select Unlink, and then either mute or delete the track.
Check playback
Play back the synced sequence to ensure the audio and video are perfectly aligned. Make any small adjustments as needed.
Additional Tips:
◆ For precise syncing, you can place markers on both the audio and video waveforms where specific sounds (like claps or loud noises) occur. Aligning these markers can make manual syncing easier.
◆ Zooming in on the timeline allows you to see the waveform details more clearly and make fine adjustments.
Both methods will help you sync audio and video in Premiere Pro, ensuring that your final edit has clear, well-timed sound and visuals.
Part 2. An Easy Alternative Way to Sync Audio and Video
If you’re looking for an easy alternative way to sync audio and video, tools like ArkThinker Video Converter Ultimate provide simple methods without complicated steps. It offers precise audio-video synchronization features, allowing you to easily adjust timing mismatches between sound and visuals. Its user-friendly interface allows you to adjust the audio track or swap it out completely, guaranteeing seamless synchronization without needing advanced editing expertise. The tool accommodates numerous video and audio formats, including MP4, MOV, MKV, WMV, AVI, MP3, FLAC, ALAC, and more, making it ideal for different media projects. Plus, it features real-time preview and batch processing capabilities, simplifying the synchronization process for users of all skill levels.
Here’s how to use it:
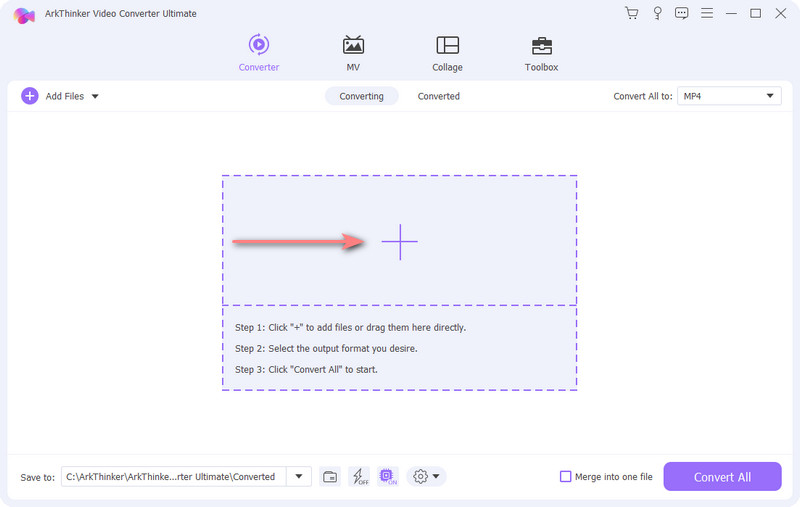
Import your video file
Free download, install, and launch Video Converter Ultimate on your Windows or Mac computer.
Next, click on Add Files or the + icon to locate and import your video file.
Sync audio and video
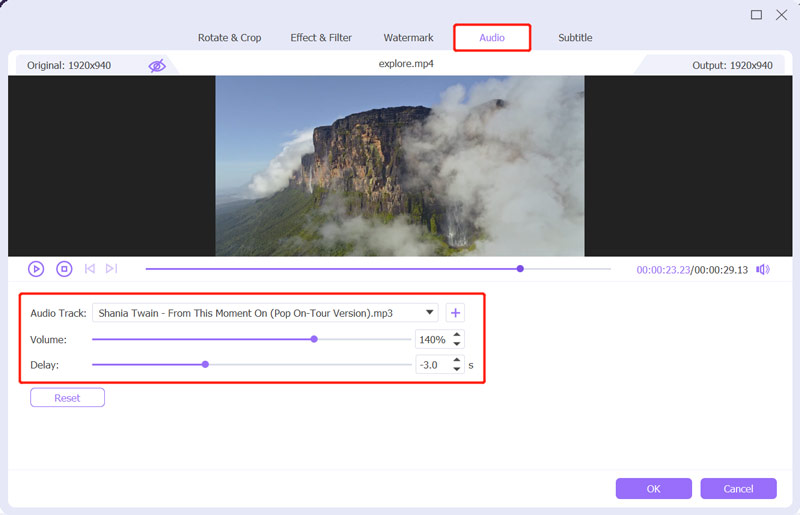
Once your video file is added, click the edit button and switch to access the Audio editing window.
Here, you can choose an audio track from the video and then set the length of Delay of the audio track to sync with the video file. Besides, you can adjust the audio volume to edit it.
If you find the current audio track unsatisfactory, simply click the plug button to add new background music and replace the existing audio.
Save your video
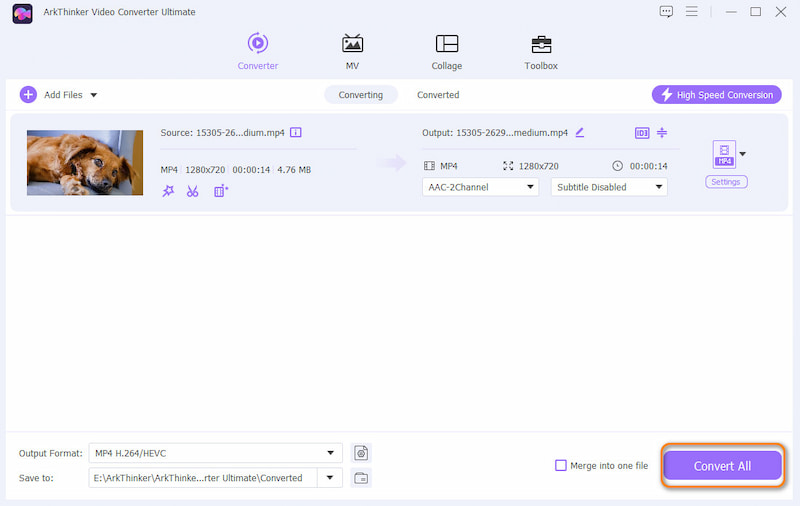
After syncing the audio with your video, click OK to apply your changes and go back to the main interface.
Then, choose the desired output format for the video file. If you do not want to encode this video file, just select Same as source.
Finally, click the Convert All button to save your edited video file.
Conclusion
Syncing audio and video in Premiere Pro doesn’t have to be a complicated process. Whether you choose to align them manually or use Premiere’s sync tool, both methods ensure high-quality results. If you need easier alternative software, ArkThinker Video Converter Ultimate provides excellent solutions for quick syncing. Now, you can confidently fix any audio and video out-of-sync issues and ensure your projects run smoothly!
By mastering these techniques, you’ll have no trouble ensuring your Premiere Pro syncs sound to video perfectly in your future projects.
What do you think of this post? Click to rate this post.
Excellent
Rating: 4.8 / 5 (based on 410 votes)
Find More Solutions
How to Compress Audio Files Without Losing Sound Quality How to Combine 2 or More Audio Files on Different Devices Add Album Art to MP3 on Windows, Mac, iPhone, and Android Adobe Premiere Crop Video – How to Crop Video in Premiere Concrete Tutorial to Rotate a Video in Adobe Premiere Learn How to Create a Split Screen in Adobe Premiere ProRelative Articles
- Edit Audio
- 4 Best Song Repeaters for Mac, PC, iPhone, Android, Online
- How to Change Voice Recording into Another Voice in Quick Ways
- How to Replace Audio in a Video On Different Devices 2023
- Audio Cutters: Offline and Online Tools to Cut Audio Files
- Effective Technique on How to Split a Track in Audacity
- How to Replace Audio in a Video On Different Devices 2022
- How to Clip Audio in Audacity, WMP, iMovie, Online, Trimmer
- 4 Easiest Ways to Change and Edit Audio Volume on PC and Mac
- 4 Easy Methods to Edit Audio Files on Windows and Mac
- How to Compress Audio Files Without Losing Sound Quality


