


[Solved] How to Remove Image Background in GIMP in 2 Methods
GIMP, an open-source raster graphics editor, offers a versatile environment for image editing, retouching, and composition. Its user-friendly UI and extensive feature set make it a popular option for both novices and experts. Among its many functionalities, the ability to isolate backgrounds from images stands as a key feature. This article shows 2 ways of removing backgrounds from an image in GIMP seamlessly.

- GUIDE LIST
- Part 1. Remove Background in GIMP Via Fuzzy Tool
- Part 2. Remove Background in GIMP Using Path Tool
- Part 3. Easier Method to Remove Background from Images
- Part 4. FAQs
Part 1. Remove Background in GIMP Via Fuzzy Tool
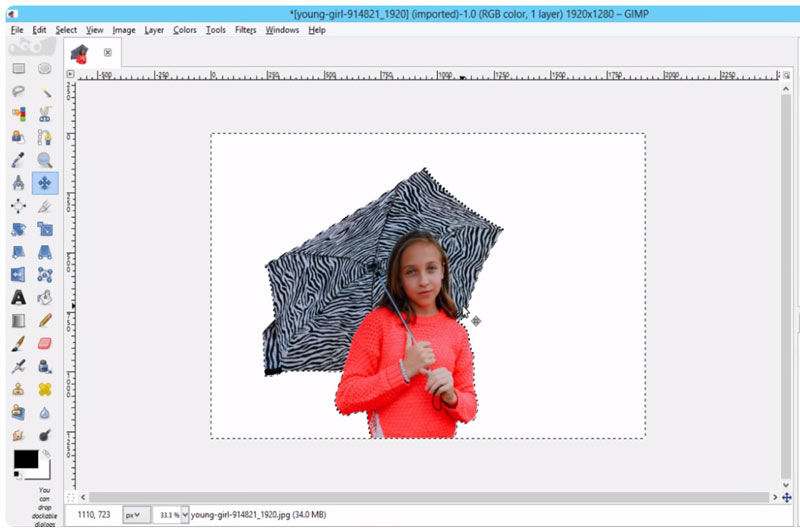
The Fuzzy Select tool excels at selecting areas with similar colors while considering variations in tone and texture. This tool is particularly useful for removing backgrounds with irregular patterns or subtle color variations. By adjusting the threshold and feathering options, users can achieve smooth transitions between the subject and the background.
Run GIMP and open the image you want to edit.
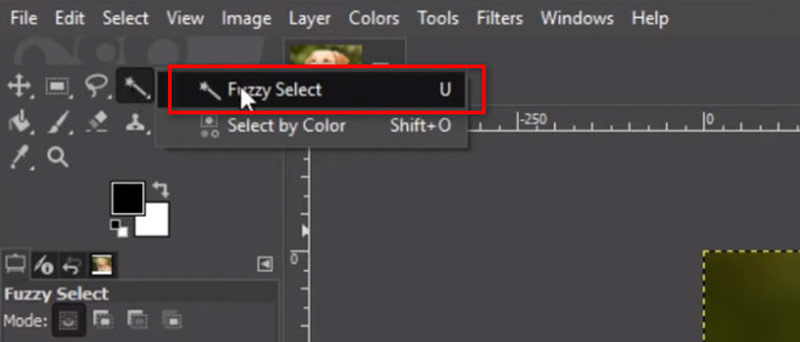
In the toolbox, select the Fuzzy Select Tool. You can also press the U key as a shortcut.
The Fuzzy Select Tool icon looks like a magic wand.
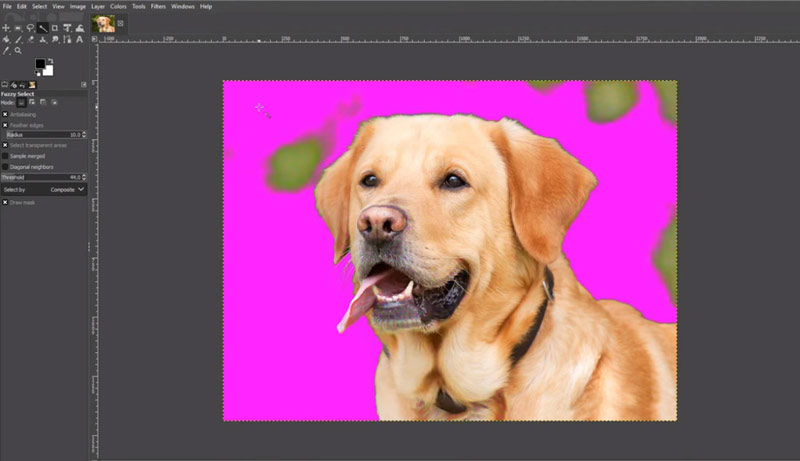
Before using the Fuzzy Select Tool, you may want to adjust the tool settings. The primary setting to adjust is the Threshold, which determines how similar in color adjacent pixels need to be to be selected.
Set the threshold higher for more similar colors and lower for less similar colors.

Click on an area of the background with the Fuzzy Select Tool. GIMP will select contiguous areas of a similar color based on the threshold you've set. Hold down the Shift key and click on additional areas to add them to the selection.
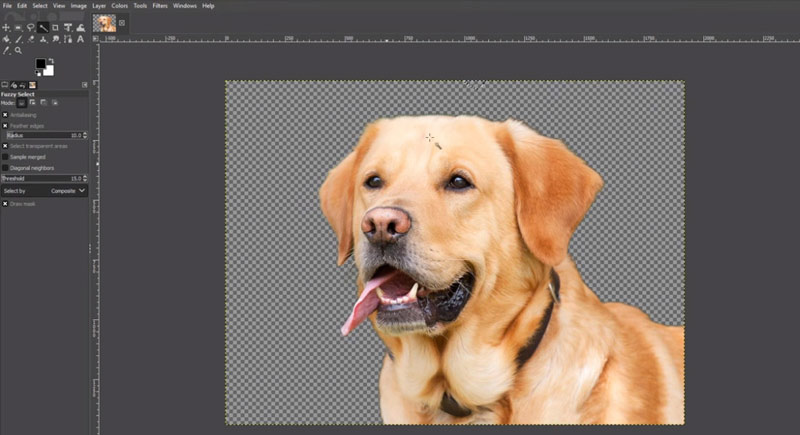
Once you've selected the background, press the Delete key on your keyboard.
This will remove the selected background pixels, leaving the foreground intact.
If the background removal isn't perfect, undo the deletion (Ctrl + Z) and refine your selection by adjusting the threshold or manually adding/subtracting from the selection with the Fuzzy Select Tool or other selection tools.
That's it! You've successfully removed the background using the Magic Wand Tool in GIMP. Always keep in mind that practice makes perfect; therefore, don't be scared to try out various tools and settings to get the desired outcome.
By picking the watermark area, you may quickly and easily remove the watermark from an image in GIMP using this method.
Part 2. Remove Background in GIMP Using Path Tool
For more complex backgrounds or images with intricate details, the Path tool provides a precise method for background removal. By manually outlining the subject, users can create a path that defines the boundary between the subject and the background. Once the path is created, converting it into a selection allows for easy removal or manipulation of the background.
Open the image you wish to edit in GIMP.
In the toolbox, select the Path Tool. It's represented by an icon that looks like a fountain pen.
Alternatively, you can press the B key to select the Path Tool quickly.

Zoom in on the image to get a clear view.
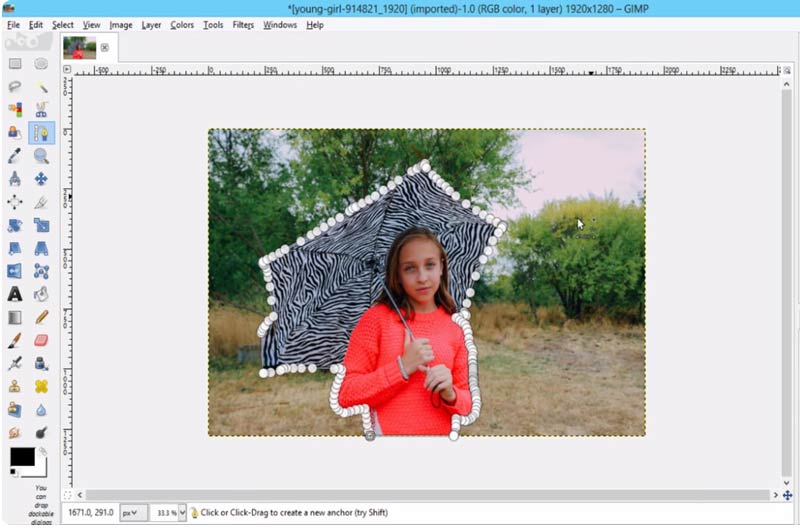
Start by clicking to create anchor points around the object you want to keep. Click and drag to create curved lines if needed. Continue placing anchor points until you've outlined the entire object.
To close the path, either click on the first anchor point you created or double-click on the last anchor point.
In the Paths dialog, right-click on the path you've just created.
Click the context menu and choose Path to Selection. This turns your route into a list of options.
After converting the path to a selection, you might need to refine it by using the Free Select Tool or the Lasso Tool to add or subtract areas from the selection as needed.
Once you're satisfied with the selection, press the Delete key on your keyboard. This will remove the selected background.
Once you're satisfied with the background removal, export your image in your desired file format.
Part 3. Easier Method to Remove Background from Images
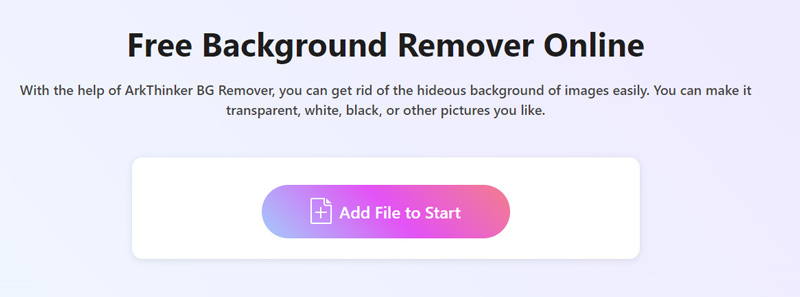
For those seeking an even simpler and costing solution, third-party online tools like ArkThinker Background Remover Online offer a one-click solution to remove backgrounds from images as the GIMP alternative for free. The web tool utilizes advanced AI algorithms to automatically detect and remove backgrounds, saving you time and effort.
This cutting-edge freeware is compatible with Windows, Mac, iOS, Android, Chrome, and any device that can access the web. This tool is suitable for both professional and recreational photographers to meet all your background removal needs for portraits, products, animals, and more. Besides, this freeware can change the photo background into a solid color or your customized image in one click, even creating a transparent picture directly.
Access our free online image background remover from any browser on any device. Upload your image that you want to get rid of the background by clicking on Add File to Start.
Then, it will automatically be processed to remove your image background automatically. Not satisfied with the result? No problem! Use the Keep or Erase option to keep or remove the background you want from the result.
Repeat the process until you're completely happy.
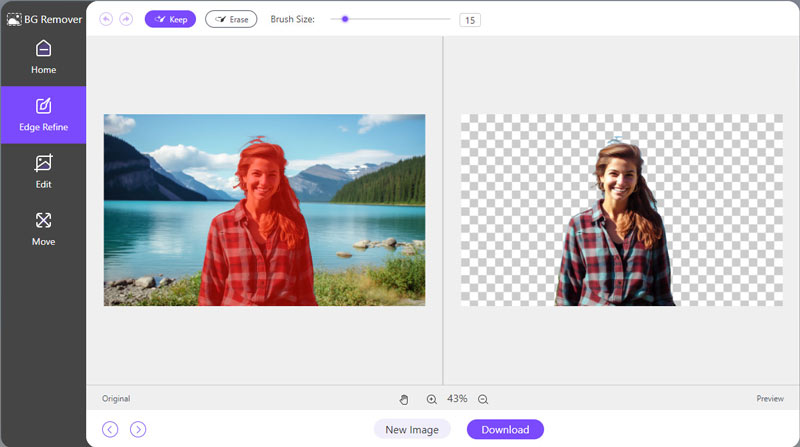
After that, your background-free image is ready to download. Just click Download and save your updated image to your device.

If you want to change or add a new background, just switch to the Edit tab and select the solid color or Image to upload a new background.
To change the image size, the Crop feature is available for you.
Part 4. FAQs
Does GIMP have a background remover?
Yes, the GIMP has tools and capabilities like the Path Tool and Fuzzy Select Tool that may be used to remove backgrounds from photographs.
Can GIMP improve image quality?
Yes, GIMP can enhance image quality through resizing, color adjustments, and sharpening tools. By refining dimensions, adjusting color balance, and sharpening details, GIMP helps to optimize image appearance.
Where is transparency in GIMP?
Transparency settings in GIMP can be found under the Layer menu. Selecting Transparency followed by Add Alpha Channel enables transparency for the active layer.
Why can't I remove the white background in GIMP?
Difficulty in removing white backgrounds may arise due to insufficient contrast between the subject and the background. Adjusting the selection tools' tolerance or utilizing advanced techniques like layer masking can help overcome this issue.
How do you add transparency to the background in GIMP?
To add transparency to the background in GIMP, ensure the image has an alpha channel enabled. Then, use selection tools or layer masks to isolate the subject, allowing the transparent background to show through.
Conclusion
Removing backgrounds in GIMP is a fundamental skill for anyone working with digital images. Whether you prefer the precision of manual selection tools or the convenience of automated plugins, GIMP offers rich options to satisfy your needs. With practice and experimentation, mastering background removal can elevate your image editing capabilities and unlock new creative possibilities. Also, if you like a free and easy solution online, ArkThinker Background Remover Online will be a nice option.
Find More Solutions
3 Easy Ways to Remove Unwanted Objects from Pictures 2 Easy Ways to Remove a Reddit Watermark Quickly Remove Watermark in Lunapic & Its Alternative [2024] Guide to Remove Watermark from Photo in Lightroom [Free] 3 Methods to Remove People from Photos Quickly and Easily 2 Ways to Remove Text from An Image Online/OfflineRelative Articles
- Edit Image
- Effective Options to Resize Picture for Twitter- 3 Online Tools
- How to Remove Watermark from Placeit Images and Videos
- How to Make Photo HD on Different Devices and Remove Artifacts
- Updated and Unbiased Review of WatermarkRemover.io
- 3 Easy Ways to Remove Image and Text Watermarks from PDF
- Remove Watermark from GIF: Effortless Methods to Edit GIF
- Save TikTok Photos Without Watermark in 2 Hassle-Free Ways
- What Is Pixlr & How to Remove Watermark from Photo
- [2024] Inpaint Review & How to Use It to Remove Watermark
- How to Remove Alamy Watermark from Images (100% Working)