


How to Add Watermark to Word - Steps
Do you want to add a polished look or discreetly show ownership in your Word documents? Watermarks are the solution! With the help of this guide, you can master watermarking. We'll show you how to add watermarks in Word. Watermarks, either text or picture, can be easily added to your documents. It turns them from plain text into branded works of art. To create the ideal appearance, unleash your inner designer by adjusting the typefaces, colors, and opacity. Are unwelcome watermarks on documents you've received overwhelming you? Do not panic! We'll introduce you to a quick and easy internet tool that gets rid of them. You'll be an expert at watermarking by the end, guaranteeing the security and professionalism of your documents.

- GUIDE LIST
- Part 1. How to Insert Watermark in Word- Text Watermark and Image Watermark
- Part 2. How to Customize Your Watermark in Word
- Part 3. Bonus Tip: How to Remove Watermark from Images with ArkThinker Watermark Remover
- Part 4. FAQs about Watermark in Word
Part 1. How to Insert Watermark in Word - Text Watermark and Image Watermark
Have you ever thought that your Word documents were missing something? Perhaps some subtle branding or an ownership mark? Watermarks, however, are ready to take your call! With the help of this tutorial, you will be able to add a watermark to Word documents with ease. Imagine turning your documents from plain files into branded works of art. They will have your company's logo discreetly in the background. These translucent images or text overlays can add professionalism or prevent unauthorized copying. It will teach you how to insert both text and image watermarks into your Word documents.
Alternatively, consider protecting your work with a copyright notice that is neatly included in the text. We'll guide you through the process step by step. You'll learn how to add text and image watermarks to your papers. It will make them secure and unique.
Method 1. Add Text Watermark to Word
Go to the Design tab after opening a Word document. Find the watermark area under the settings for the Page Background. Select Watermark by clicking.
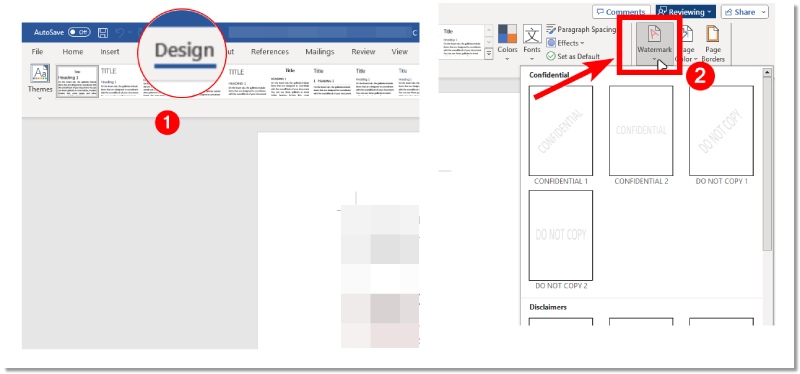
Select Text watermark from the watermark drop-down. In the designated field, type the text you want. Experiment with formatting parameters such as color, size, and font style to add personality to your text watermark.

Hit OK, and you're done! Now, your text watermark appears on every page of your document.

Method 2. Add Image Watermark to Word
Follow steps 1 and 2 from the text watermark method
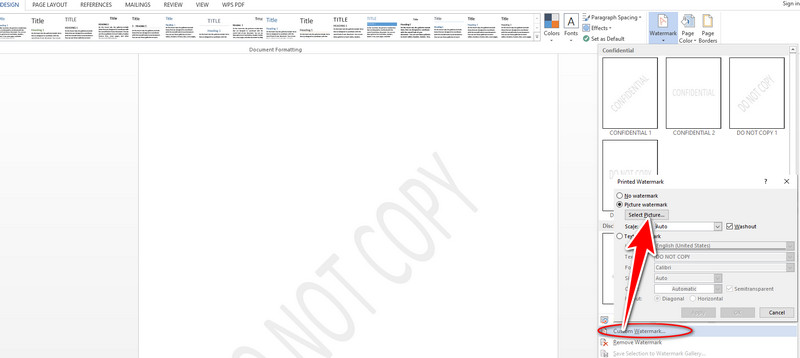
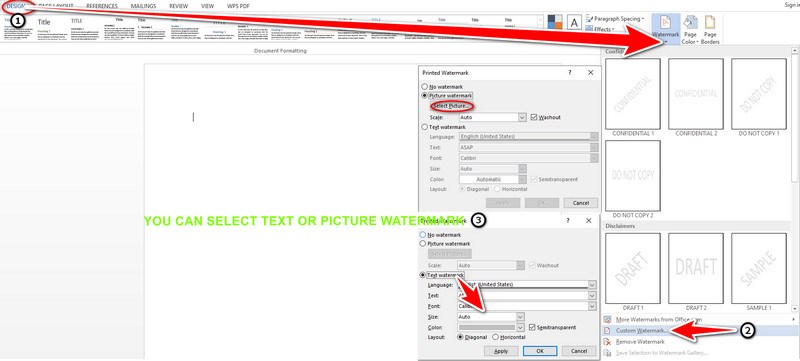
Choose the picture watermark from the watermark drop and down and click the custom watermark window. To select the required image, click Select Picture and explore your folders. You may alter the image's transparency and size to get a balanced appearance.
Once you click OK, your picture watermark will be added to your document. You'll become an expert on how to insert watermark in Word quickly by following these methods!

Part 2. How to Customize Your Watermark in Word
You've become an expert at putting watermarks, both text and image, into Word documents! But where is watermark in Word customization? However, the adventure is far from over. This tutorial explores watermark customization. It gives you the ability to turn plain watermarks into artistic masterpieces. They will flawlessly match your documents. Imagine a copyright notice that uses a modest typeface and color to fit in with the surroundings. Imagine a watermark with your company's logo. It's just transparent enough to show the paper's content but not dominate it. Prepare to let your creative side go as we examine Word's customizing features!
Choose Watermark, and then find the Custom Watermark from the Design tab. Select an image by selecting Picture Watermark, or put your watermark text in the Text box by selecting Text Watermark. Then click OK.
You can also select a Ghost text for special treatment. To view the header, double-click the area close to the top of the page. Click the watermark to make it selected after moving the cursor over it until a four-headed arrow appears.
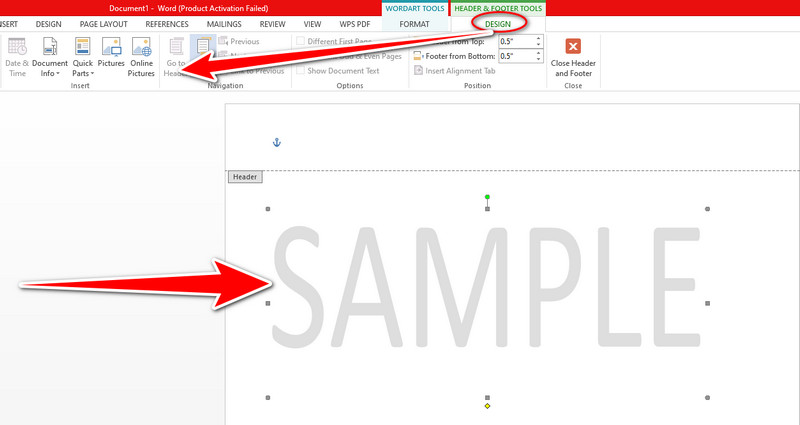
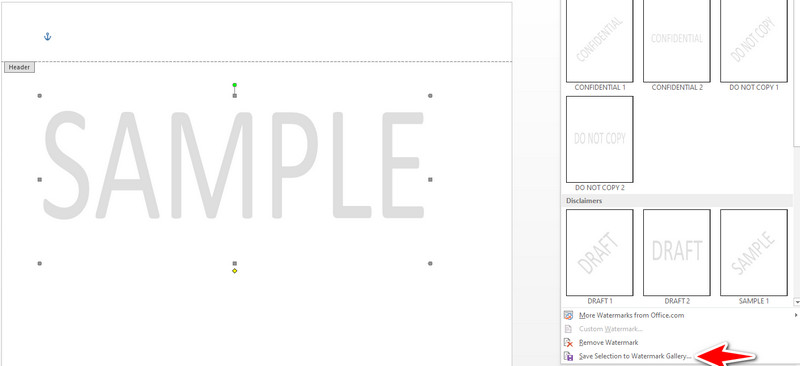
Go back to the Design tab and click the watermark gallery. Choose Save Selection to add a watermark to the image. Click OK after naming the watermark.
Part 3. Bonus Tip: How to Remove Watermark from Images with Arkthinker Watermark Remover
Do unwelcome watermarks hamper your images? Do not panic! This tutorial introduces you to ArkThinker Online Watermark Remover. It's a free web app that lets you erase watermarks easily on any photo. ArkThinker Watermark Remover enables you to delete distracting logos easily. These include text overlays or any blemishes that damage your photos. You may restore your desired clean and spotless aesthetic by having ArkThinker delete them with ease and also blemishes disappear thanks to its clever algorithms, giving your pictures a polished, expert appearance.
The tool is easy to use and analyzes your photos with remarkable accuracy. It uses advanced algorithms to erase watermarks while keeping the surrounding features. Prepare to give your watermarked pictures a fresh look! The upcoming parts will cover the easy steps to use ArkThinker Watermark Remover. It creates beautiful, watermark-free photographs.
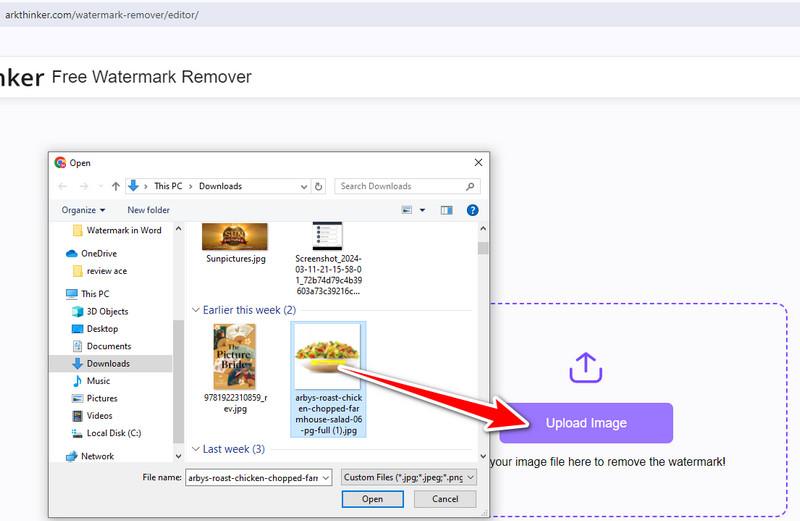
Visit the website for ArkThinker Watermark Remover. Upload Your Watermarked Picture by clicking the Select Image button. Look through your files and select the picture from which you wish to take the watermark off.
ArkThinker provides two techniques for removing watermarks. Choose the right brush to remove minor watermarks precisely. The Lasso Tool is ideal for choosing watermarks with bigger, asymmetrical shapes. Select the technique that best fits the dimensions and form of your watermark. Click Erase after you've selected the watermark area. Its clever algorithms will remove the watermark from the image.

Once you're happy, save your watermark-free image to your device by clicking the Download option.

Part 4. FAQs about Watermark in Word
Can I customize my watermark in Word?
Of course! Double-clicking your watermark will bring up editing mode after it has been inserted. After that, you can alter a number of elements:
• Font: Using the Font tab on the ribbon, play around with different font sizes and styles.
• Color: Using the Font Color dropdown option, select a text watermark color that goes well with the rest of your document.
• Image watermarks are transparent: To adjust their visibility, right-click the image and choose Format Picture. Then, in the Format Picture pane, move the Transparency slider.
• Placement: To move the watermark to a desired spot on the page, click and hold it while editing.
How to watermark a picture in Word?
To watermark a picture in Word:
1. Insert the picture.
2. Format it (resize, crop, etc.).
3. Apply an artistic effect to make it appear as a watermark.
4. Adjust transparency for the watermark effect.
5. Reposition and resize the watermark.
6. Save your document.
What are Word's watermarks, and how are they used?
Watermarks are graphics. They are quietly inserted into the background of your Word documents. These elements are usually text or logos. They accomplish a number of goals:
• Ownership: Put your name or a copyright notice on your document to assert your ownership.
• Branding: Use a polished company logo to improve your documents.
• Confidentiality: Requires marking important documents. They must be marked as Draft or Confidential to keep others from seeing them.
Conclusion
One useful tool for branding and protection across many platforms is watermarking. We can add watermark to Word, either text- or image-based, and can be simply added and customized in Word to improve document security and branding. Also, tools like ArkThinker Watermark Remover offer a simple way to remove watermarks from pictures. Watermarking is key. It makes documents and photos look good and safe. It balances customization and security. Start perfecting your watermark skills by following this guide or sharing it to help more.
What do you think of this post? Click to rate this post.
Excellent
Rating: 4.8 / 5 (based on 406 votes)
Find More Solutions
How Can I Add and Remove Watermark in Excel? 3 Steps Only [3 Tools] The Ultimate Ways to Remove a Logo from a Picture How to Watermark Photos on iPhone: Methods with Apps and Tools Remove Adobe Stock Watermark from Image [Full Guide] How to Add Watermark to Video on Different Devices 2024 Remove Watermark from GIF: Effortless Methods to Edit GIFRelative Articles
- Edit Image
- FaceApp Remove Watermark: The Best Way to Remove the Logo
- Top Emoji Removers to Remove Emojis from Pictures in 2024
- Top 7 GIF Background Removers [Free Incl.]
- 2 Easy Ways to Change Transparency of Image in Google Slides
- Ultimate Guide to Remove Background in Illustrator
- Remove Watermark from GIF: Effortless Methods to Edit GIF
- Save TikTok Photos Without Watermark in 2 Hassle-Free Ways
- What Is Pixlr & How to Remove Watermark from Photo
- [2024] Inpaint Review & How to Use It to Remove Watermark
- How to Remove Alamy Watermark from Images (100% Working)