How to Blur Face in Video Online, Desktop, and Mobile Phone
Privacy and content protection are more critical than ever, and blurring faces in videos has become an essential skill. When you share a video on YouTube, TikTok, Instagram, etc., preserving someone's anonymity or simply focusing on other elements within the footage, blurring faces is incredibly useful. Various tools offer different types of blurring techniques, such as pixelation and Gaussian blur, each catering to specific needs. If you’re looking for ways to blur faces in a video, you are coming to the right place. In this guide, we will share 4 ways to hide or mosaic a face in footage.

- GUIDE LIST
- Part 1. How to Blur Faces in a Video with a Desktop Editor
- Part 2. How to Blur Faces in a Video Professionally
- Part 3. How to Blur Faces in a Video on iPhone
- Part 4. How to Blur Faces Online with Flixier
- Part 5. FAQs About Blurring Faces in Videos
Part 1. How to Blur Faces in a Video with a Desktop Editor
When it comes to blurring faces in a video on your desktop, ArkThinker Video Converter Ultimate offers a seamless solution. This tool includes a watermark remover feature that can be creatively used to blur faces, giving you the control you need without the complexity. It works on both Windows and Mac computers, so you can make one or multiple faces blurry from a video file. Besides, its powerful editing features allow you to enhance your video, denoise audio, and process over 1000 video formats.
- Support more than 1000 formats for the conversion of audio and video.
- Batch processing can significantly reduce your time.
- Create split-screen videos by combining images and videos.
- Improve the quality of SD to HD, or even 4K, 5K, or 8K video.
Start by downloading and installing ArkThinker Video Converter Ultimate.
Once the installation is complete, open the software. Navigate to the Toolbox section and select the Watermark Remover option.

Click on the Add File button to import the video that needs face blurring.
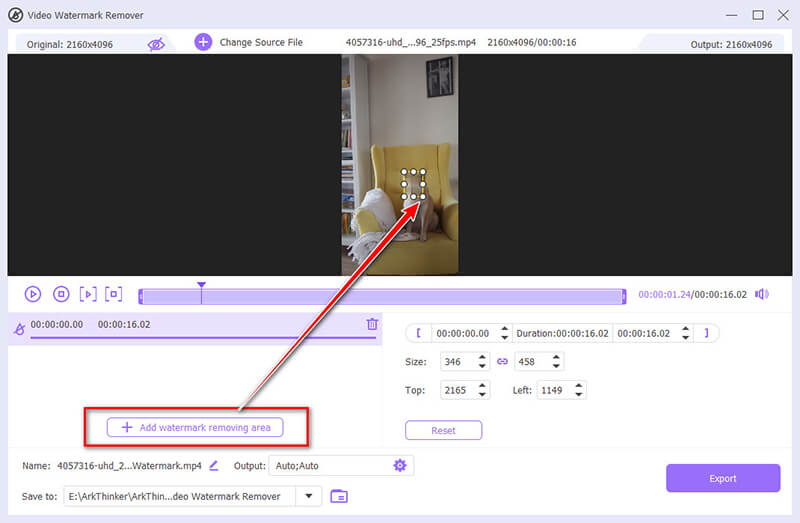
By choosing Add watermark removal area from the menu on the left, you can use the selection tool to highlight the face or faces you want to blur. As necessary, reposition the area to guarantee total coverage.
Use the same selection procedure as above to choose and confirm the faces you wish to blur.
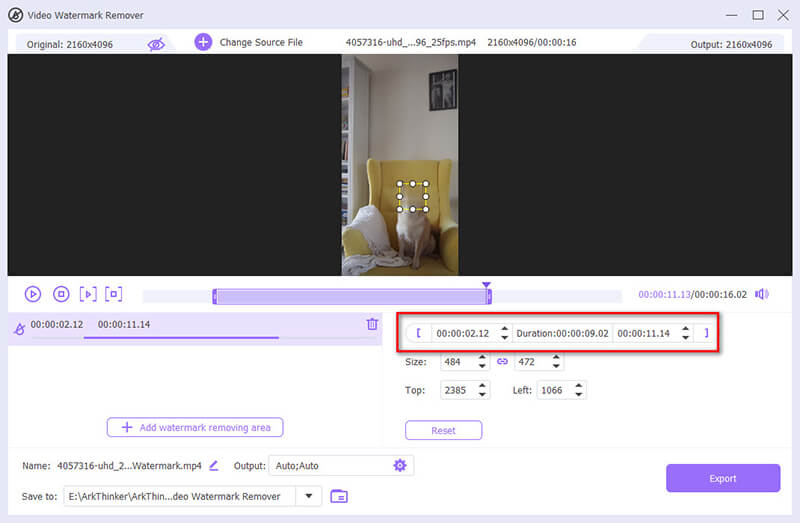
You should also adjust the beginning and finishing times of the facial blur using the playback processing bar.
After making a selection, preview the outcome and apply the blur effect. If satisfied, move on to the following action.
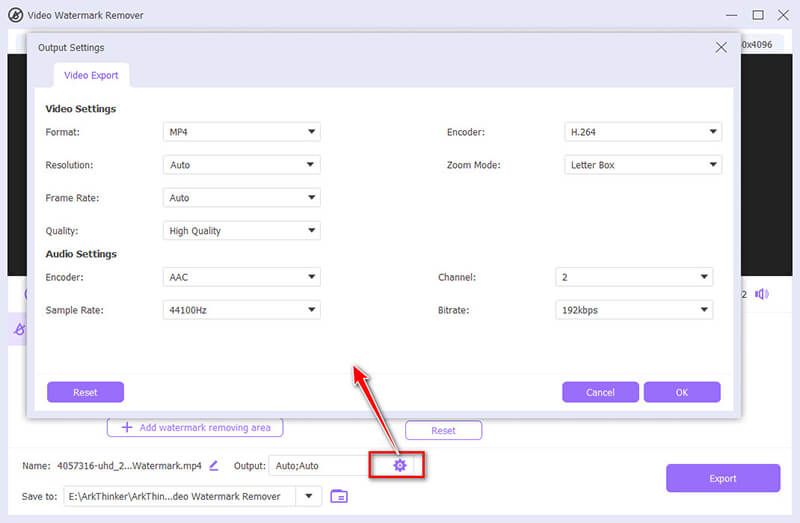
Select the desired output format from the drop-down menu next to Output, then select Export to begin blending the face in your movie.
One hidden feature of this software that can help you blur or hide a face in a video file is the Watermark feature, where you can add an image or text watermark to overlay the face you want to blur. (Check this post to learn how to add a watermark to a video here.)
- Easy to use, even for beginners.
- Multiple faces can be blurred in a video file.
- Provides a straightforward and quick process.
- Limited customization options for advanced users.
Part 2. How to Blur Faces in a Video Professionally
Adobe Premiere Pro is the go-to tool for professionals looking to blur faces in videos. It provides advanced features that allow for precise control over the blur effect, making it ideal for more complex projects.
Open Adobe Premiere Pro and import the video with the face you want to blur.
Go to the New Item option and select Adjustment Layer. Drag this adjustment layer onto the timeline above your video track.
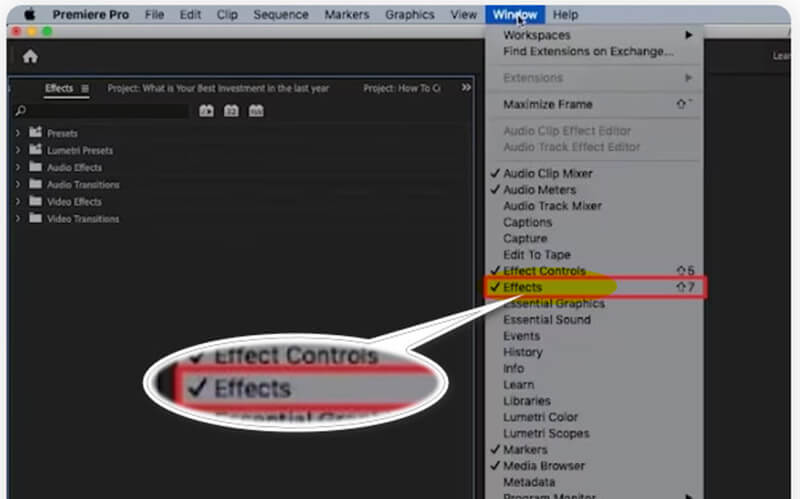
Go to the Effects panel and search for Gaussian Blur. Drag this effect onto the adjustment layer.
In the Effects Control panel, use the masking tools (ellipse or pen) to create a mask over the face you want to blur. Adjust the mask's position and size as needed.
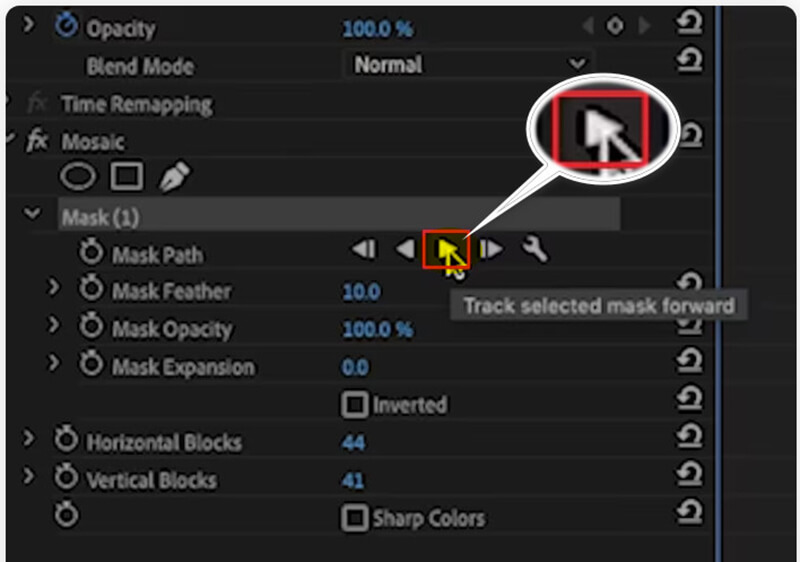
Increase the blur amount to your desired level. You can also animate the mask to track the face throughout the video.
Once satisfied with the blur effect, render the video and export it using your preferred settings.

My experience shows that patience and careful tracking adjustments are essential to ensure the blur stays aligned with the face, especially in videos with complex movements.
- Extensive customization options for professional results.
- High-quality output with minimal quality loss.
- Requires a more substantial learning curve.
- Higher cost compared to simpler tools.
Part 3. How to Blur Faces in a Video on iPhone
If you need to blur faces in a video directly from your iPhone, the Blur Video - Face Blur app is a handy tool. It offers a user-friendly interface that lets you quickly blur specific areas in your videos without needing a computer.
Download the Blur Video - Face Blur app from the App Store and launch it.
Tap on Choose a Video and select the video you want to add a blur effect from your gallery.
Use the blur tool to select the blur shape: Rectangle, or Circle, then draw over the face you wish to blur. Adjust the intensity and size of the blur as needed.
Once you’re satisfied with the effect, preview the video to ensure everything looks right. Then, save the edited video back to your gallery.
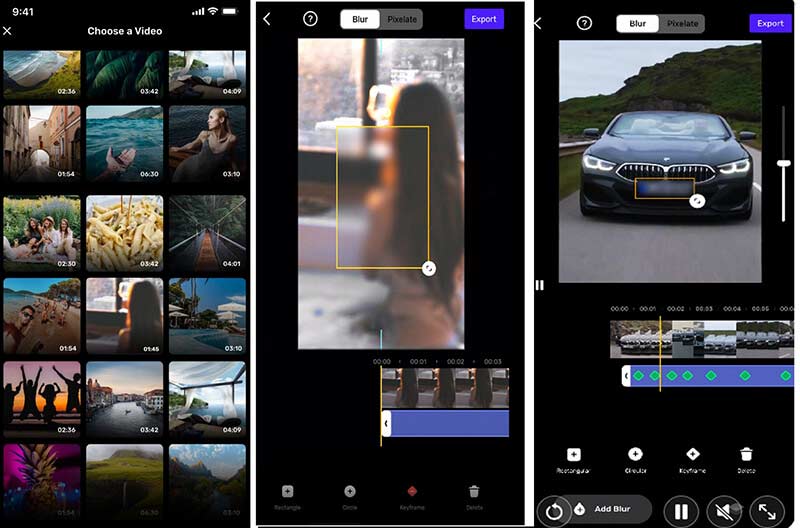
When using the video face blur app on an iPhone to blur a face in a video, it's essential to take your time in adjusting the blur effect to ensure it accurately follows the face throughout the video because it is not easy to move your finger on an iPhone.
- Easy to use with a straightforward interface.
- No need for additional software installation on a computer.
- Convenient for quick edits on the go.
- May result in slight quality loss.
- Limited customization compared to desktop solutions.
Part 4. How to Blur Faces Online with Flixier
Flixier is an excellent online tool for blurring faces in a video without the need to install software. It’s ideal for users who need a quick solution that works on any device with a browser.
Visit the Flixier website and create an account if you don’t have one. Click on the Choose Video button to click to upload a video with the face from your computer or cloud storage.
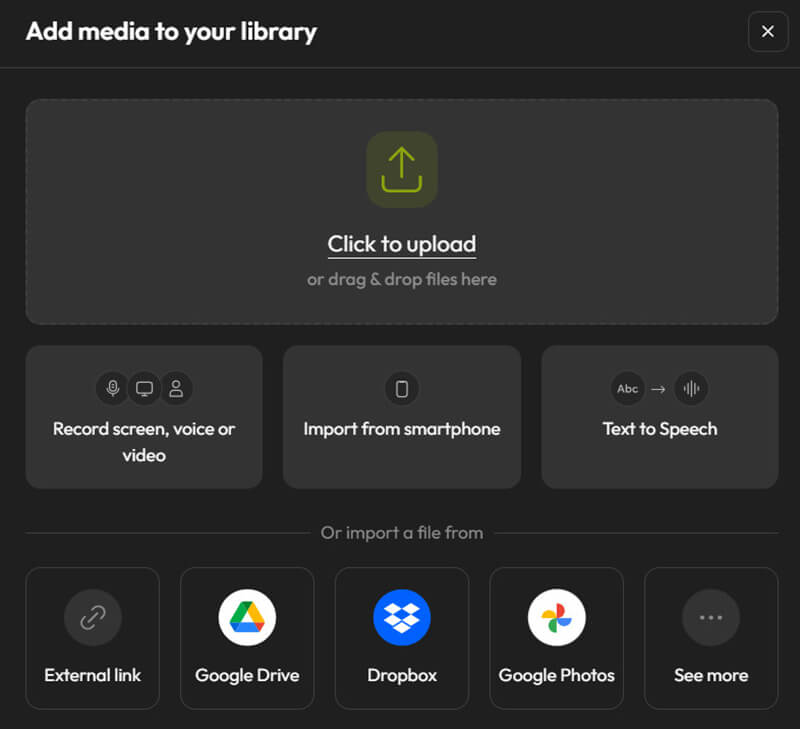
Drag the video file into the timeline editing window. Then, select a square mask from the Shapes menu. Put the mask over the portion of the video showing the face you wish to restrict. The blur's size and intensity can be changed as necessary.
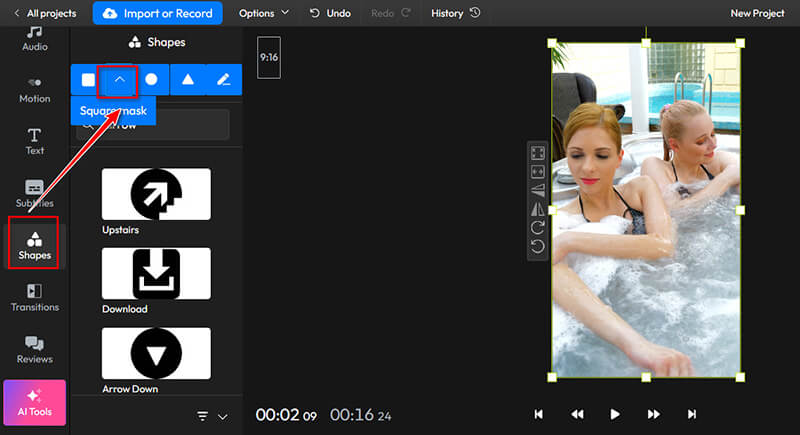
Next, select your preferred blur or pixelation effect. Drag the mask item on the timeline to change the effect's duration.
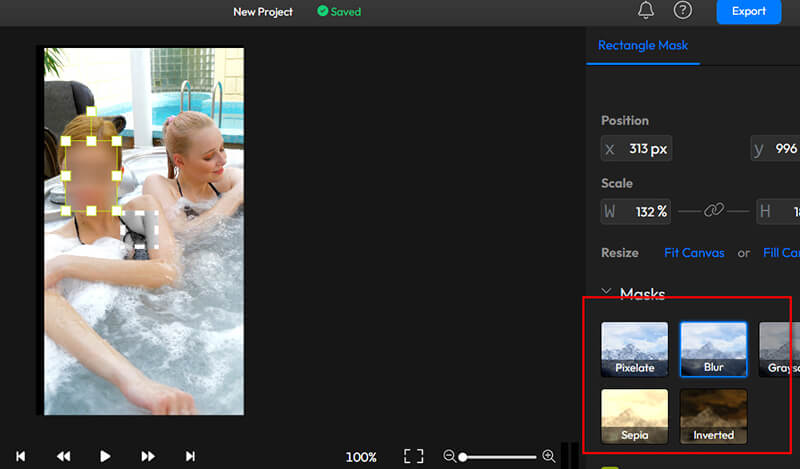
Once you’ve applied the blur, preview the video to make sure it meets your expectations. Finally, export the video in your preferred format.
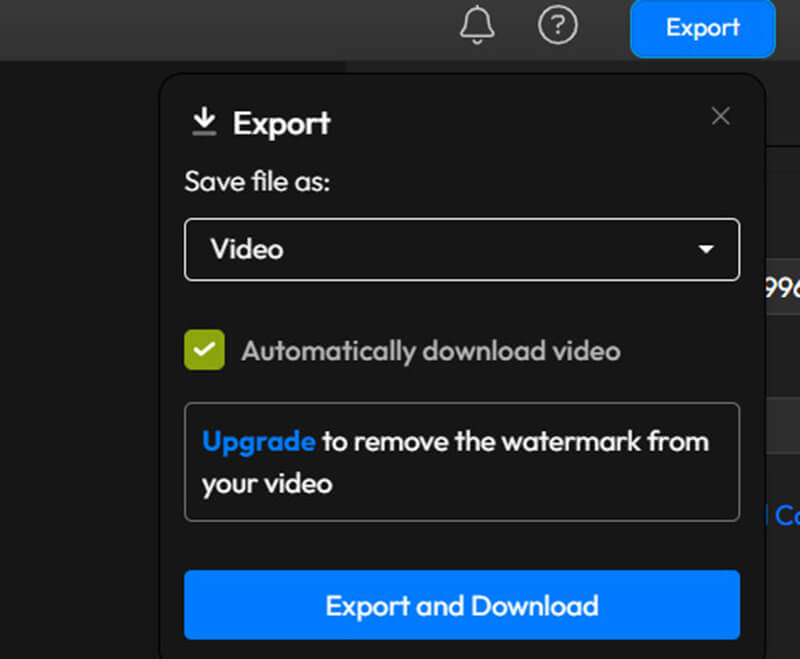
In this step, you need to sign in to export and download the video. It would be best if you also made a subscription to remove the watermark. Or you can learn from this post to remove the watermark from a video file.
I found that using the keyframe feature to track the face as it moves throughout the video ensures consistent blurring, even if the subject is in motion. Also, a helpful tip is to zoom in on the timeline to make more precise adjustments so I can quickly see the results without long waits.
- Accessible from any device with internet access.
- No software installation required.
- Simple interface suitable for beginners.
- Potential quality issues depending on internet connection.
- Limited customization compared to desktop editors.
Part 5. FAQs About Blurring Faces in Videos
What is the best way to blur faces in a video without losing quality?
Using professional tools like Adobe Premiere Pro offers the best quality with minimal loss. However, for quick tasks, desktop tools like ArkThinker Video Converter Ultimate also provide decent results.
Can I blur faces in a video after it’s been uploaded to social media?
Yes, some platforms allow for post-upload edits, but it’s generally best to blur faces before uploading to ensure consistent quality across all platforms.
What is the difference between pixelation and blurring?
Pixelation breaks the image into visible pixels, making it hard to discern details, while blurring smooths the image by averaging the surrounding pixels, creating a softer, out-of-focus effect.
Conclusion
Blurring faces in a video is crucial for privacy, compliance, and content protection. This article gathers the 4 ways to make the face blurry in a video file via desktop, online, and mobile phone tools. Which method is your favorite one? Or do you have a better recommendation method? Tell us by leaving your comments below.
What do you think of this post? Click to rate this post.
Excellent
Rating: 4.8 / 5 (based on 410 votes)
Find More Solutions
3 Apps to Blur Videos on iOS/Android, Computer, and Online Fix a Blurry Video, Unblur a Video, and Make a Video Clear How to Unblur an Image in 4 Workable Ways [Online/Desktop] Fix Blurry Photos in 3 Doable Approaches [Beginner’s Guide] 3 Ways to Remove Watermark from PowerDirector Videos How to Crop AVI Files Using Online and Offline Video CroppersRelative Articles
- Edit Video
- 2 Ways to Crop a Video Dimension in CapCut [2024 Guide]
- 3 Ways to Remove Watermark from PowerDirector Videos
- How to Remove Watermark from Renderforest Videos in 2 Ways
- Movavi Watermark: Full Guide to Add and Remove It
- Crop WMV File Using 4 Easy Methods for Quick Results
- How to Make a Short Video Longer with 3 Different Methods
- Loop a Video on iPhone, iPad, Android Phone, and Computer
- Free Video Editing Software – 7 Best Free Video Editor Apps
- 3 TikTok Watermark Remover Apps to Remove TikTok Watermark
- Video Filter – How to Add and Put a Filter on a Video 2024


