5 Steps to Merge Clips in Premiere: A Complete and Easy Guide
I needed to merge clips in Premiere for a personal project. I had captured several short clips on my phone during a vacation, and I wanted to combine them into a smooth travel montage. How to do that?
Adobe Premiere Pro is a powerful video editing software widely used by professionals and hobbyists alike. It offers a range of tools for creating stunning videos, from basic edits to advanced effects. One of the most essential tasks in video editing is merging clips, whether you’re combining multiple shots to create a seamless sequence or simply streamlining your project.
Figuring out how to merge clips and ensure a fluid transition between each one was key to making the final product look professional. If you’re in a similar situation or just want to improve your editing skills, follow this article to merge clips in Premiere.

- GUIDE LIST
- Part 1. How to Merge Video Clips in Adobe Premiere Pro
- Part 2. Tips for Seamless Merging
- Part 3. Alternative to Merge Video Clips
Part 1. How to Merge Video Clips in Adobe Premiere Pro
Merging clips in Premiere Pro involves importing, arranging, and adjusting the clips to flow together seamlessly. Here’s a step-by-step guide to help you to merge videos.
Import your video clips
To start, open Adobe Premiere Pro and create a new project. Then, follow these steps to import your video clips:
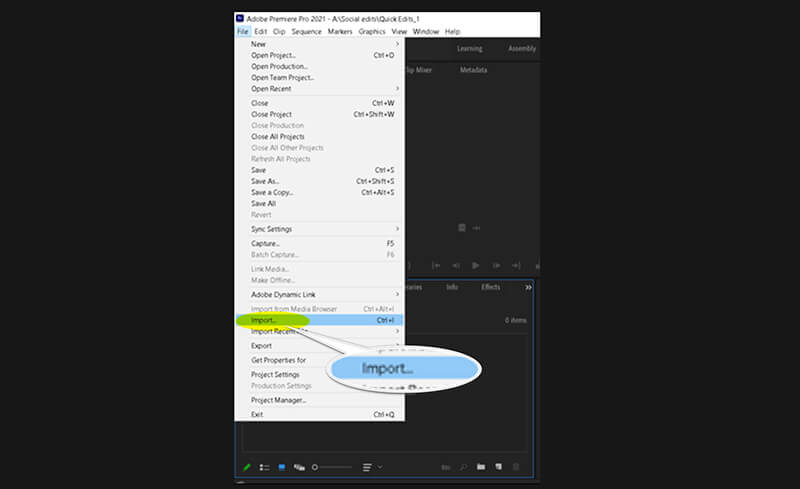
◆ Open the File menu and click on Import.
◆ Then, select the video clips you wish to combine from your computer.
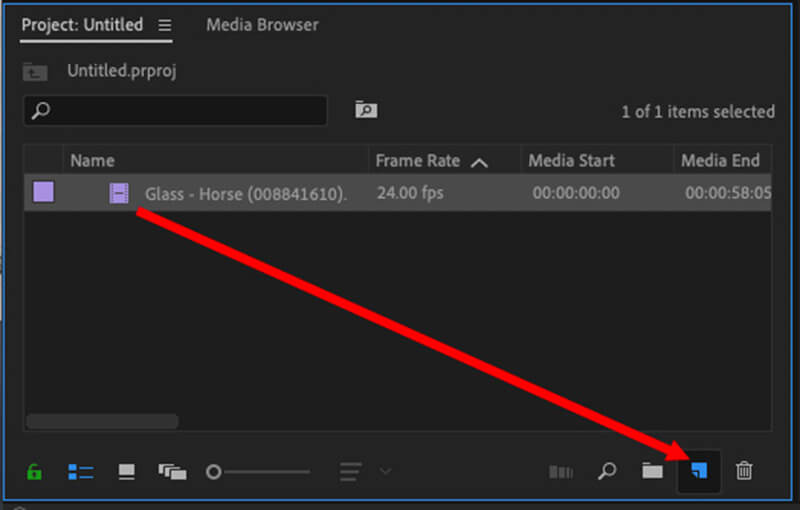
You can also simply drag and drop the clips into the Project Panel.
Create a new sequence
Once your clips are imported, you’ll need to create a new sequence to arrange them:
◆ In the Project Panel, right-click on a clip and select New Sequence from Clip. This creates a sequence that matches the clip’s settings.
◆ You can also create a new sequence by going to File > New > Sequence and manually selecting your preferred sequence settings.
Arrange the clips on the timeline
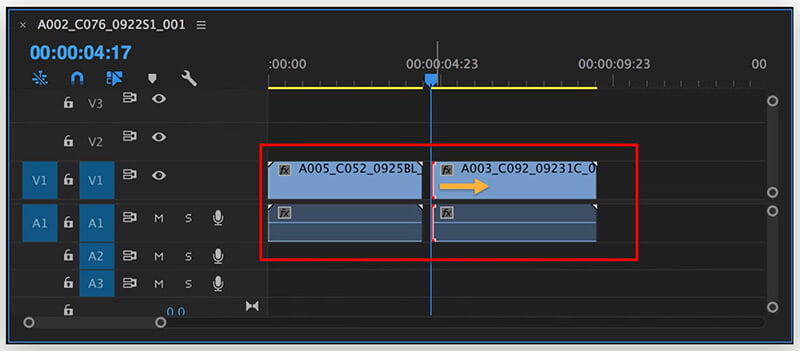
Next, drag the clips from the Project Panel to the Timeline panel. Place them one after another in the order you want them to appear. You can easily rearrange clips by clicking and dragging them to different positions on the timeline.
Trim and adjust the clips
To ensure a smooth flow between the clips, you might need to trim the edges:
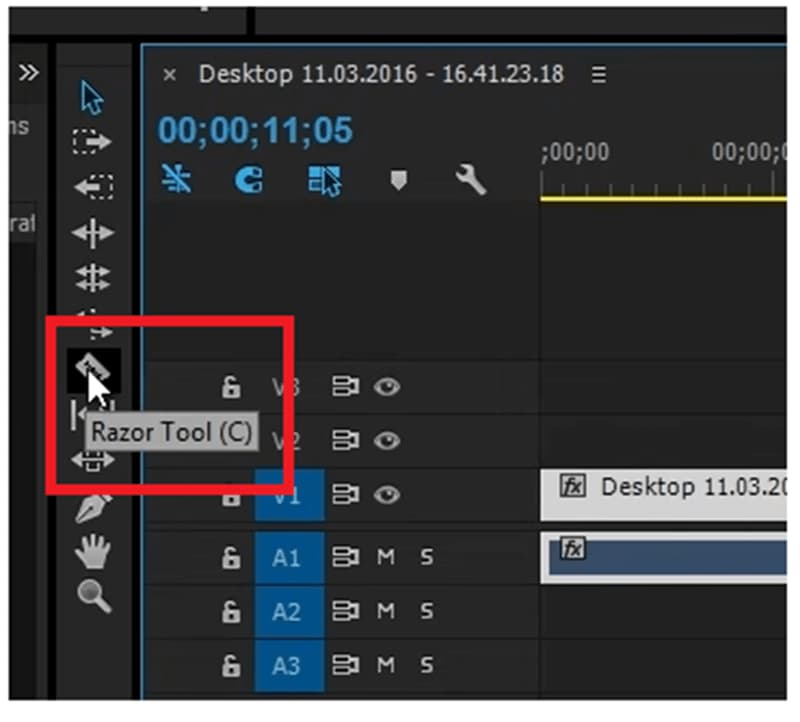
◆ Use the Razor Tool (C) to cut unnecessary parts from the beginning or end of each clip.
◆ You can also adjust the clip duration by clicking and dragging the edges of each clip in the Timeline.
Export the merged clips
Once you’re happy with your merged clips, it’s time to export:
◆ Go to File > Export > Media.
◆ Select your preferred export settings, such as format, resolution, and file destination, then click Export.
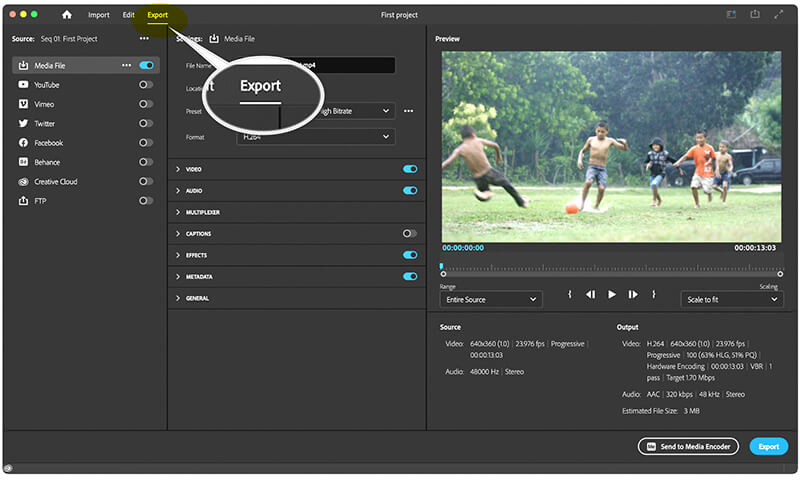
You’ve successfully merged your clips in Adobe Premiere Pro!
Part 2. Tips for Seamless Merging
While merging clips is a straightforward process, there are a few tips that can help you achieve a more polished result:
Adjust Transitions
To create smoother transitions between clips, consider adding video transitions:
◆ Go to the Effects Panel and search for a transition like Cross Dissolve or Dip to Black.
◆ Drag the transition effect to the cut point between two clips on the timeline.
This adds a fade effect that makes the transition less abrupt.

Match Audio Levels
Merging clips often involves dealing with varying audio levels. You can sync or change audio of the video to make it match with the merged video file. To fix this:
◆ Select the audio portion of each clip in the Timeline.
◆ Go to Audio Clip Mixer and adjust the levels so that the volume is consistent across all clips.
This ensures that your video’s audio doesn’t fluctuate between clips.

Part 3. Alternative to Merge Video Clips
If you find Adobe Premiere Pro too complex for simple merging tasks, or if the Adobe Premiere merge clips greyed out issue occurs, you can use ArkThinker Video Converter Ultimate as an alternative. This software offers a more user-friendly interface for merging clips, along with other handy video conversion features.
Key Features of ArkThinker Video Converter Ultimate
◆ Merge multiple video clips with just a few clicks at once to save time.
◆ After merging, you can convert the video to numerous formats such as MP4, AVI, MOV, and more.
◆ Include basic editing features like trimming, cropping, adding effects, and more.
◆ Offer over 20 tools to edit clips like 4K video enhancement, remove video watermark, etc.
How to Merge Clips Using ArkThinker Video Converter Ultimate
Download and install ArkThinker Video Converter Ultimate. After that, run this video merger on your Windows or Mac computer.
Locate and open the Video Merger tool within the Toolbox. To merge your videos, just click the Plus button to add the clips you wish to combine.

Arrange the clips in your preferred order. You can easily drag each clip to reposition it or use the Forward and Background options. If you want to insert clips before or after a specific one, utilize the Ahead and Behind features. Feel free to trim or edit any clip as needed.

Once you're satisfied with your adjustments, rename your project, tweak the output settings, and choose where to save the final file. Finally, click the Export button to create your merged videos.
Conclusion
Learning how to merge clips in Premiere Pro is a valuable skill for any video editor, allowing you to create seamless videos with ease. With the steps outlined in this guide, you can confidently import, arrange, and merge clips in Premiere to enhance your projects. If you prefer a simpler tool, ArkThinker Video Converter Ultimate offers an easy solution for merging clips and converting them to a variety of formats.
Whether you’re merging clips for a personal project or professional work, the right tools and techniques can make all the difference in creating polished, cohesive videos.
What do you think of this post? Click to rate this post.
Excellent
Rating: 4.9 / 5 (based on 416 votes)
Find More Solutions
3 Ways to Blur Face in Video by AI A Step-by-Step Guide to Merge Multiple Videos Using VLC Remove Audio from Video – Mute Video on Different Devices Adobe Premiere Crop Video – How to Crop Video in Premiere Concrete Tutorial to Rotate a Video in Adobe Premiere Learn How to Create a Split Screen in Adobe Premiere ProRelative Articles
- Edit Video
- 4 Ways to Blur Face in Video by AI
- 2024 60FPS Video Converters to Upscale Higher Quality
- The Best YouTube Video Format You Want to Convert 2024
- 3 Ways to Blur Face in Video by AI
- 2 Ways to Crop a Video Dimension in CapCut [2024 Guide]
- 3 Ways to Remove Watermark from PowerDirector Videos
- How to Remove Watermark from Renderforest Videos in 2 Ways
- Movavi Watermark: Full Guide to Add and Remove It
- Crop WMV File Using 4 Easy Methods for Quick Results
- How to Make a Short Video Longer with 3 Different Methods


