


Ένας πλήρης οδηγός για τη χρήση του Audacity για την αφαίρεση φωνητικών
Το Audacity είναι ένα ισχυρό, δωρεάν λογισμικό επεξεργασίας ήχου ανοιχτού κώδικα που έχει κερδίσει τεράστια δημοτικότητα μεταξύ των λάτρεις της μουσικής και των δημιουργών περιεχομένου. Με τις ευέλικτες δυνατότητές του, μπορείτε να εκτελέσετε μια σειρά εργασιών, από απλή εγγραφή ήχου έως πολύπλοκες διαδικασίες επεξεργασίας. Ένα από τα πιο περιζήτητα χαρακτηριστικά του Audacity είναι η ικανότητά του να αφαιρεί φωνητικά από τραγούδια, επιτρέποντάς σας να δημιουργείτε κομμάτια καραόκε, να απομονώνετε όργανα ή απλά να απολαμβάνετε τα αγαπημένα σας τραγούδια χωρίς φωνητικά. Σε αυτό το άρθρο, θα σας δείξουμε τον βήμα προς βήμα οδηγό για αποτελεσματικότητα αφαιρέστε φωνητικά από τραγούδια χρησιμοποιώντας το Audacity.

- ΛΙΣΤΑ ΟΔΗΓΩΝ
- Μέρος 1. Πώς να χρησιμοποιήσετε το Audacity για να αφαιρέσετε φωνητικά
- Μέρος 2. Το Audacity Vocal Isolation δεν λειτουργεί
- Μέρος 3. Εναλλακτικές μέθοδοι για την αφαίρεση φωνητικών
Μέρος 1. Πώς να χρησιμοποιήσετε το Audacity για να αφαιρέσετε φωνητικά
Είτε είστε έμπειρος επεξεργαστής ήχου είτε αρχάριος, θα βρείτε εύκολο να ακολουθήσετε αυτό το σεμινάριο.
Σημείωση: Η αφαίρεση φωνητικών από τον ήχο διαφέρει από διαχωρισμός ενός κομματιού ήχου στο Audacity, και εφαρμόζονται τα ακόλουθα βήματα για τη λήψη φωνητικής απομόνωσης.
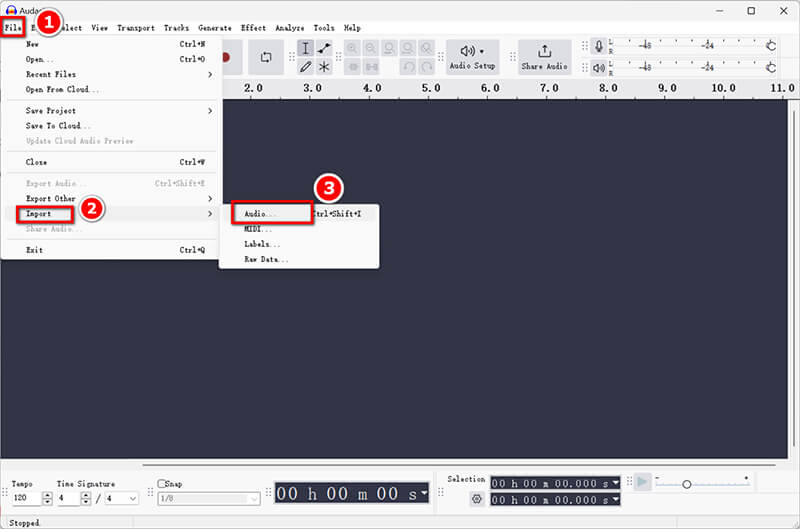
Βήμα 1: Εισαγάγετε τον ήχο
Για να ξεκινήσετε, πρέπει να φέρετε το αρχείο ήχου που θέλετε να επεξεργαστείτε στο Audacity.
1. Ανοίξτε το Audacity: Εκκινήστε την εφαρμογή στον υπολογιστή σας. Το Audacity είναι συμβατό με Windows, Mac και Linux και μπορείτε να το κατεβάσετε δωρεάν σε αυτές τις πλατφόρμες δωρεάν.
2. Εισαγωγή αρχείου ήχου: Κάντε κλικ στο Αρχείο > Εισαγωγή > Ήχος και επιλέξτε το τραγούδι από τη συσκευή σας. Μπορείτε επίσης απλά να σύρετε και να αποθέσετε το αρχείο στο παράθυρο Audacity.
Βήμα 2: Δημιουργήστε ένα φωνητικό κομμάτι
Στη συνέχεια, θα θέλετε να δημιουργήσετε ένα αντίγραφο του αρχικού κομματιού για επεξεργασία.
1. Αντιγράψτε το κομμάτι: Επιλέξτε το κομμάτι ήχου κάνοντας κλικ σε αυτό και μετά μεταβείτε στο Επεξεργασία > Διπλότυπο. Αυτό θα δημιουργήσει ένα δεύτερο κομμάτι που μπορείτε να τροποποιήσετε για να εξαγάγετε τα φωνητικά.
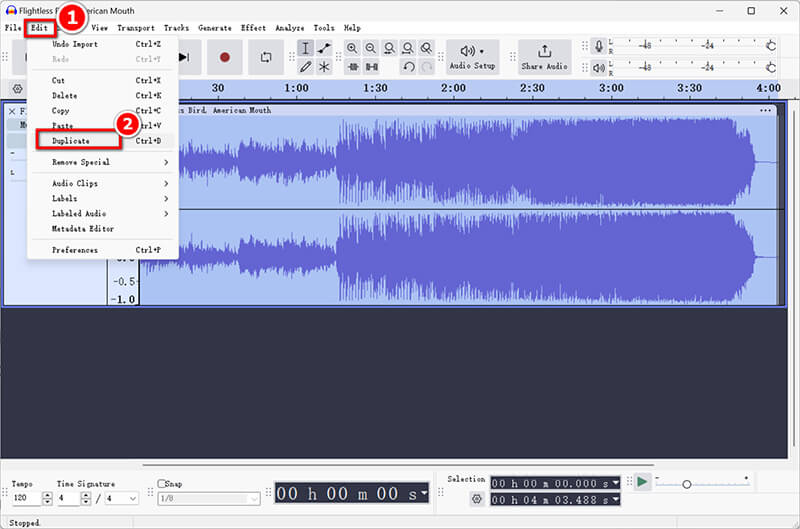
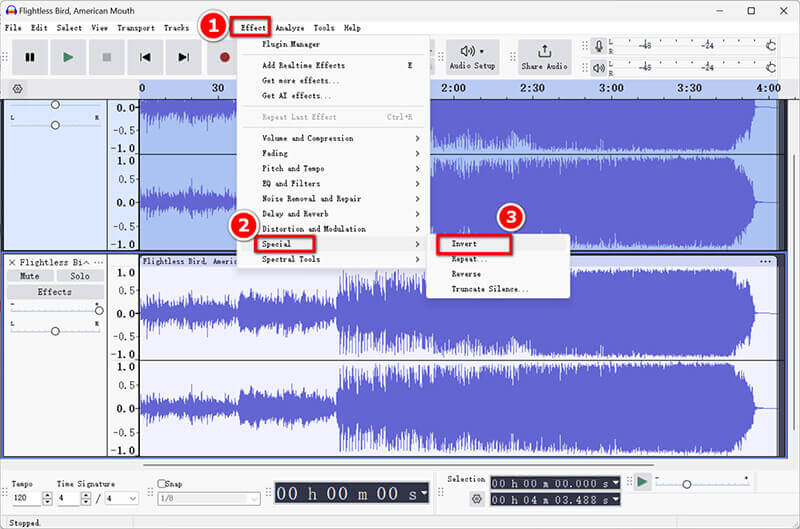
2. Εφαρμόστε εφέ για να απομονώσετε φωνητικά: Με επιλεγμένο το διπλό κομμάτι, μεταβείτε στο Εφέ > Αντιστροφή. Αυτό το βήμα είναι απαραίτητο για τη διαδικασία αφαίρεσης της φωνής.
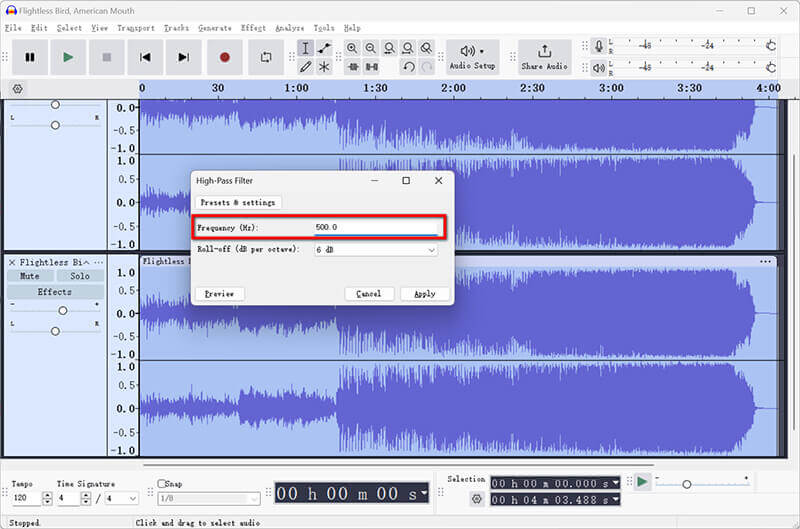
Βήμα 3: Απομονώστε τα φωνητικά
Τώρα που τα κομμάτια σας είναι έτοιμα, ήρθε η ώρα να εστιάσετε στην απομόνωση των φωνητικών.
1. Χρησιμοποιήστε φίλτρα και εφέ: Διατηρήστε επιλεγμένο το διπλό κομμάτι και μεταβείτε στο Εφέ > EQ και φίλτρα. Επιλέξτε το Φίλτρο High-Pass επιλογή που βοηθά στην εξάλειψη ήχων χαμηλής συχνότητας που συνήθως συνδέονται με φωνητικά.

2. Προσαρμόστε τις ρυθμίσεις για βέλτιστα αποτελέσματα: Πειραματιστείτε με τις ρυθμίσεις φίλτρου. Ένα καλό σημείο εκκίνησης είναι μια συχνότητα αποκοπής μεταξύ 300 Hz και 500 Hz, αλλά μη διστάσετε να την προσαρμόσετε με βάση το αρχείο ήχου σας.
Βήμα 4: Βελτιώστε το φωνητικό κομμάτι
Αφού απομονώσετε τα φωνητικά, είναι σημαντικό να βελτιώσετε το κομμάτι σας για καλύτερη ευκρίνεια.
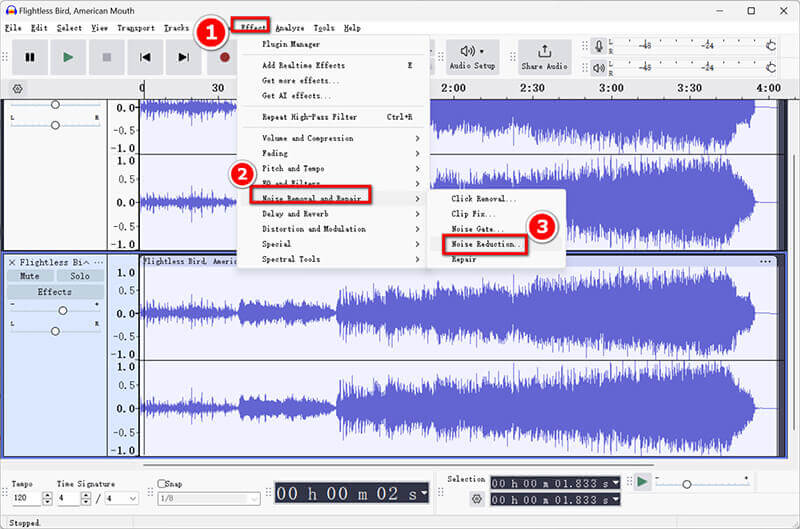
1. Αφαιρέστε τον υπολειπόμενο θόρυβο ή τα τεχνουργήματα: Μεταβείτε στο Effect > Noise Removal and Repair > Noise Reduction. Επιλέξτε ένα τμήμα του ήχου που έχει θόρυβο φόντου, κάντε κλικ στην επιλογή Λήψη προφίλ θορύβου και, στη συνέχεια, εφαρμόστε το σε ολόκληρο το κομμάτι. Αυτό θα βοηθήσει στην εξάλειψη τυχόν υπολειπόμενου θορύβου μετά την αφαίρεση των φωνητικών.
2. Βελτιώστε τη φωνητική απομόνωση: Ακούστε προσεκτικά την έξοδο. Ίσως χρειαστεί να προσαρμόσετε τα επίπεδα έντασης ή να προσθέσετε εφέ όπως συμπίεση ή αντήχηση για να βελτιώσετε τον συνολικό ήχο πριν ξεκινήσετε τη μείωση της φωνής στο Audacity.
Βήμα 5: Εξαγωγή του κομματιού χωρίς φωνητικά
Επιτέλους, ήρθε η ώρα να αποθηκεύσετε την επεξεργασμένη εργασία σας.
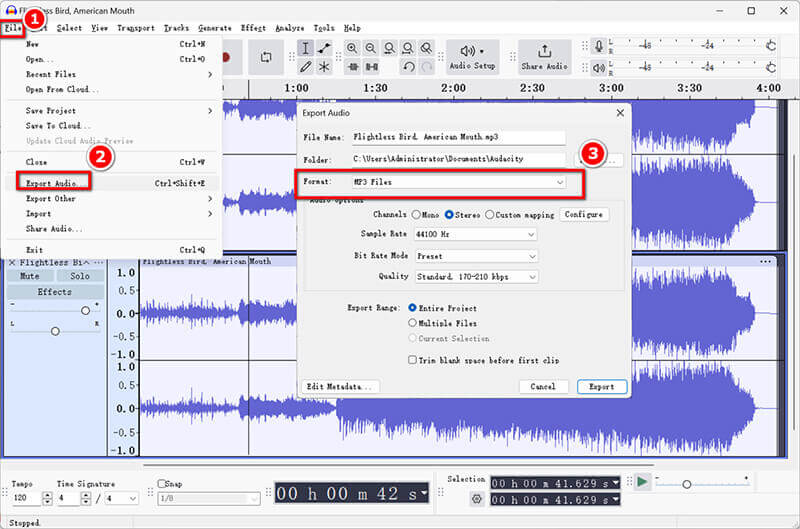
Κάντε κλικ στο Αρχείο > Εξαγωγή ήχου για να επιλέξετε Αποθήκευση της απομονωμένης φωνητικής στον υπολογιστή σας ή στο audio.com στο cloud. Στο αναδυόμενο παράθυρο, επιλέξτε την έξοδο φωνητικής εξόδου ως MP3 ή τη μορφή που προτιμάτε.
Για να διατηρήσετε τα απομονωμένα φωνητικά ως ξεχωριστό αρχείο, απλώς εξαγάγετε το διπλό κομμάτι πριν διαγράψετε τα φωνητικά.
Το Audacity είναι ένα εύκολο λογισμικό επεξεργασίας ήχου για τη διαχείριση όλων των προβλημάτων ήχου. Αν θέλετε να αφαιρέστε τον ήχο από το βίντεο, ελέγξτε αυτήν την ανάρτηση.
Μέρος 2. Το Audacity Vocal Isolation δεν λειτουργεί
Μερικές φορές, οι χρήστες αντιμετωπίζουν προβλήματα με τη φωνητική απομόνωση που δεν λειτουργεί όπως αναμένεται. Ακολουθούν μερικοί συνήθεις λόγοι και λύσεις:
Ποιότητα κομματιού
Εάν το αρχικό κομμάτι έχει κακή ποιότητα ή υπερβολικό θόρυβο, μπορεί να είναι δύσκολο να απομονώσετε αποτελεσματικά τα φωνητικά. Σκεφτείτε να χρησιμοποιήσετε ένα αρχείο ήχου υψηλότερης ποιότητας.
Θέματα στερεοφωνικού κομματιού
Οι τεχνικές αφαίρεσης φωνής συχνά λειτουργούν καλύτερα σε στερεοφωνικά κομμάτια. Εάν το κομμάτι σας είναι μονοφωνικό, δοκιμάστε να το μετατρέψετε σε στερεοφωνικό πριν εφαρμόσετε τη διαγραφή φωνητικών.
Περιορισμοί πρόσθετων
Ορισμένα εφέ ενδέχεται να μην λειτουργούν σωστά εάν δεν έχετε εγκαταστήσει τα απαραίτητα πρόσθετα. Βεβαιωθείτε ότι όλα τα πρόσθετα είναι ενημερωμένα.
Εσφαλμένη εφαρμογή εφέ
Ελέγξτε ξανά ότι έχετε ακολουθήσει σωστά τα βήματα, ειδικά κατά την εφαρμογή των εφέ αντιστροφής και φιλτραρίσματος. Ο πειραματισμός με διαφορετικές ρυθμίσεις μπορεί να αποφέρει καλύτερα αποτελέσματα.
Μέρος 3. Εναλλακτικές μέθοδοι για την αφαίρεση φωνητικών
Αν ψάχνετε για εναλλακτικές λύσεις στο Audacity για αφαίρεση φωνής, ακολουθούν ορισμένες επιλογές:
Πρόσθετα τρίτων
Υπάρχουν διάφορα πρόσθετα τρίτων που μπορούν να βελτιώσουν τις δυνατότητες εξαγωγής φωνής του Audacity. Το Vocal Remover Pro είναι ένα από αυτά.
Αυτό το πρόσθετο μπορεί να βοηθήσει στην επίτευξη πιο αποτελεσματικής φωνητικής απομόνωσης. Απλώς εγκαταστήστε το και, στη συνέχεια, μεταβείτε στο Εφέ και επιλέξτε την προσθήκη από τη λίστα για να ξεκινήσετε τη διαδικασία.
Λογισμικό επεξεργασίας ήχου: Adobe Podcast
Το Adobe Podcast είναι μια άλλη ισχυρή επιλογή για φωνητική απομόνωση. Τα προηγμένα χαρακτηριστικά AI του μπορούν να αφαιρέσουν αποτελεσματικά τα φωνητικά με ελάχιστη χειροκίνητη παρέμβαση. Δείτε πώς να το χρησιμοποιήσετε:
Φορτώστε το κομμάτι στο Adobe Podcast.
Χρησιμοποιήστε τη λειτουργία απομόνωσης φωνής και προσαρμόστε τις ρυθμίσεις όπως απαιτείται.
Μόλις ικανοποιηθείτε με την έξοδο, εξάγετε το αρχείο σας στην επιθυμητή μορφή.
Μπόνους: ArkThinker Video Converter Ultimate
Για όσους μπορεί επίσης να εργάζονται με αρχεία βίντεο, σκεφτείτε να το χρησιμοποιήσετε ArkThinker Video Converter Ultimate. Προσφέρει δυνατότητες αφαίρεσης θορύβου για βίντεο, κάτι που μπορεί να είναι ωφέλιμο αν θέλετε να εξαγάγετε ήχο από αρχεία βίντεο ελαχιστοποιώντας παράλληλα τη φωνητική παρουσία. Επιπλέον, σας επιτρέπει να απενεργοποιήσετε, να αλλάξετε και να προσθέσετε τα κομμάτια ήχου φόντου ενός αρχείου βίντεο. Επιπλέον, αυτό το εργαλείο προσφέρει ισχυρά εφέ επεξεργασίας ήχου όπως περικοπή, συγχώνευση και άλλα.
- Υποστηρίζει περισσότερες από 1000 μορφές, συμπεριλαμβανομένων MP4, MKV, AVI, MP3 κ.λπ.
- Η μαζική μετατροπή σάς δίνει τη δυνατότητα να χειρίζεστε πολλά αρχεία με μία κίνηση.
- Το ενσωματωμένο πρόγραμμα επεξεργασίας βίντεο παρέχει εργαλεία για περικοπή, περικοπή και προσθήκη ειδικών εφέ.
- Η επιτάχυνση υλικού εγγυάται 30 φορές μεγαλύτερη ταχύτητα μετατροπής.
συμπέρασμα
Αυτό το άρθρο παρέχει έναν περιεκτικό οδηγό για το πώς να αφαιρέσετε φωνητικά από ένα τραγούδι χρησιμοποιώντας το Audacity. Είναι μια απλή διαδικασία που περιλαμβάνει την εισαγωγή ενός τραγουδιού, την αναπαραγωγή του κομματιού, την εφαρμογή εφέ και την εξαγωγή του αποτελέσματος. Να θυμάστε ότι η ποιότητα των αποτελεσμάτων σας θα εξαρτηθεί από το αρχικό αρχείο ήχου και τις ρυθμίσεις που θα επιλέξετε κατά τη διάρκεια της διαδικασίας. Επίσης, ενώ δεν θέλετε να δοκιμάσετε το Audacity, προτείνονται οι παραπάνω εναλλακτικές λύσεις ή βύσματα για να σας βοηθήσουν να κάνετε γρήγορη εξαγωγή φωνής.
Τι γνώμη έχετε για αυτό το post; Κάντε κλικ για να βαθμολογήσετε αυτήν την ανάρτηση.
Εξοχος
Εκτίμηση: 4.9 / 5 (με βάση 412 ψήφοι)
Βρείτε περισσότερες λύσεις
10 καλύτεροι κόφτες MP3 για την περικοπή αρχείων MP3 σε διαφορετικές συσκευές Audio Cutters: Εργαλεία εκτός σύνδεσης και ηλεκτρονικά για την αποκοπή αρχείων ήχου Πώς να αντικαταστήσετε τον ήχο σε ένα βίντεο σε διαφορετικές συσκευές 2024 4 ευκολότεροι τρόποι για να αλλάξετε και να επεξεργαστείτε την ένταση του ήχου σε PC και MacΣχετικά άρθρα
- Επεξεργασία ήχου
- 4 Καλύτεροι επαναλήπτες τραγουδιών για Mac, PC, iPhone, Android, Online
- Πώς να αλλάξετε την εγγραφή φωνής σε άλλη φωνή με γρήγορους τρόπους
- Πώς να αντικαταστήσετε τον ήχο σε ένα βίντεο σε διαφορετικές συσκευές 2023
- Audio Cutters: Εργαλεία εκτός σύνδεσης και ηλεκτρονικά για την αποκοπή αρχείων ήχου
- Αποτελεσματική τεχνική για το πώς να χωρίσετε ένα κομμάτι στο Audacity
- Πώς να αντικαταστήσετε τον ήχο σε ένα βίντεο σε διαφορετικές συσκευές 2022
- Πώς να κάνετε κλιπ ήχου σε Audacity, WMP, iMovie, Online, Trimmer
- 4 ευκολότεροι τρόποι για να αλλάξετε και να επεξεργαστείτε την ένταση του ήχου σε PC και Mac
- 4 εύκολες μέθοδοι επεξεργασίας αρχείων ήχου σε Windows και Mac
- Πώς να συμπιέσετε αρχεία ήχου χωρίς απώλεια ποιότητας ήχου