


Guide complet sur l'utilisation d'Audacity pour supprimer les voix
Audacity est un logiciel d'édition audio puissant, gratuit et open source qui a acquis une immense popularité auprès des amateurs de musique et des créateurs de contenu. Grâce à ses capacités polyvalentes, vous pouvez effectuer une gamme de tâches, du simple enregistrement audio aux processus d'édition complexes. L'une des fonctionnalités les plus recherchées d'Audacity est sa capacité à supprimer les voix des chansons, vous permettant de créer des pistes de karaoké, d'isoler des instrumentaux ou simplement de profiter de vos morceaux préférés sans voix. Dans cet article, nous vous montrerons le guide étape par étape pour supprimer efficacement les voix des chansons. supprimer les voix des chansons avec Audacity.

- LISTE DES GUIDES
- Partie 1. Comment utiliser Audacity pour supprimer les voix
- Partie 2. L'isolation vocale d'Audacity ne fonctionne pas
- Partie 3. Méthodes alternatives pour supprimer les voix
Partie 1. Comment utiliser Audacity pour supprimer les voix
Que vous soyez un éditeur audio expérimenté ou un novice, vous trouverez ce tutoriel facile à suivre.
Note: Supprimer les voix de l'audio est différent de diviser une piste audio dans Audacity, et les étapes suivantes sont appliquées pour obtenir une isolation vocale.
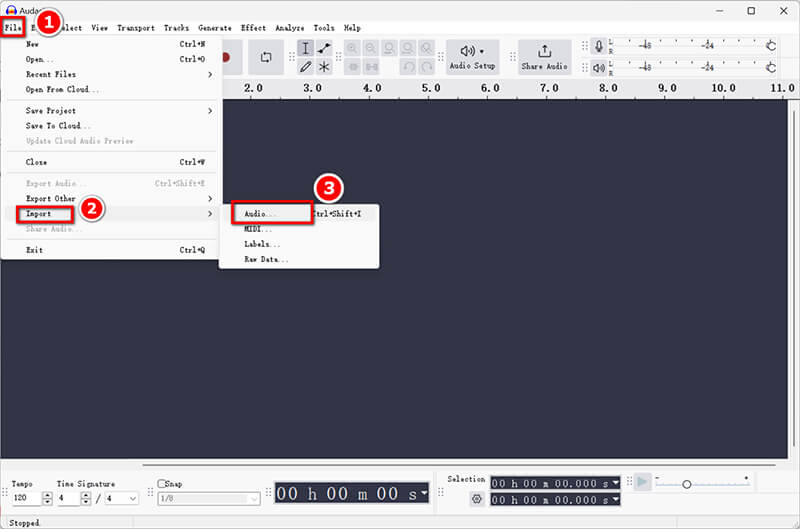
Étape 1 : Importer l'audio
Pour commencer, vous devez importer le fichier audio que vous souhaitez éditer dans Audacity.
1. Ouvrez Audacity: Démarrez l'application sur votre ordinateur. Audacity est compatible avec Windows, Mac et Linux, et vous pouvez le télécharger gratuitement sur ces plateformes.
2. Importer un fichier audio:Cliquez sur Fichier > Importer > Audio et choisissez la chanson sur votre appareil. Vous pouvez également simplement faire glisser et déposer le fichier dans la fenêtre Audacity.
Étape 2 : Créer une piste vocale
Ensuite, vous souhaiterez faire une copie de la piste originale pour l’éditer.
1. Dupliquer la piste: Sélectionnez la piste audio en cliquant dessus, puis allez dans Édition > Dupliquer. Cela créera une deuxième piste que vous pourrez modifier pour extraire les voix.
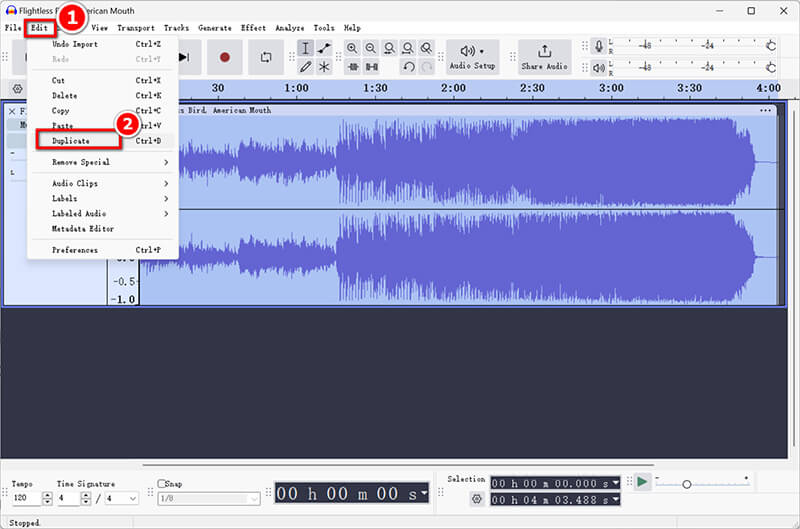
2. Appliquer des effets pour isoler les voix:Avec la piste dupliquée sélectionnée, allez dans Effet > Inverser. Cette étape est essentielle pour le processus de suppression des voix.
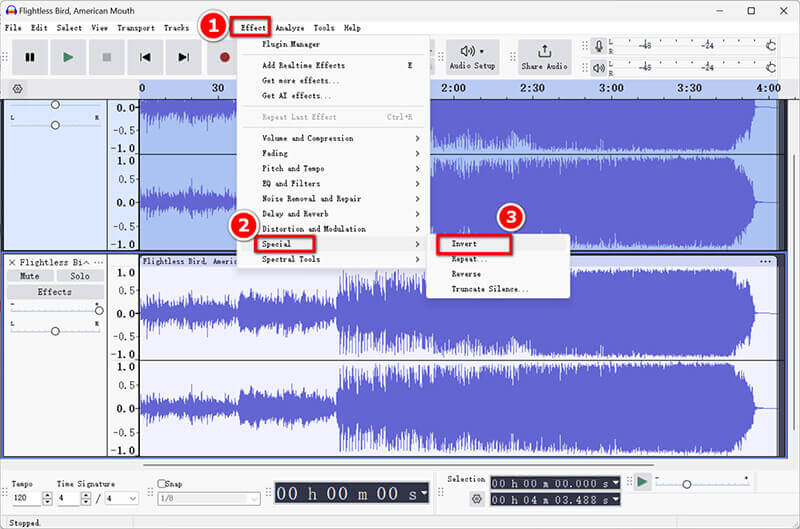
Étape 3 : Isoler les voix
Maintenant que vos morceaux sont prêts, il est temps de se concentrer sur l'isolation des voix.
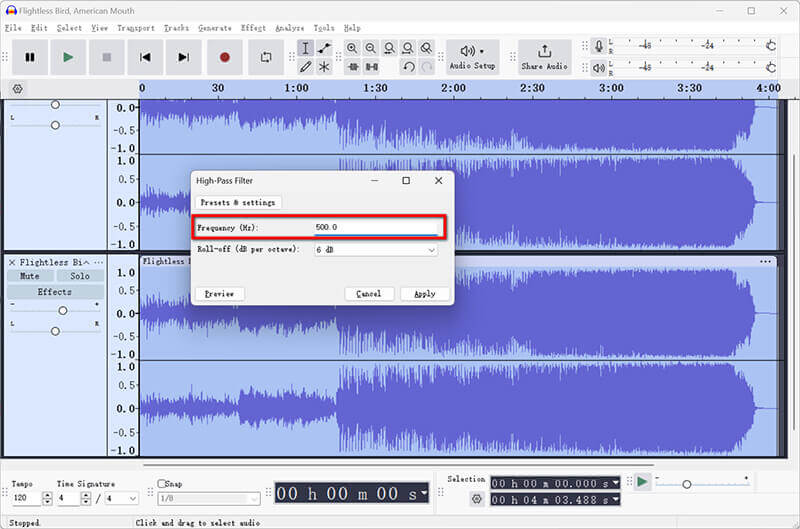
1. Utilisez des filtres et des effets: Gardez la piste dupliquée sélectionnée et accédez à Effet > Égaliseur et filtres. Choisissez l' Filtre passe-haut option permettant d'éliminer les sons de basse fréquence généralement liés aux voix.

2. Ajustez les paramètres pour des résultats optimaux: Expérimentez avec les paramètres du filtre. Un bon point de départ est une fréquence de coupure entre 300 Hz et 500 Hz, mais n'hésitez pas à l'ajuster en fonction de votre fichier audio.
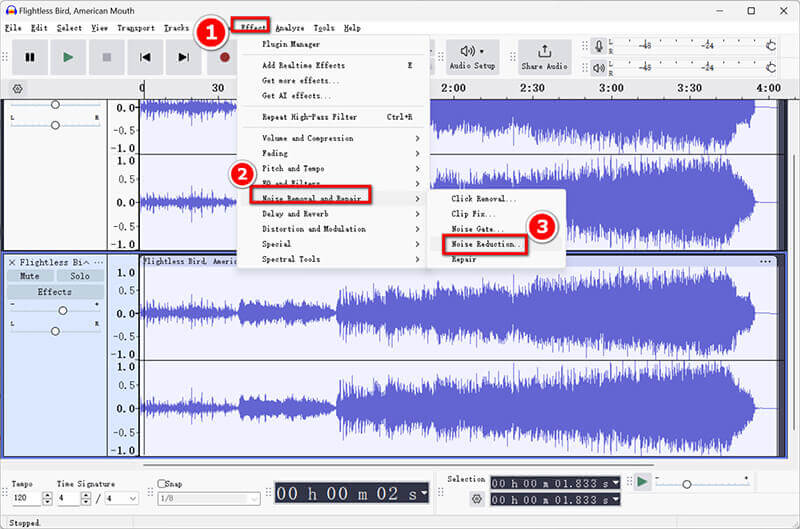
Étape 4 : Affiner la piste vocale
Après avoir isolé les voix, il est crucial d'affiner votre morceau pour une meilleure clarté.
1. Supprimez le bruit résiduel ou les artefacts: Allez dans Effet > Suppression et réparation du bruit > Réduction du bruit. Sélectionnez un segment de l'audio qui contient du bruit de fond, cliquez sur Obtenir le profil de bruit, puis appliquez-le à l'ensemble de la piste. Cela permettra d'éliminer tout bruit résiduel après la suppression des voix.
2. Ajustez l'isolation vocale:Écoutez attentivement le résultat. Vous devrez peut-être ajuster les niveaux de volume ou ajouter des effets tels que la compression ou la réverbération pour améliorer le son global avant de lancer une réduction vocale dans Audacity.
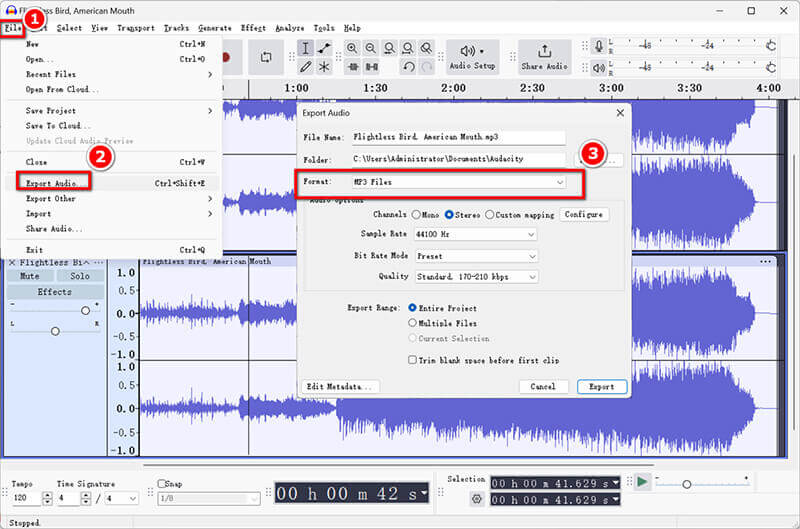
Étape 5 : Exporter la piste sans voix
Enfin, il est temps de sauvegarder votre travail modifié.
Cliquez sur Fichier > Exporter l'audio pour sélectionner Enregistrer la voix isolée sur votre ordinateur ou audio.com dans le cloud. Dans la fenêtre contextuelle, sélectionnez la sortie vocale au format MP3 ou votre format préféré.
Pour conserver les voix isolées dans un fichier séparé, exportez simplement la piste dupliquée avant de supprimer les voix.
Audacity est un logiciel d'édition audio simple pour gérer tous les problèmes audio. Si vous voulez supprimer l'audio de la vidéo, consultez ce post.
Partie 2. L'isolation vocale d'Audacity ne fonctionne pas
Parfois, les utilisateurs rencontrent des problèmes d'isolation vocale qui ne fonctionnent pas comme prévu. Voici quelques raisons courantes et solutions :
Qualité de la piste
Si la piste originale est de mauvaise qualité ou contient trop de bruit, il peut être difficile d'isoler efficacement les voix. Pensez à utiliser un fichier audio de meilleure qualité.
Problèmes de piste stéréo
Les techniques de suppression des voix fonctionnent souvent mieux sur les pistes stéréo. Si votre piste est mono, essayez de la convertir en stéréo avant d'appliquer la suppression des voix.
Limitations des plugins
Certains effets peuvent ne pas fonctionner correctement si vous n'avez pas installé les plugins nécessaires. Assurez-vous que tous les plugins sont à jour.
Application d'effet incorrecte
Vérifiez que vous avez suivi correctement les étapes, notamment lors de l'application des effets d'inversion et de filtrage. L'expérimentation de différents paramètres peut donner de meilleurs résultats.
Partie 3. Méthodes alternatives pour supprimer les voix
Si vous recherchez des alternatives à Audacity pour la suppression vocale, voici quelques options :
Plugins tiers
Il existe plusieurs plugins tiers qui peuvent améliorer les capacités d'extraction vocale d'Audacity. Vocal Remover Pro est l'un d'entre eux.
Ce plugin peut vous aider à obtenir une isolation vocale plus efficace. Installez-le simplement, puis accédez à Effet et sélectionnez le plugin dans la liste pour démarrer le processus.
Logiciel de montage audio : Adobe Podcast
Adobe Podcast est une autre option robuste pour l'isolation vocale. Ses fonctionnalités d'IA avancées peuvent supprimer efficacement les voix avec une intervention manuelle minimale. Voici comment l'utiliser :
Chargez la piste dans Adobe Podcast.
Utilisez la fonction d’isolation vocale et ajustez les paramètres selon vos besoins.
Une fois satisfait du résultat, exportez votre fichier dans le format souhaité.
Bonus : ArkThinker Video Converter Ultimate
Pour ceux qui travaillent également avec des fichiers vidéo, pensez à utiliser ArkThinker Convertisseur Vidéo UltimeIl offre des fonctionnalités de suppression du bruit pour les vidéos, ce qui peut être utile si vous cherchez à extraire l'audio des fichiers vidéo tout en minimisant la présence vocale. En outre, il vous permet de désactiver, de modifier et d'ajouter les pistes audio d'arrière-plan d'un fichier vidéo. En outre, cet outil offre de puissants effets d'édition audio tels que le découpage, la fusion, etc.
- Prend en charge plus de 1000 formats, notamment MP4, MKV, AVI, MP3, etc.
- La conversion par lots vous permet de gérer plusieurs fichiers en une seule fois.
- L'éditeur vidéo intégré fournit des outils pour rogner, recadrer et ajouter des effets spéciaux.
- L'accélération matérielle garantit une vitesse de conversion 30 fois plus rapide.
Conclusion
Cet article fournit un guide complet sur la façon de supprimer les voix d'une chanson à l'aide d'Audacity. Il s'agit d'un processus simple qui consiste à importer une chanson, à dupliquer la piste, à appliquer des effets et à exporter le résultat. N'oubliez pas que la qualité de vos résultats dépendra de votre fichier audio d'origine et des paramètres que vous choisissez au cours du processus. De plus, même si vous ne souhaitez pas essayer Audacity, les alternatives ou plug-ins ci-dessus sont recommandés pour vous aider à effectuer rapidement une extraction vocale.
Que pensez-vous de cette publication? Cliquez pour noter cet article.
Excellent
Notation: 4.9 / 5 (basé sur 412 voix)
Trouver plus de solutions
10 meilleurs découpeurs MP3 pour découper des fichiers MP3 sur différents appareils Audio Cutters : outils hors ligne et en ligne pour couper des fichiers audio Comment remplacer l'audio dans une vidéo sur différents appareils 2024 4 façons les plus simples de modifier et d'éditer le volume audio sur PC et MacArticles relatifs
- Modifier l'audio
- 4 meilleurs répéteurs de chansons pour Mac, PC, iPhone, Android, en ligne
- Comment changer l'enregistrement vocal en une autre voix de manière rapide
- Comment remplacer l'audio dans une vidéo sur différents appareils 2023
- Audio Cutters : outils hors ligne et en ligne pour couper des fichiers audio
- Technique efficace pour diviser une piste dans Audacity
- Comment remplacer l'audio dans une vidéo sur différents appareils 2022
- Comment couper de l'audio dans Audacity, WMP, iMovie, Online, Trim
- 4 façons les plus simples de modifier et d'éditer le volume audio sur PC et Mac
- 4 méthodes simples pour éditer des fichiers audio sur Windows et Mac
- Comment compresser des fichiers audio sans perdre la qualité sonore