


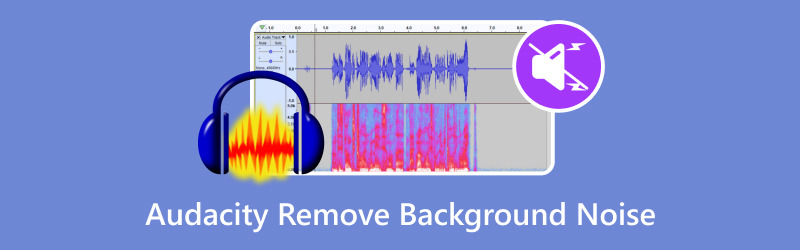
Trinn-for-trinn veiledning for å fjerne bakgrunnsstøy i Audacity
Å ta opp ren lyd kan være en utfordring, spesielt hvis du jobber i mindre enn ideelle miljøer. Bakgrunnsstøy, som summing, klikk eller skravling, kan få selv de beste opptakene til å høres uprofesjonelle ut. Det er her verktøy som Audacity kommer godt med. Audacity er en gratis, åpen kildekode lydredigerer som tilbyr et kraftig støyreduksjonsverktøy, som gjør det enkelt å fjerne uønskede lyder fra opptakene dine.
I denne artikkelen vil vi dele en fullstendig veiledning for bruk Audacity for å fjerne bakgrunnsstøy og polere lyden til perfeksjon.
- GUIDELISTE
- Del 1. Slik bruker du Audacity for å fjerne bakgrunnsstøy
- Del 2. Alternativ måte å fjerne bakgrunnsstøy på
- Del 3. Vanlige spørsmål
Del 1. Slik bruker du Audacity for å fjerne bakgrunnsstøy
Audacity er et populært lydredigeringsprogram som er gratis og åpen kildekode. Det brukes ofte til forskjellige lydoppgaver, for eksempel å bli kvitt bakgrunnsstøy. Selv om Audacity ikke spesifikt har en funksjon kalt "bakgrunnsfjerning" for å isolere eller fjerne musikk og bakgrunnslyder fra vokal, tilbyr den verktøy for støyreduksjon og visse typer lydisolering.
Slik kan du bruke det:
Importer lyden din
Åpne Audacity og last inn lydfilen ved å klikke på Fil > Import > Lyd eller dra og slippe filen inn i grensesnittet.
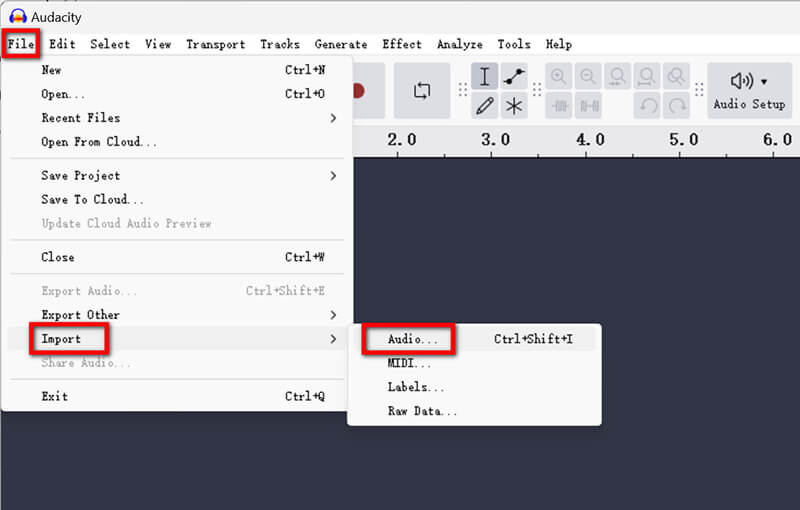
Eller du kan ta opp en lydfil i Audacity direkte for å fange opp lyden du vil beholde. (Audacity vil ikke spille inn?)
Velg en støyprofil
• Identifiser en del av lyden som bare inneholder bakgrunnsstøy (f.eks. stillhet med en svak summing).
• Marker denne delen ved å klikke og dra over den.
• Gå til Effekt > Støyfjerning og reparasjon > Støyreduksjon.
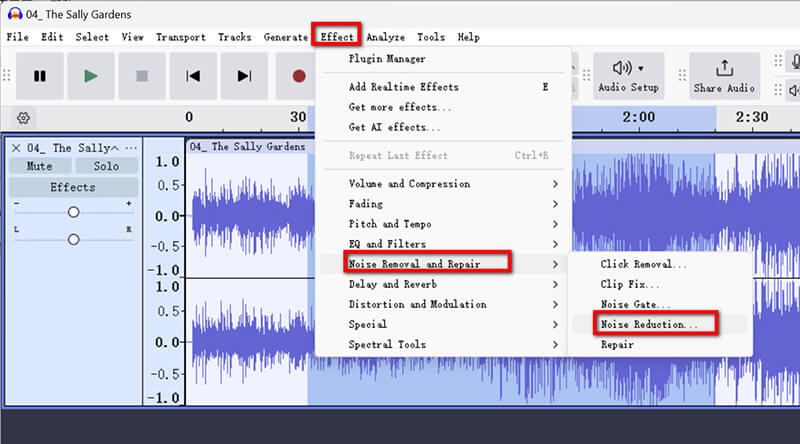
• Klikk Få støyprofil. Audacity vil analysere prøven for å lage en støyprofil.
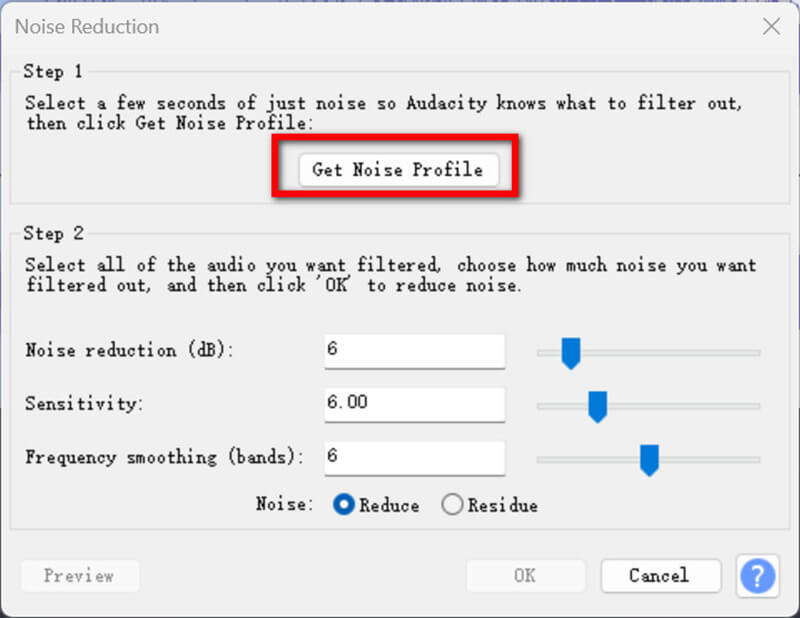
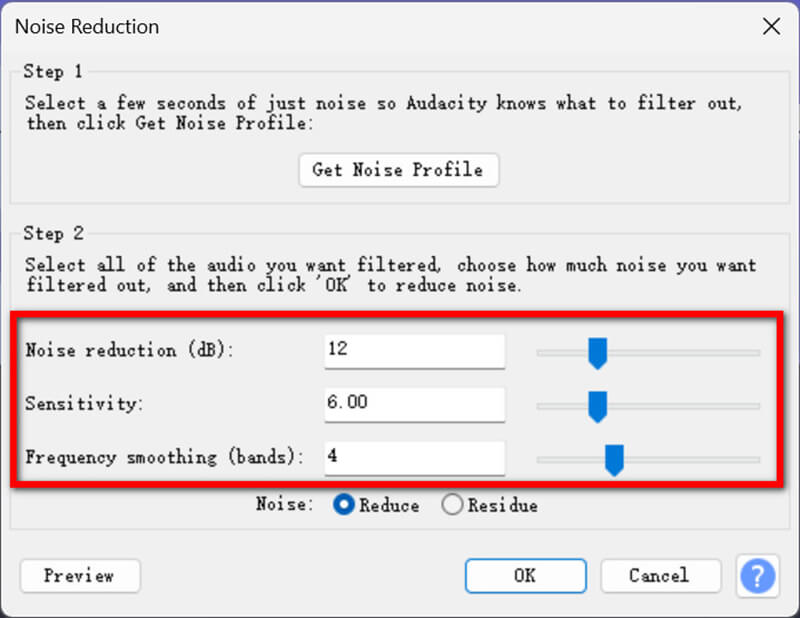
Bruk støyreduksjon
• Marker hele lydsporet eller delen du vil rense.
• Gå tilbake til Effekt > Støyfjerning og reparasjon > Støyreduksjon.
• Juster følgende innstillinger:
1. Støyreduksjon (dB): Bestemmer hvor mye støy som skal fjernes. Start med 12 dB.
2. Følsomhet (dB): Justerer nivået der lyd gjenkjennes som støy. Prøv en verdi mellom 3 og 6.
3. Frekvensutjevning (bånd): Bidrar til å unngå forvrengning. En verdi på 3 er et godt utgangspunkt.
• Klikk OK for å bruke endringene.
Forhåndsvisning og finjustering
Spill av lyden for å sjekke om bakgrunnsstøyen er borte. Om nødvendig, finjuster innstillingene og bruk på nytt.
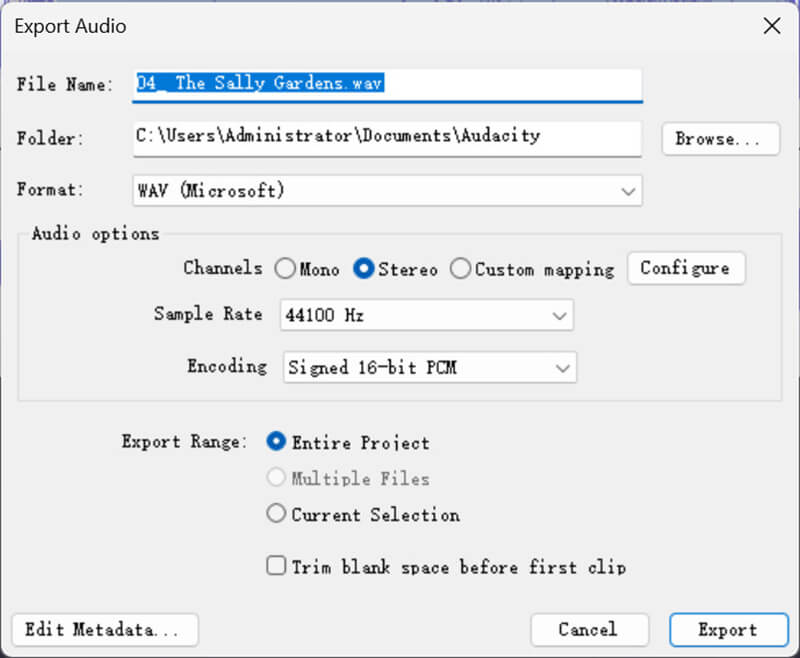
Når innstillingene er gjort, eksporterer du lydfilen fra Audacity ved å klikke Eksporter > Eksporter til datamaskin, lag deretter utdataprofilen som navn, destinasjon, format, samplingsfrekvens, koding, etc.
Klikk deretter Eksport for å lagre lydfilen med reduksjon av bakgrunnsstøy.
For å oppnå de beste resultatene med Audacity støyreduksjon, vurder disse tipsene:
• Velg en ren støyprofil: Jo renere støyprøven din er, jo bedre kan Audacity skille mellom støy og ønsket lyd.
• Unngå overbehandling: Overdreven støyreduksjon kan gjøre lyden din robotisk eller forvrengt.
• Eksperimenter med innstillinger: Hvert opptak er forskjellig, så test ulike verdier for støyreduksjon, følsomhet og frekvensutjevning.
Audacity er gratis, enkel å bruke og tilpassbare innstillinger.
Del 2. Alternativ måte å fjerne bakgrunnsstøy på
Hvis du leter etter et enklere eller mer avansert alternativ, anbefaler jeg ArkThinker Video Converter Ultimate. Dette verktøyet tilbyr en enkel, men kraftig måte å eliminere bakgrunnsstøy uten å kreve så mye manuell justering. Sammenlignet med Audacity, er det en alt-i-ett video- og lydkonverterer, -redigerer og -forsterker for å redusere lyd og video for MP4, MKV, MOV, MP3, FLAC, WAV og mer enn 1000 formater.
• Bli raskt kvitt bakgrunnslyd og videostøy automatisk av AI.
• Eliminer bakgrunnsstøy for flere lyd- eller videofiler samtidig.
• Rediger lyd og video som trimme, slå sammen, komprimere osv.
• Over 20 verktøy for å avgrense video- og lydfilen.
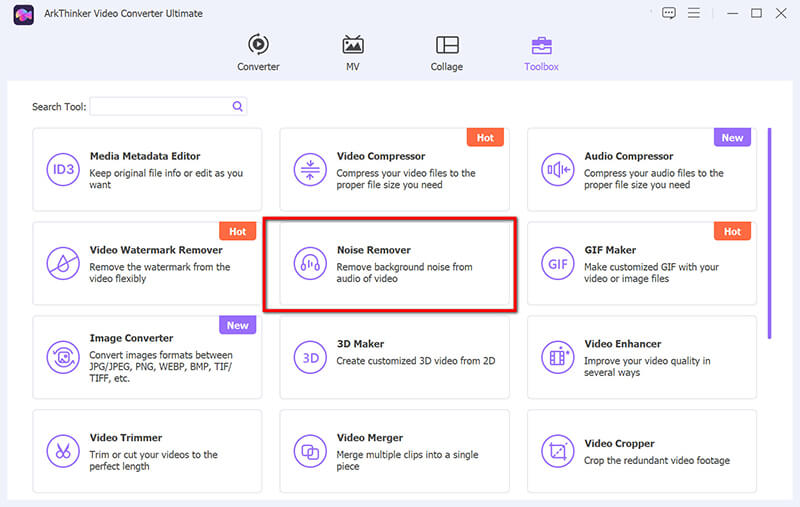
For å bli kvitt bakgrunnsstøy i ArkThinker Video Converter Ultimate, følg disse trinnene:
Last ned og installer programvaren gratis på din Windows- eller Mac-datamaskin.
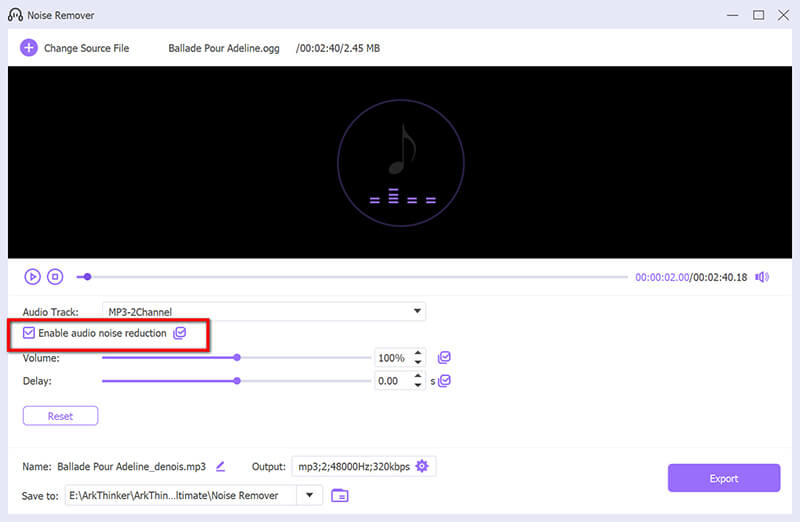
Kjør dette verktøyet for fjerning av lydstøy, naviger til Verktøykasse-fanen og gå til Støyfjerner.
For å starte, trykk på den store plussknappen for å laste opp lydfilen du vil rydde opp ved å redusere støyen.
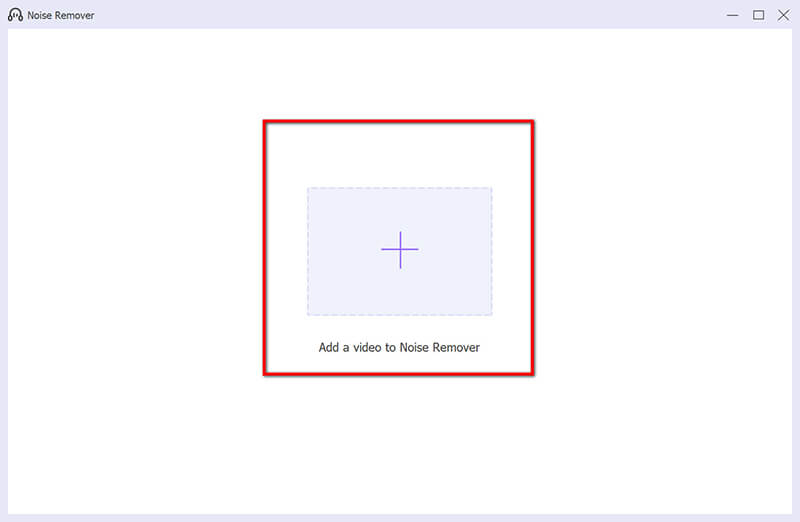
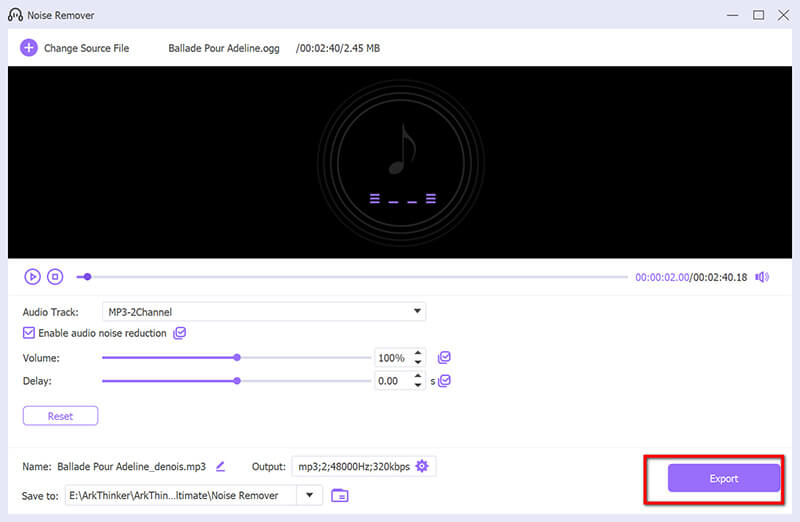
Kryss av i boksen for Aktiver lydstøyreduksjon.
Hvis du vil, kan du justere ytterligere innstillinger som volum, forsinkelse, lydspor, etc.
Velg ønsket utdataformat og klikk Eksport for å lagre lydfilen med støyfjerning.
Sammenlignet med Audacity er dette verktøyet raskere og mer automatisert når du fjerner lydstøy.
Del 3. Vanlige spørsmål
Hvordan får jeg til at Audacity ikke fanger opp bakgrunnsstøy?
Slik minimerer du bakgrunnsstøy under opptak:
• Bruk en mikrofon av høy kvalitet og plasser den nær lydkilden.
• Ta opp i et stille, akustisk behandlet miljø.
• Bruk popfiltre eller frontruter for å redusere omgivelsesstøy.
Hvordan demper jeg hvit støy i Audacity?
Følg trinnene som er skissert i verktøyprosessen for støyreduksjon ovenfor. Fokuser på å velge en ren støyprofil fra en del av opptaket med bare hvit støy. Hvis lydstøyen er i en av vokalene til filen, kan du fjern vokalen i Audacity direkte.
Hva er de beste innstillingene for støyfjerning i Audacity?
De ideelle innstillingene avhenger av opptaket ditt, men her er et godt utgangspunkt:
• Støyreduksjon (dB): 12
• Følsomhet: 5
• Frekvensutjevning (bånd): 3
Test disse innstillingene og juster dem basert på dine spesifikke behov.
Konklusjon
Fjerning av bakgrunnsstøy kan forvandle opptakene dine fra amatør til profesjonell kvalitet. Enten du velger å bruke Audacity for å eliminere bakgrunnsstøy eller velger et verktøy som ArkThinker Video Converter Ultimate, har du nå kunnskapen til å rydde opp i lydstøyen din effektivt. Med Audacity får du et gratis og allsidig verktøy for å rydde opp i bakgrunnsstøy, mens ArkThinker Video Converter Ultimate gir en mer automatisert tilnærming. Uansett hva du velger, er nøkkelen å eksperimentere med innstillinger og finne det som fungerer best for lyden din.
Hva synes du om dette innlegget? Klikk for å rangere dette innlegget.
Utmerket
Vurdering: 4.9 / 5 (basert på 490 stemmer)
Finn flere løsninger
Effektiv teknikk for hvordan du deler et spor i Audacity De 5 beste Audacity-alternativene for Windows og Mac Hvordan spille inn lydbøker og ACX-taleopptaksprosjekter Lær hvordan du tar opp Discord-lyd og samtaler på tre måter Voicemail-opptak på iPhone, Android-telefon og datamaskinRelative artikler
- Ta opp lyd
- Matchløs prosess for hvordan du tar opp lyd på Android-enheter
- Hvordan spille inn vokal i Ableton Live: trinn for trinn
- Beste MP3-opptaker for å ta opp datamaskinlyd og mikrofon
- Hvordan erstatte lyd i en video på forskjellige enheter 2022
- Hvordan klippe lyd i Audacity, WMP, iMovie, Online, Trimmer
- 4 enkleste måter å endre og redigere lydvolum på PC og Mac
- 4 enkle metoder for å redigere lydfiler på Windows og Mac
- Hvordan komprimere lydfiler uten å miste lydkvalitet
- Hvordan kombinere 2 eller flere lydfiler på forskjellige enheter
- 5 Beste Music Tag Editors for iPhone, Android, PC og Mac