


A Step-by-Step Guide to Record Webex Meetings
Webex is an efficient tool for online meetings and webinars. Whether you're a host or a participant, it's often necessary to record a session to review important points or share with absent colleagues. But how do you record a Webex meeting without missing anything?
In this guide, we will share the full guide to the entire process of recording a Webex meeting, whether you're the host or not. From using Webex's built-in recording feature to an alternative solution for participants who don’t have recording privileges, you’ll find everything you need to know right here.

- GUIDE LIST
- Part 1. How to Record Meetings in Webex Using Its Built-In Recording Feature
- Part 2. Why Can’t I Record a Webex Meeting
- Part 3. A Better Way to Record Webex Meetings If You Are Not the Host
- Part 4. FAQs
Part 1. How to Record Meetings in Webex Using Its Built-In Recording Feature
Recording a meeting in Webex is straightforward, and if you're the host, you have full control over the recording process. Here’s how you can record your Webex session from start to finish.
When I first used Webex for a team meeting, I was a bit unsure about where to find the record option, but it's really easy once you know where to look. Here’s the step-by-step breakdown of how to start recording:
Start your Webex meeting
Once you’ve scheduled your meeting and are ready to go, launch Webex and start your session as usual. You’ll need to be logged in with your host account.
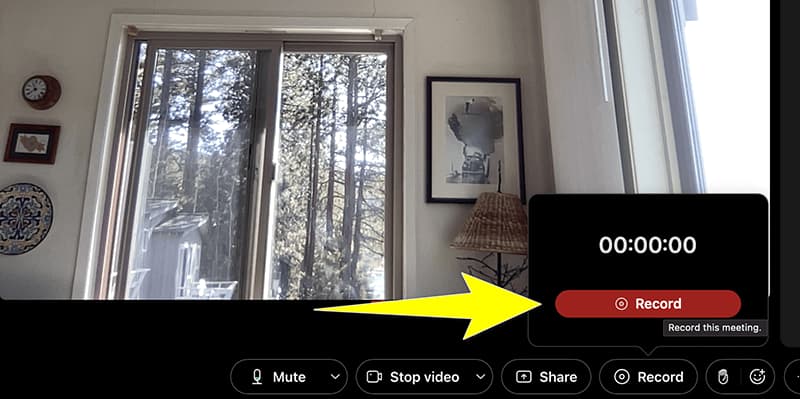
Look for the record button
Once the meeting begins, locate the record button on your screen. It’s typically found in the toolbar at the bottom of the Webex window, right next to the other options like Mute, Share Screen, and Participants.
Click on the Record button
When you're ready to begin, just click the Record button.
A small window will pop up, indicating that the meeting is being recorded. If you’re recording a long session, I’d recommend checking in from time to time to ensure it’s still recording properly.
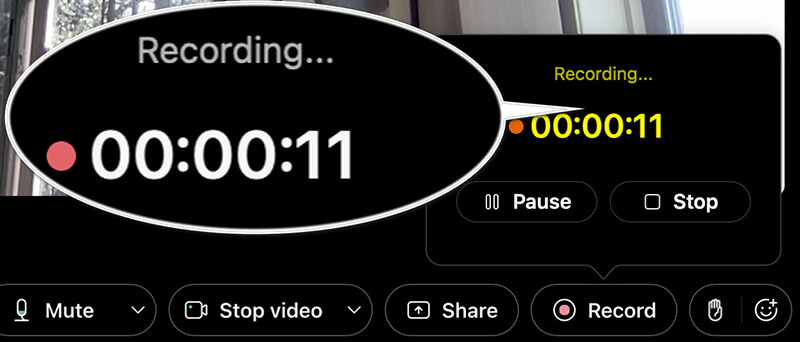
Confirm the recording status
You should see a small notification saying Recording… in the top left corner of the screen. This confirms that your meeting is being recorded. If the host has set up automatic recordings, this may happen without you needing to click anything.
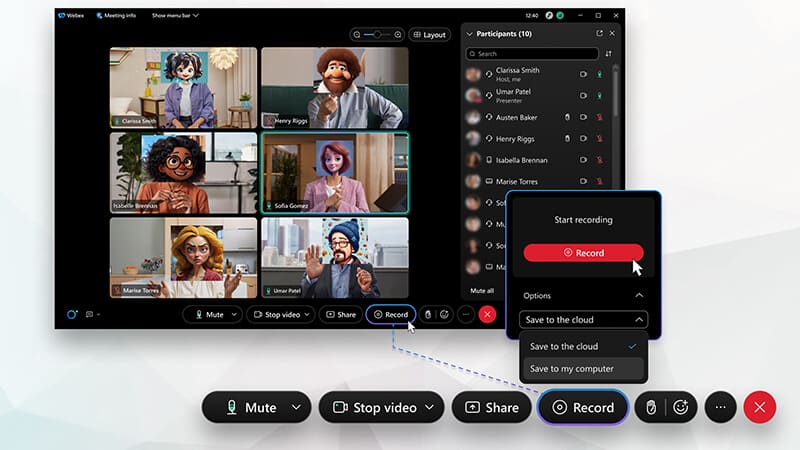
Record in the cloud or locally
Webex gives you two options to save the recording: to the cloud (if enabled) or to your computer’s local storage.
Cloud recordings are especially useful if you want to share them with participants easily. If you're unsure, I recommend saving to the cloud unless you have a specific reason to save locally.
Stopping the recording
When your meeting wraps up, you’ll need to stop the recording:
To stop the recording, simply click the Record button again. The recording will stop, and a confirmation message will appear saying that the recording has ended.
If the recording is stored on your computer, Webex will automatically ask where you’d like to save the file. If you’re using cloud storage, Webex will automatically upload it to your account.
That’s it! The process of recording a Webex meeting is simple and can be done with just a few clicks.
Part 2. Why Can’t I Record a Webex Meeting
It’s frustrating when you can’t figure out why you can’t record a meeting in Webex, especially if you’re relying on that recording to share information later. There are several reasons why you might encounter issues:
You’re Not the Host
One of the most common issues people run into is that they aren’t the host of the meeting. By default, Webex allows only hosts and co-hosts to record meetings. If you're a participant, you'll need to ask the host to grant you recording permissions, or you’ll be left without the ability to record.
Your Webex Account Doesn’t Support Recording
Not all Webex accounts have recording capabilities. For example, free-tier accounts may have limited or no access to recording features. If you're on a free account and don’t have access to the recording option, this could be the issue. If you need this feature, consider upgrading to a paid plan.
Recordings Are Disabled by the Host
The host has the power to turn off the recording feature for the session. In some cases, they might have chosen to prevent participants from recording, whether due to privacy concerns or meeting-specific rules. If you can’t find the record button, it’s likely because the host has turned it off.
Webex Settings Block Recordings
It’s also possible that certain settings in your Webex account might be blocking your ability to record. For example, if you're using Webex through your company or organization, your admin might have set restrictions on recording.
Part 3. A Better Way to Record Webex Meetings If You Are Not the Host
So, what happens if you’re not the host and still need to record the meeting? Webex allows you to record only if you have permission from the host, but what if the host doesn't permit you? The solution is to use a third-party tool to record your screen.
One excellent tool I recommend is ArkThinker Screen Recorder. I’ve used this tool in the past to record Webex meetings when I didn’t have the option to record directly through the platform. It’s easy to use and has great features for both beginners and advanced users.
Compared with the built-in recording feature in WebEx, this meeting recorder can capture high-quality video and audio from your Webex meetings in up to 4K. Moreover, it provides you with a separate audio recorder to record both system sound and microphone input, ensuring that the meeting’s conversation is captured. Besides, this tool offers more video editing features while and after recording like trim, merge, etc.
Here are the steps of how to use ArkThinker Screen Recorder to record WebEx recordings.
First, free download ArkThinker Screen Recorder for your operating system by clicking the download link below.
Open the program, and it will go to the Video Recorder option by default.
Choose whether to record the entire screen or just the Webex meeting window. If you're recording a meeting, it’s best to select the meeting window only. Besides, if you attend this WebEx meeting as a participant without permission of recording it, you can toggle on the camera option to record yourself with the screen together.
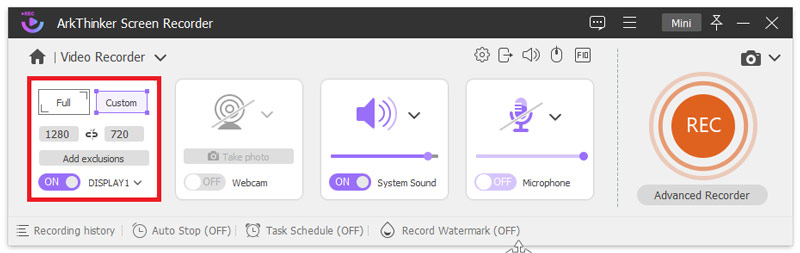
Moreover, you need to make sure you enable both system sound and microphone, as you'll want to capture both the meeting’s audio and your voice if you're speaking.
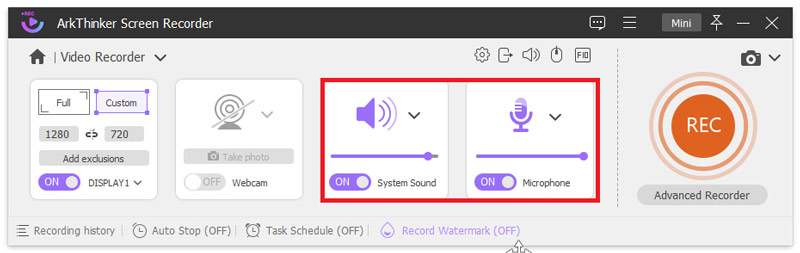
Click the REC button to begin recording Webex. You’ll see a small countdown before the recording starts.
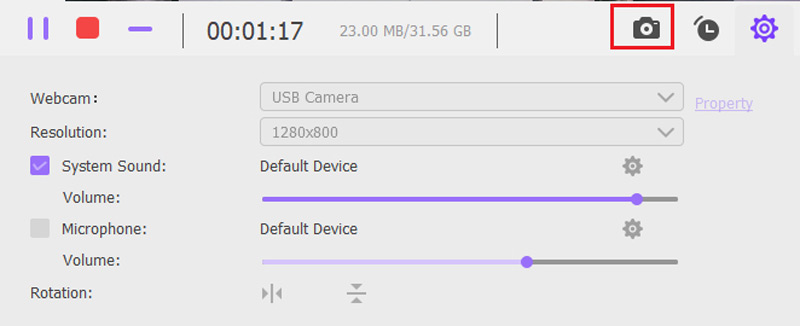
While recording, the floating bar lets you edit the screen, like drawing a shape, zooming in, highlighting the recording, and more.

Once the meeting ends, click the Stop button. ArkThinker Screen Recorder will allow you to preview and save the recording.
It’s a great workaround if you're not the host but still want a high-quality recording of the meeting for Zoom, Meet, Skype, WebEx, and more. Plus, it gives you more control over the content of your recording.
Part 4. FAQs
Can I Record a Webex Meeting as a Participant?
Yes, but only if the host permits you. If you’re a participant and the host hasn’t allowed you to record, you won’t have access to the recording feature. However, you can use third-party software like ArkThinker Screen Recorder to capture the meeting.
Where Are Webex Recordings Saved?
If you’re recording the meeting to the cloud, Webex will store the recording on their servers. You’ll receive an email with a link to the recording once it’s available. If you’re recording locally to your computer, the file will be saved in the location you choose during the recording process.
Can You Record on Webex for Free?
Yes, you can record Webex meetings for free, but there are limitations. Free-tier Webex accounts may have limited recording features or may not allow you to save recordings to the cloud. You may also be restricted in the length of your recordings.
Conclusion
Recording Webex meetings is an incredibly useful feature, whether you're hosting or just attending. As a host, you have full control over the process, but even if you’re not the host, you can still capture the meeting using third-party tools like ArkThinker Screen Recorder. Remember, if you can't record directly in Webex, the workaround is simple: use a screen recorder, and you’re good to go.
What do you think of this post? Click to rate this post.
Excellent
Rating: 4.9 / 5 (based on 416 votes)
Relative Articles
- Record Video
- Screen Recorder with Facecam: Best Offline and Online Tools
- 2024 VSDC Screen Recorder – Latest Review & Best Alternative
- ADV Screen Recorder—Features, Guides & Alternative for PC
- Loom Screen Recorder – An Efficient and Easy-To-Use Tool
- Is Panopto Recorder Worth Using When You Need to Record a Video?
- The Details of Review Vidma Recorder on Android Phones
- An IObit Screen Recorder Review of Its Details and Features
- Quick Video Recorder for Android – Ultimate Review
- Detailed Reviews of ScreenFlow for Mac and Windows PC
- ScreenRec Review: Free and Creative Tool for Everyone