


Audacity'de Arkaplan Gürültüsünü Kaldırmak İçin Adım Adım Kılavuz
Temiz ses kaydı yapmak, özellikle de ideal olmayan ortamlarda çalışıyorsanız, zor olabilir. Vızıltı, tıklama veya gevezelik gibi arka plan gürültüsü, en iyi kayıtları bile amatörce gösterebilir. İşte Audacity gibi araçlar tam da bu noktada işe yarar. Audacity, kayıtlarınızdan istenmeyen sesleri kaldırmayı kolaylaştıran güçlü bir Gürültü Azaltma aracı sunan ücretsiz, açık kaynaklı bir ses düzenleyicisidir.
Bu yazıda, kullanımıyla ilgili tam bir kılavuz paylaşacağız Arkaplan gürültüsünü ortadan kaldırma cesareti ve sesinizi mükemmelliğe ulaştırın.
- REHBER LİSTESİ
- Bölüm 1. Arkaplan Gürültüsünü Kaldırmak İçin Audacity Nasıl Kullanılır
- Bölüm 2. Arkaplan Gürültüsünü Kaldırmanın Alternatif Yolu
- Bölüm 3. SSS
Bölüm 1. Arkaplan Gürültüsünü Kaldırmak İçin Audacity Nasıl Kullanılır
Audacity, ücretsiz ve açık kaynaklı popüler bir ses düzenleme programıdır. Genellikle arka plan gürültüsünden kurtulmak gibi farklı ses görevleri için kullanılır. Audacity, vokallerden müzik ve arka plan seslerini izole etmek veya kaldırmak için özel olarak 'arka plan kaldırma' adlı bir özelliğe sahip olmasa da, gürültü azaltma ve belirli ses izolasyonu türleri için araçlar sunar.
İşte nasıl kullanabileceğiniz:
Sesinizi İçe Aktarın
Audacity'yi açın ve ses dosyanızı yüklemek için tıklayın Dosya > İçe aktarmak > Ses veya dosyayı arayüze sürükleyip bırakabilirsiniz.
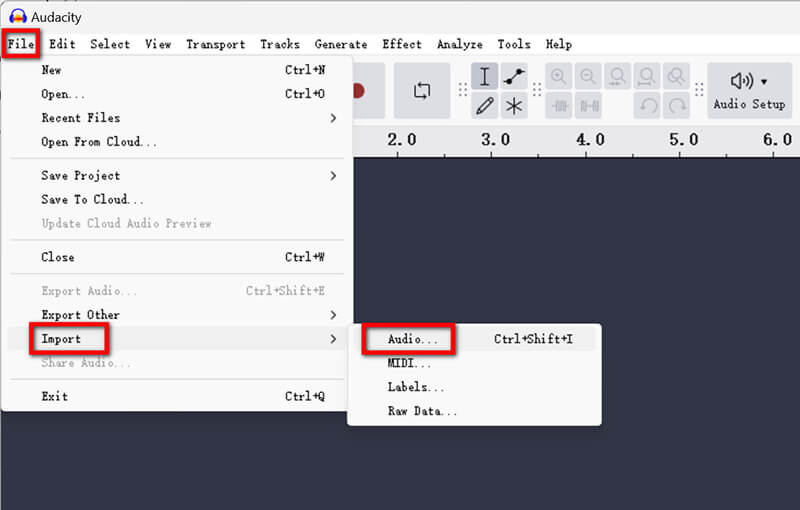
Veya, saklamak istediğiniz sesi yakalamak için doğrudan Audacity'de bir ses dosyası kaydedebilirsiniz.Audacity kayıt yapmıyor?)
Bir Gürültü Profili Seçin
• Ses dosyanızda yalnızca arka plan gürültüsü içeren bir bölüm belirleyin (örneğin, hafif bir uğultulu sessizlik).
• Bu bölümün üzerine tıklayıp sürükleyerek vurgulayın.
• Git Etki > Gürültü Giderme ve Onarımı > Gürültü Azaltma.
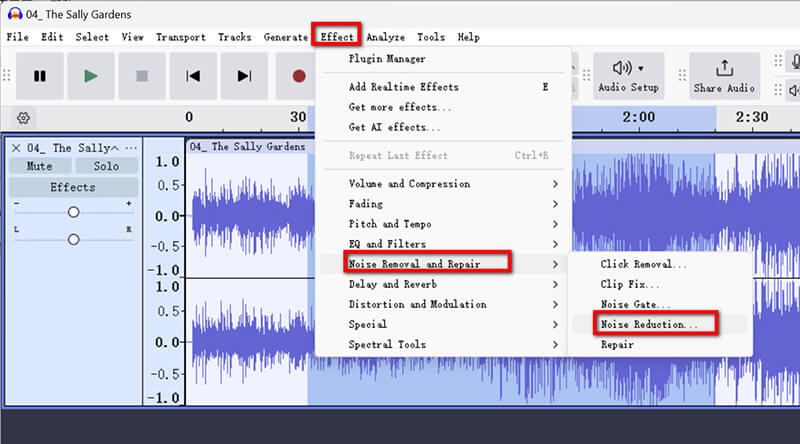
• Tıklamak Gürültü Profilini AlAudacity, gürültü profili oluşturmak için örneği analiz edecektir.
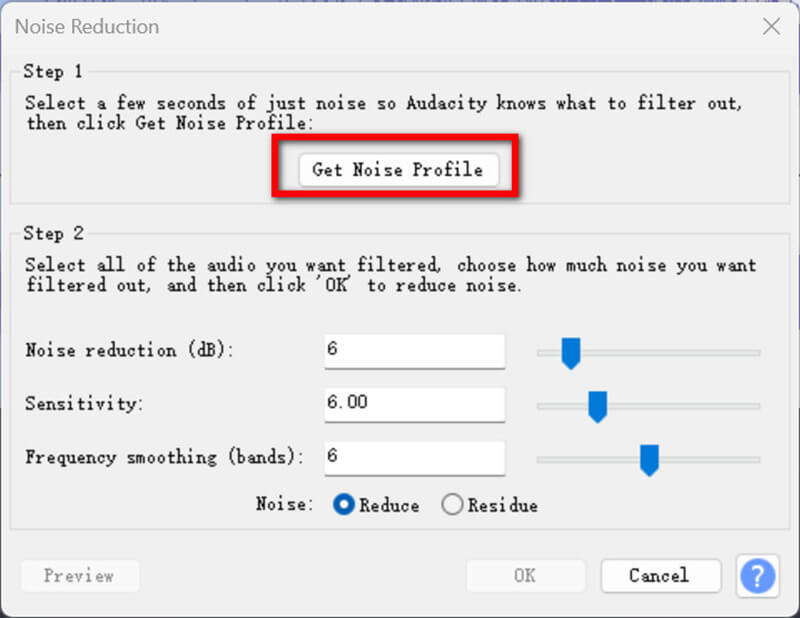
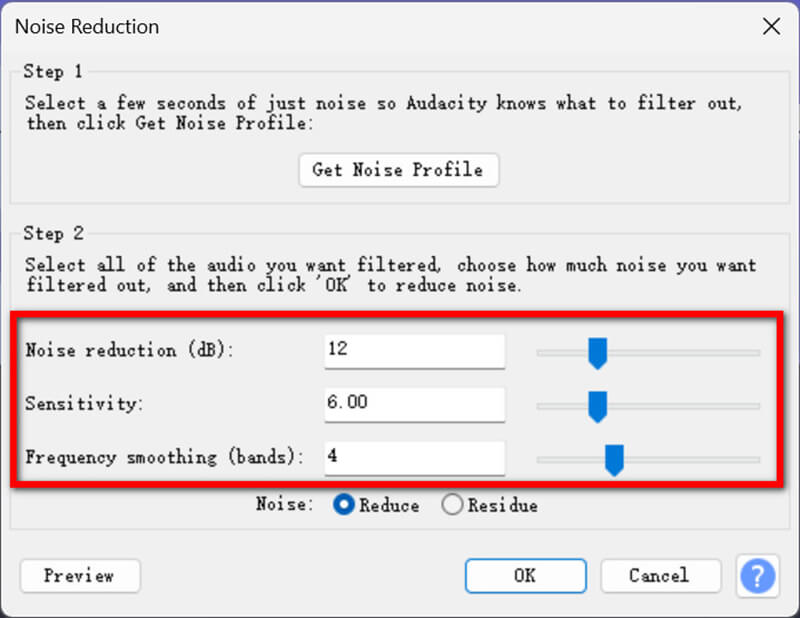
Gürültü Azaltma Uygula
• Temizlemek istediğiniz ses parçasının tamamını veya bölümünü vurgulayın.
• Geri dön Etki > Gürültü Giderme ve Onarımı > Gürültü Azaltma.
• Aşağıdaki ayarları düzenleyin:
1. Gürültü Azaltma (dB): Ne kadar gürültünün kaldırılacağını belirler. 12 dB ile başlayın.
2. Hassasiyet (dB): Sesin gürültü olarak tanındığı seviyeyi ayarlar. 3 ile 6 arasında bir değer deneyin.
3. Frekans Yumuşatma (bantlar): Bozulmayı önlemeye yardımcı olur. 3 değeri iyi bir başlangıç noktasıdır.
• Tıklamak TAMAM Değişiklikleri uygulamak için.
Önizleme ve İnce Ayar
Arkaplan gürültüsünün gidip gitmediğini kontrol etmek için sesi çalın. Gerekirse ayarları değiştirin ve yeniden uygulayın.
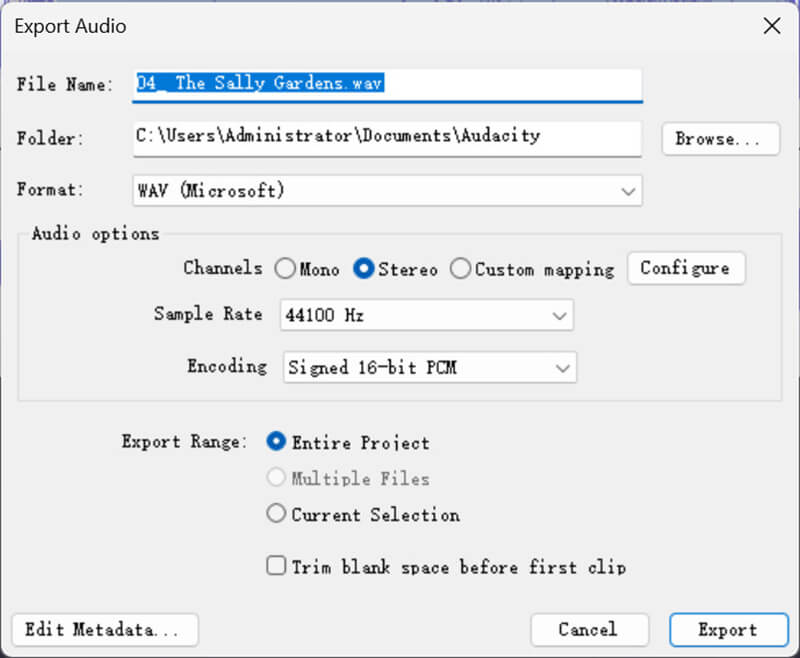
Ayarlar tamamlandıktan sonra Audacity'den ses dosyasını dışa aktarmak için tıklayın Dışa Aktar > Bilgisayara Aktar, ardından isim, hedef, format, örnekleme hızı, kodlama vb. gibi çıktı profilini oluşturun.
Sonra tıklayın İhracat Ses dosyasını arka plan gürültüsünü azaltarak kaydetmek için.
En iyi sonuçları elde etmek için Audacity gürültü azaltma, şu ipuçlarını göz önünde bulundurun:
• Temiz Gürültü Profilini Seçin: Gürültü örneğiniz ne kadar temiz olursa, Audacity gürültü ile istenen sesi o kadar iyi ayırt edebilir.
• Aşırı İşlemeyi Önleyin: Aşırı gürültü azaltma, sesinizin robotik veya bozuk çıkmasına neden olabilir.
• Ayarlarla Deneyler: Her kayıt farklıdır, bu nedenle Gürültü Azaltma, Hassasiyet ve Frekans Yumuşatma için çeşitli değerleri test edin.
Audacity ücretsizdir, kullanımı kolaydır ve özelleştirilebilir ayarlara sahiptir.
Bölüm 2. Arkaplan Gürültüsünü Kaldırmanın Alternatif Yolu
Daha kolay veya daha gelişmiş bir seçenek arıyorsanız, şunu öneririm: ArkThinker Video Dönüştürücü Ultimate. Bu araç, çok fazla manuel ayarlama gerektirmeden arka plan gürültüsünü ortadan kaldırmak için kolay ama güçlü bir yol sunar. Audacity ile karşılaştırıldığında, MP4, MKV, MOV, MP3, FLAC, WAV ve 1000'den fazla format için ses ve videoyu parazitten arındırmak için hepsi bir arada bir video ve ses dönüştürücü, düzenleyici ve güçlendiricidir.
• Yapay zeka ile arka plandaki ses ve video gürültüsünü otomatik olarak hızla ortadan kaldırın.
• Birden fazla ses veya video dosyası için arka plan gürültüsünü aynı anda ortadan kaldırın.
• Kırpma, birleştirme, sıkıştırma vb. gibi ses ve video düzenlemeleri yapın.
• Video ve ses dosyanızı geliştirmek için 20'den fazla araç.
ArkThinker Video Converter Ultimate'daki arka plan gürültüsünden kurtulmak için şu adımları izleyin:
Yazılımı Windows veya Mac bilgisayarınıza ücretsiz indirin ve kurun.
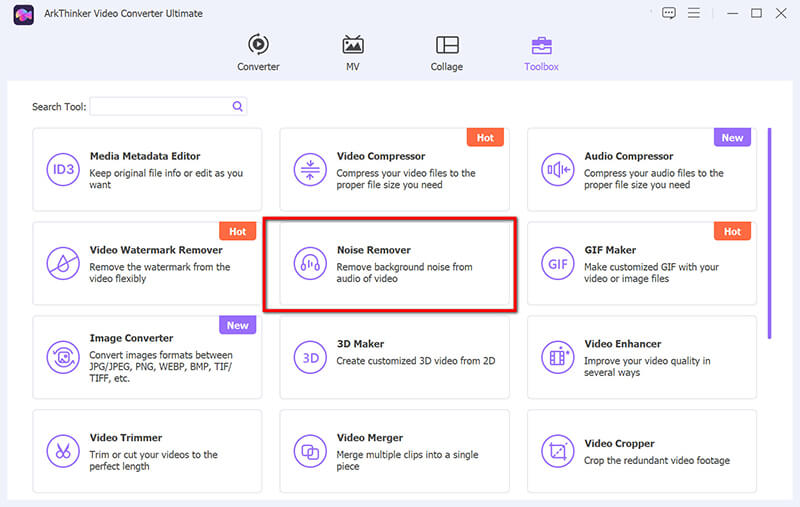
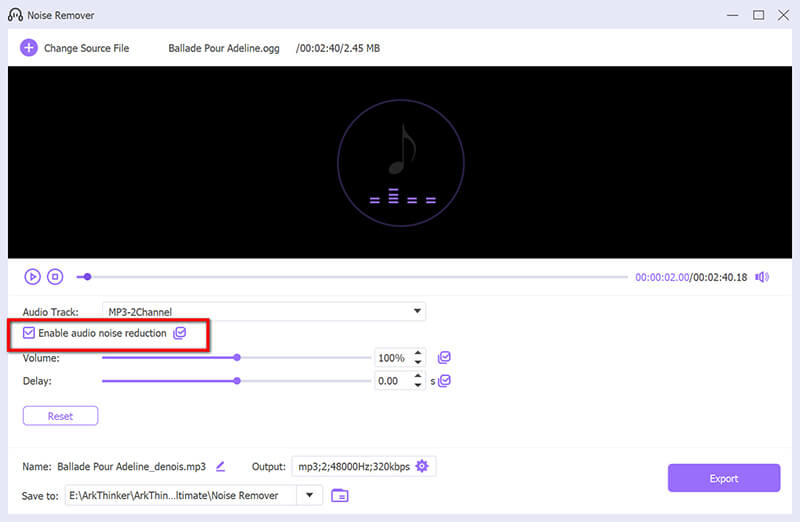
Bu ses gürültüsünü giderme aracını çalıştırın, Araç Kutusu sekmesine gidin ve şuraya gidin: Gürültü Giderici.
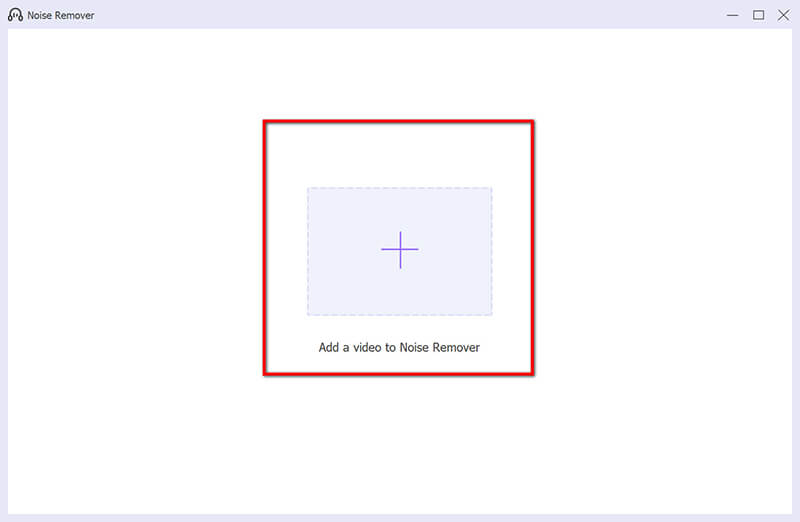
Başlamak için, gürültüyü azaltarak temizlemek istediğiniz ses dosyasını yüklemek için büyük artı düğmesine basın.
Onay kutusunu işaretleyin Ses Gürültü Azaltmayı Etkinleştir.
İsterseniz ses, gecikme, ses parçası gibi ek ayarları da yapabilirsiniz.
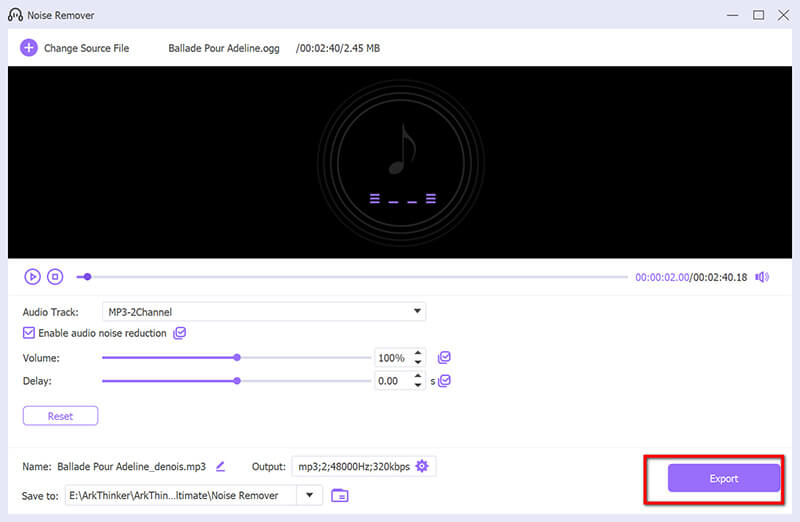
İstediğiniz çıktı biçimini seçin ve tıklayın İhracat ses dosyasını gürültü giderme ile kaydetmek için.
Bu araç Audacity ile karşılaştırıldığında ses parazitini gidermede daha hızlı ve daha otomatiktir.
Bölüm 3. SSS
Audacity'nin arka plandaki gürültüyü algılamamasını nasıl sağlarım?
Kayıt sırasında arka plan gürültüsünü en aza indirmek için:
• Kaliteli bir mikrofon kullanın ve mikrofonu ses kaynağına yakın bir yere yerleştirin.
• Sessiz ve akustik açıdan iyi bir ortamda kayıt yapın.
• Ortam gürültüsünü azaltmak için pop filtreleri veya ön camlar kullanın.
Audacity'de beyaz gürültüyü nasıl susturabilirim?
Yukarıdaki Gürültü Azaltma aracı sürecinde özetlenen adımları izleyin. Kaydınızın yalnızca beyaz gürültü içeren bir bölümünden temiz bir gürültü profili seçmeye odaklanın. Ses gürültüsü dosyanın vokallerinden birindeyse, Audacity'deki vokalleri kaldırın direkt olarak.
Audacity'de gürültü giderme için en iyi ayarlar nelerdir?
İdeal ayarlar kaydınıza bağlıdır, ancak iyi bir başlangıç noktası şudur:
• Gürültü Azaltma (dB): 12
• Hassasiyet: 5
• Frekans Yumuşatma (bantlar): 3
Bu ayarları test edin ve özel ihtiyaçlarınıza göre ayarlayın.
Çözüm
Arkaplan gürültüsünü kaldırmak kayıtlarınızı amatörden profesyonel kaliteye dönüştürebilir. Arkaplan gürültüsünü ortadan kaldırmak için Audacity'yi kullanmayı veya ArkThinker Video Converter Ultimate gibi bir aracı tercih etmeyi seçin, artık ses gürültünüzü etkili bir şekilde temizleme bilgisine sahipsiniz. Audacity ile arkaplan gürültüsünü temizlemek için ücretsiz ve çok yönlü bir araç elde edersiniz, ArkThinker Video Converter Ultimate ise daha otomatik bir yaklaşım sunar. Hangisini seçerseniz seçin, önemli olan ayarlarla denemeler yapmak ve sesiniz için en iyi olanı bulmaktır.
Bu yazı hakkında ne düşünüyorsunuz? Bu gönderiyi derecelendirmek için tıklayın.
Harika
Değerlendirme: 4.9 / 5 (dayalı 490 oylar)
Daha Fazla Çözüm Bul
Audacity'de Bir Parçayı Bölme Konusunda Etkili Teknik Windows ve Mac için En İyi 5 Audacity Alternatifi Sesli Kitaplar ve ACX Ses Kaydı Projeleri Nasıl Kaydedilir Discord Sesi ve Çağrıları 3 Yolla Nasıl Kaydedeceğinizi Öğrenin iPhone, Android Telefon ve Bilgisayarda Sesli Mesaj Kaydıİlgili Makaleler
- Ses kaydı
- Android Cihazlarda Ses Kaydetme Konusunda Eşsiz Süreç
- Ableton Live'da Vokal Nasıl Kaydedilir: Adım Adım
- Bilgisayar Sesini ve Mikrofonu Kaydetmek için En İyi MP3 Kaydedici
- Farklı Cihazlardaki Bir Videodaki Sesi Değiştirme 2022
- Audacity, WMP, iMovie, Online, Trimmer'da Ses Nasıl Kırpılır
- PC ve Mac'te Ses Düzeyini Değiştirmenin ve Düzenlemenin En Kolay 4 Yolu
- Windows ve Mac'te Ses Dosyalarını Düzenlemenin 4 Kolay Yöntemi
- Ses Kalitesini Kaybetmeden Ses Dosyaları Nasıl Sıkıştırılır
- Farklı Cihazlarda 2 veya Daha Fazla Ses Dosyası Nasıl Birleştirilir
- iPhone, Android, PC ve Mac için En İyi 5 Müzik Etiketi Düzenleyicisi